Mastering Pencil Shading Techniques: A Comprehensive Guide for Artists

Unlock your artistic potential with our in-depth tutorial on mastering pencil shading techniques, a cornerstone skill for creating realistic and textured drawings. Pencils are a versatile tool, and by mastering various shading methods, you can achieve a wide array of effects to enhance your illustrations. This guide offers a detailed, step-by-step exploration of shading techniques, divided into “平行直线” (Parallel Lines) and “交叉直线” (Cross Lines) as illustrated in the provided images. Suitable for artists of all levels—beginners to professionals—this tutorial will help you refine your pencil work and bring depth to your artwork.
Introduction to Pencil Shading
Shading with a pencil involves manipulating line direction, spacing, and pressure to create tonal variations and textures. The techniques demonstrated in this guide range from simple parallel strokes to intricate cross-hatching, enabling you to render everything from smooth gradients to detailed surfaces. The images serve as a visual guide, showing the progression from basic strokes to complex patterns, making it easy to follow along. Equip yourself with a range of pencils, a sharpener, and quality paper, and let’s dive into the process.
Step-by-Step Tutorial
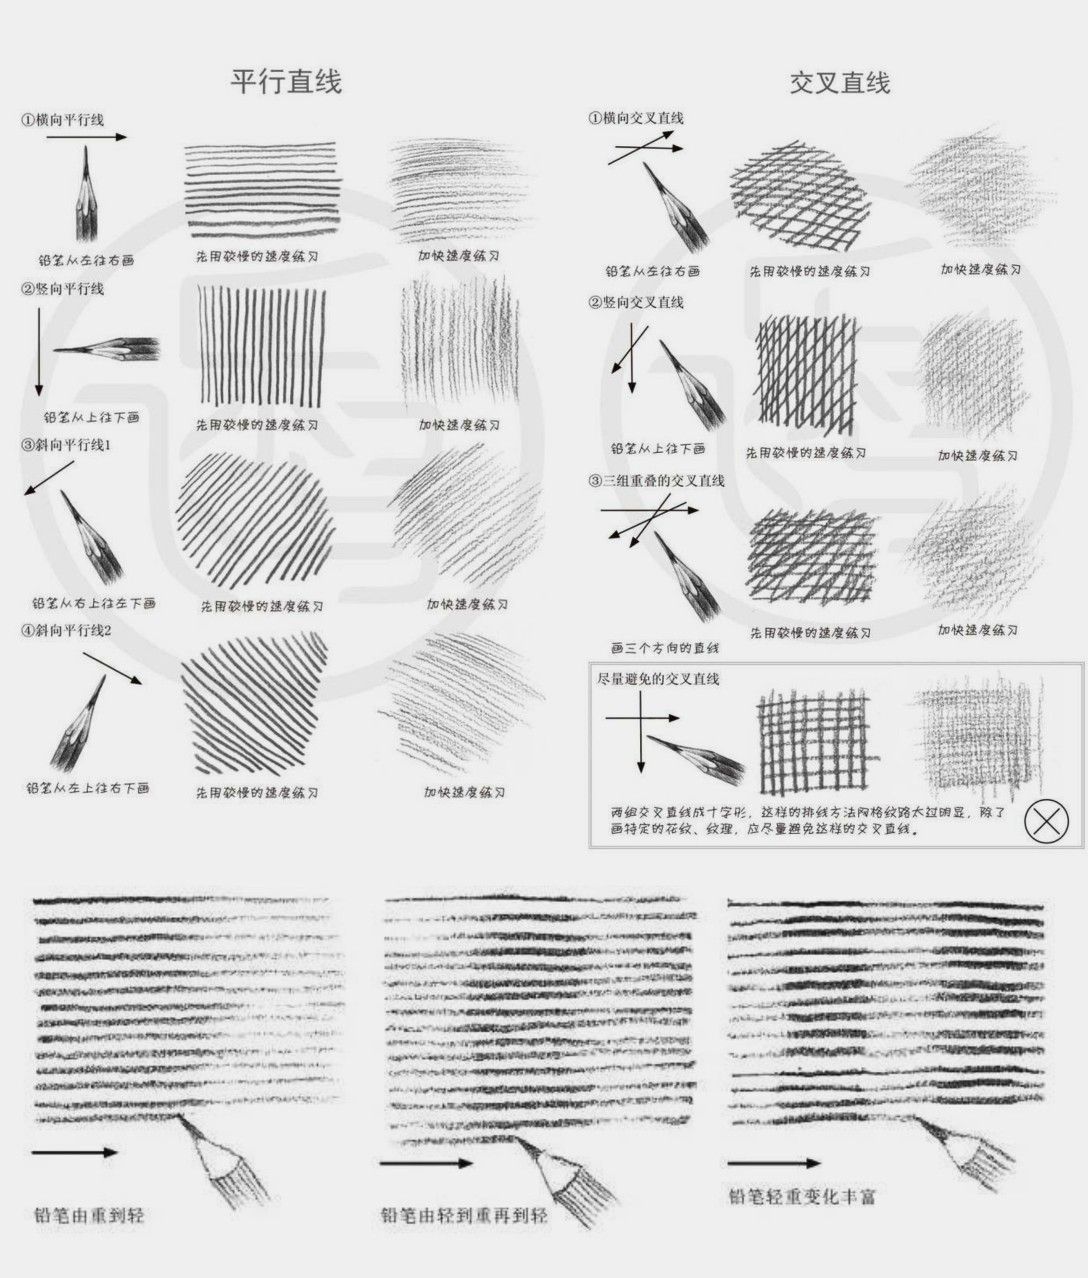
- Step 1: Mastering Parallel Line Shading (平行直线)
- Basic Parallel Lines: Start with the simplest technique by drawing evenly spaced parallel lines, as shown in the top left example. Use a sharp pencil and vary pressure to control the darkness, with closer lines creating a denser tone.
- Vertical and Horizontal Strokes: Practice vertical lines (second row, left) for a structured effect and horizontal lines (third row, left) for broader coverage, adjusting the spacing for different intensities.
- Angled Lines: Introduce diagonal lines (fourth row, left) to add dynamic texture, experimenting with angles to suit your composition.
- Graduated Lines: Create smooth gradients by starting with heavy pressure and gradually lightening your stroke (bottom row, left), ideal for transitions between light and dark areas.
- Textured Parallel Strokes: Use the side of the pencil tip (bottom left) to apply uneven, textured lines, adding a natural feel to your shading.
- Step 2: Exploring Cross-Hatching and Complex Textures (交叉直线)
- Basic Cross-Hatching: Advance to cross-hatching by overlaying parallel lines at an angle, as depicted in the top right example. Tighter intersections deepen the tone, perfect for shadows.
- Multi-Directional Cross-Hatching: Layer lines in multiple directions (second and third rows, right) to build complexity, varying angles for a richer texture.
- Dense Cross-Hatching: Apply tight, overlapping lines (fourth row, right) for a detailed, dark effect, suitable for intricate areas.
- Scribbled Texture: Combine cross-hatching with scribbled strokes (bottom row, right) for a mottled, organic texture, enhancing realism in rough surfaces.
- Refined Shading: Use precise, layered strokes (final right example) to achieve a polished finish, blending techniques for professional results.
- Step 3: Applying Techniques with Precision
- Hold your pencil firmly, using the tip for fine lines or the side for broader strokes, as illustrated by the pencil icons. Maintain consistent pressure and direction to avoid uneven shading. Place a clean sheet under your hand to prevent smudging, and rotate your paper to align strokes naturally. The images emphasize the importance of even application for a seamless look.
Practical Application
Practice each technique on scrap paper to gain confidence. Start with parallel lines to shade simple shapes like spheres or cubes, then progress to cross-hatching for portraits or landscapes. Experiment with pencil grades (e.g., 2B for darker tones, HB for lighter) and adjust your grip—writing position for precision, underhand for broader strokes—to suit the effect. Combine methods, such as graduated lines with cross-hatching, to create complex textures like fabric or skin.
Tips for Success
- Keep your pencil sharp for crisp lines and dull it slightly for softer shading.
- Practice on different paper textures to observe varying effects.
- Use a kneaded eraser to lift graphite for highlights or corrections.
- Allow each layer to dry before adding more to prevent smudging.
Conclusion
Mastering pencil shading techniques is essential for adding depth and realism to your drawings. By following this step-by-step guide and practicing with the illustrated examples, you’ll develop the skills to create a variety of effects with confidence. Whether you’re sketching still life, portraits, or detailed illustrations, these methods will elevate your artwork. Explore more drawing tutorials on our website, and share your progress with our community of artists. Start shading today and unlock the full potential of your pencil!
Happy drawing!