Fossil hunting:
Can You Find Fossils Yourself? A Beginner’s Guide

1. Understand the Basics: What Are Fossils and Where Do They Form?
Fossils are preserved remains or traces of ancient life (plants, animals, tracks, etc.) usually found in sedimentary rocks like shale, limestone, or sandstone. They form in places where sediment buried organisms quickly, protecting them from decay.
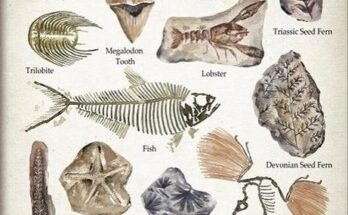
Common beginner finds include:
- Invertebrates (shells, corals, trilobites, ammonites)
- Shark teeth
- Plant impressions
- Occasionally small vertebrate bits (fish bones, etc.)
Dinosaur bones or large skeletons are rare for casual hunters and often restricted.

2. Research Locations (The Most Important Step!)
Fossils aren’t everywhere—you need to target known spots. Start local to keep it easy and low-cost.
- Search online for “fossils near [your city/state]” or “public fossil hunting sites [your state]”.
- Join local fossil clubs or forums (e.g., The Fossil Forum) for tips and group outings.
- Look for public fossil parks, beaches, quarries, or riverbeds where collecting is allowed.
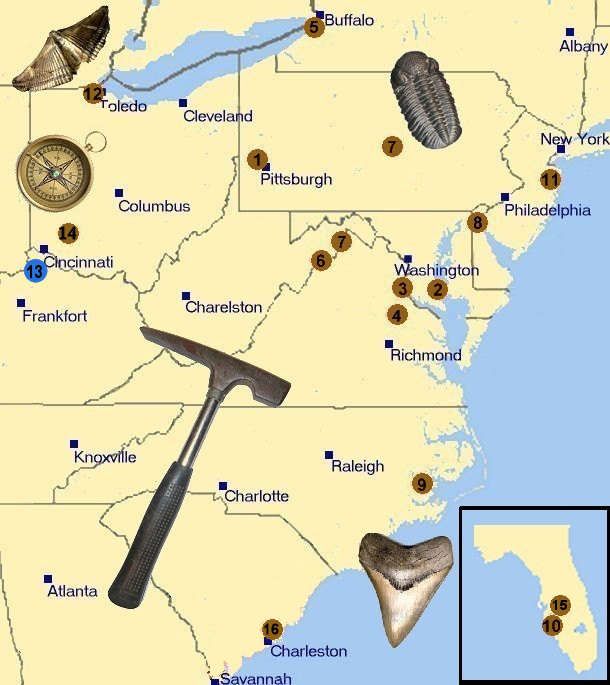
Great beginner-friendly spots in the US (many are surface collecting or easy beach/river access):
- Calvert Cliffs, Maryland — Beachcomb for Miocene shark teeth and shells along the Chesapeake Bay.
- Venice Beach or Peace River, Florida — Famous for shark teeth (sift gravel in rivers or beaches).
- Penn Dixie Fossil Park, New York — Pay-to-dig site with Devonian trilobites and more.
- U-Dig Fossils, Utah — Trilobite quarry where you dig and keep what you find.
- Trammel Fossil Park, Ohio — Free public site with labeled layers and abundant Ordovician marine fossils.
- Other classics: Riverbeds in Texas, creek exposures in the Midwest, or beaches along the Atlantic/Gulf coasts.
Since you’re in San Francisco, California, check nearby spots like:
- Bay Area exposures for marine fossils (e.g., shark teeth or shells in certain coastal cliffs or quarries).
- Head to public lands in the Central Valley or farther to places like Sharktooth Hill (near Bakersfield) for excellent Miocene marine fossils.
Always verify current access—some sites require fees or reservations.
3. Know the Laws and Ethics (Super Important!)
Rules vary hugely by land type and location—ignoring them can lead to fines or worse.
- Federal lands (BLM, National Forests, National Parks): You can usually collect reasonable amounts of common invertebrate/plant fossils for personal use (up to ~25 lbs/day on BLM land) with non-powered hand tools only. Vertebrate fossils (bones, teeth of dinosaurs/fish/mammals) are almost always illegal to collect without a permit—leave them and report if significant.
- State/local parks: Often restricted or require permits—check state-specific rules.
- Private land: Always get landowner permission.
- National Parks/Monuments (e.g., Dinosaur National Monument): No collecting allowed—look but don’t touch.
- General ethics (from the Paleontological Society): Collect responsibly, don’t over-collect, document finds, and consider donating rare specimens to museums.
Research your spot’s rules via official sites (BLM, state DNR, etc.) before going.
4. Essential Gear for Beginners (Start Simple!)
You don’t need much at first—many beginners succeed with just eyes and hands.
Must-haves:
- Sturdy shoes/boots (good traction for slippery rocks/beaches)
- Water bottle, snacks, sunscreen, hat (fossil hunting often means sun exposure)
- Backpack or bucket for finds
- Ziploc bags and permanent marker (label finds with date/location)
- Safety glasses (for splitting rocks)
- Gloves
Useful tools (add as you go):
- Rock hammer or geological pick (for breaking/splitting soft rock)
- Chisels (cold chisel for precision)
- Small brush or trowel
- Hand lens (10x magnification) to spot details
- Phone/camera for photos (document in place before collecting)
For beach/river hunting: A small sieve or sifter helps sort gravel.
5. How to Actually Find Fossils
- Look in the right places: Exposed rock outcrops, cliffs, quarries, riverbanks, beaches after storms (erosion reveals new material), road cuts.
- Scan surfaces first: Many fossils weather out and lie loose—walk slowly and look for unusual shapes, textures, or symmetries (e.g., spiral shells, ridged patterns).
- Split rocks carefully: In shale/limestone areas, gently tap layers—fossils often hide between them.
- Go after weather events: Rain or tides expose fresh material.
- Learn what to look for: Study photos of local fossils online so you recognize them in matrix (rock).
- Take notes/photos: Record GPS location, rock layer, etc.—helps with identification later.
6. Safety Tips
- Check tides/weather (coastal areas especially—rising tides trap people).
- Watch for unstable cliffs, slippery rocks, snakes/insects.
- Go with a buddy, tell someone your plans.
- Stay hydrated and take breaks.
7. Next Steps After Finding Fossils
- Clean gently (water/soft brush; avoid acids on delicate pieces).
- Identify using apps, books (e.g., “Fossils: A Guide to Prehistoric Life”), or online forums.
- Store in labeled bags/boxes.
- Join communities (Reddit’s r/FossilHunting, local clubs) to share and learn.
Fossil hunting is addictive—your first find (even a small shell imprint) feels like time travel! Start small, stay legal, and have fun exploring. If you’re heading out near SF, let me know more details and I can help narrow down spots. Happy hunting!