Mastering Female Figure Drawing: A Comprehensive Tutorial on Anatomy, Proportions, and Common Mistakes

Dive into the art of female figure drawing with our detailed tutorial, crafted to guide artists through the intricacies of anatomy, proportions, and pose construction. Based on an insightful reference image from holyelfgirl.deviantart.com, this guide offers a professional approach to sketching the female body, complete with tips, techniques, and a clear breakdown of common pitfalls to avoid. Ideal for beginners and seasoned artists alike, this tutorial provides a structured pathway to enhance your figure drawing skills with precision and confidence.
Understanding Female Anatomy and Proportions
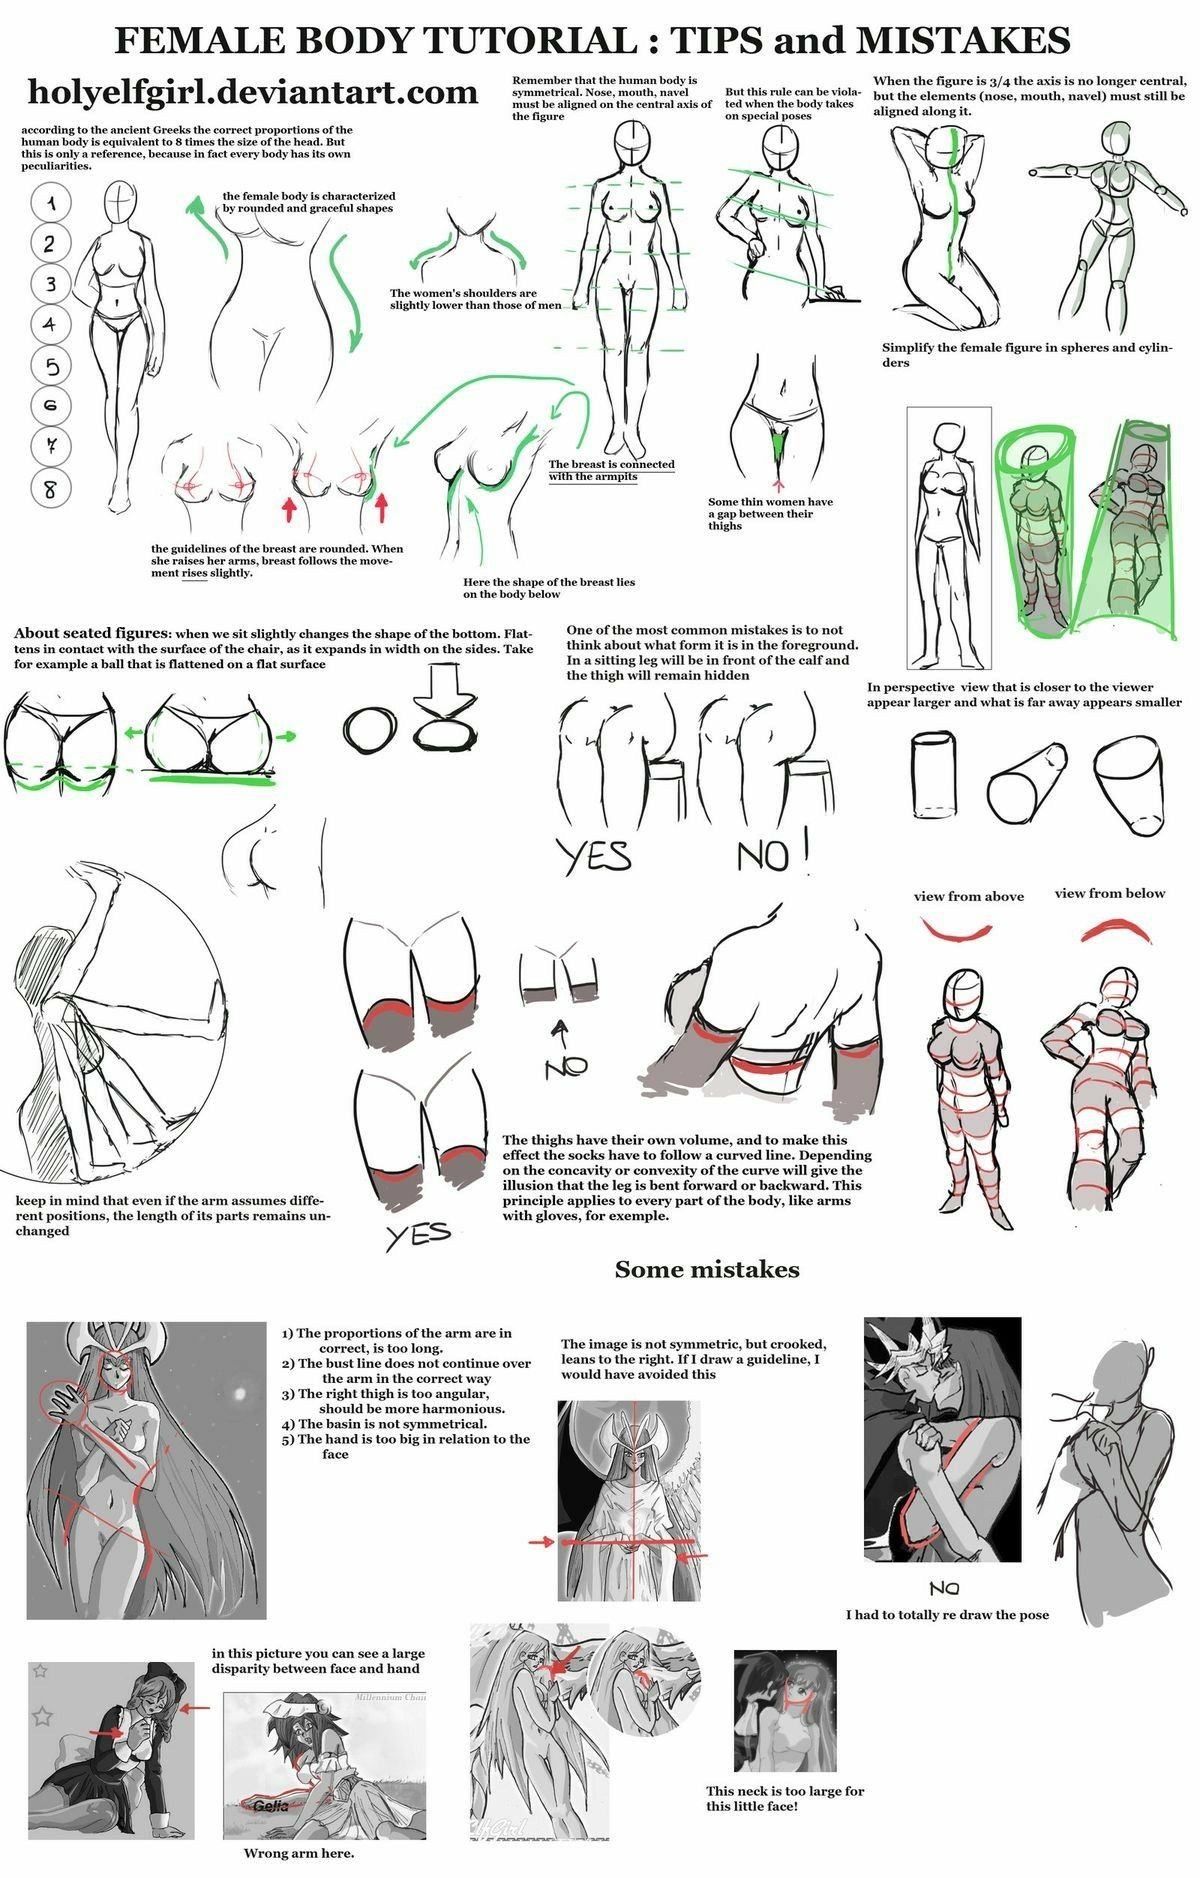
The tutorial begins with the foundational principle that the female body is approximately eight times the head’s size, a standard proportion for realistic human figures. The reference image illustrates this with a side-by-side comparison of a correctly proportioned figure and a simplified spherical representation, emphasizing the body’s rounded, graceful shapes. Key anatomical features, such as the slightly lower shoulders compared to men and the natural S-curve of the spine, are highlighted with green guidelines. Artists are encouraged to start with a basic stick figure, aligning the central axis to ensure symmetry, before fleshing out the form with attention to the breast’s rounded contours and the thigh gap often seen in thinner figures.
Mastering Pose Dynamics
Pose construction is a critical focus, with the image showcasing various stances, from standing to seated positions. The tutorial explains how the breast’s shape changes with arm movement and how contact with surfaces (e.g., a chair) affects the figure’s silhouette, as demonstrated by the annotated sketches. Perspective is addressed with examples of views from above and below, showing how closer elements appear larger. Tips include keeping arm lengths consistent despite different positions and using cylinders to map out limbs, ensuring a natural flow and balance in every pose.
Clothing and Surface Interaction
The guide delves into how clothing and surface contact influence the figure. The image provides a “Yes” and “No” comparison of thigh shading, illustrating the importance of following the body’s curve rather than creating flat, uniform lines. Annotations suggest using perspective to enhance the illusion of depth, such as with gloves or bent limbs, and highlight how fabric folds adapt to the body’s contours. This section encourages artists to practice shading techniques to reflect light and shadow accurately.
Avoiding Common Mistakes
A dedicated section outlines frequent errors and how to correct them, using visual examples from the reference image. Mistakes include:
- Proportional Errors: Uneven arm lengths, incorrect bust alignment, or angular thighs instead of rounded ones.
- Symmetry Issues: A crooked figure or an oversized face relative to the body.
- Pose Misalignment: Misjudged perspectives or exaggerated features like an overly long neck.
The tutorial provides corrective sketches, such as re-drawing a pose entirely or using a guideline to realign the figure, ensuring artists learn from these examples to refine their work.
Step-by-Step Drawing Process
- Establish the Framework: Sketch a central axis and basic proportions using the head as a unit, as shown in the reference.
- Define Anatomy: Add rounded shapes for the bust and hips, referencing the green guidelines for accuracy.
- Pose Construction: Map out limbs with cylinders, adjusting for perspective and weight distribution.
- Refine Details: Incorporate clothing folds and shading, following the body’s natural curves.
- Review and Correct: Compare your sketch to the “Yes” and “No” examples, correcting proportions and symmetry as needed.
Practical Tips for Artists
- Use References: Regularly consult the provided image to check alignment and proportions.
- Practice Regularly: Dedicate time to sketching different poses to build confidence.
- Tool Tips: Employ a range of pencils (HB to 2B) for sketching and blending tools for smooth shading.
This comprehensive tutorial is an essential resource for artists aiming to master female figure drawing. Leverage the detailed insights and visual aids from the reference image to elevate your skills. Explore our ongoing series on figure drawing for further techniques and inspiration. Happy drawing!
This professionally crafted post is designed for a website, offering a thorough educational experience based on the uploaded image, with a focus on practical application and skill development.