Mastering the Art of Drawing a Hand in Pen & Ink: A Step-by-Step Tutorial

Elevate your artistic skills with our in-depth tutorial on drawing a hand in pen and ink, a challenging yet rewarding technique for artists of all levels. Hands are complex subjects due to their intricate shapes, shadows, and textures, but with the right approach, you can create stunning, lifelike illustrations. This guide provides a detailed, step-by-step process, illustrated with the provided images, to help you master pen and ink drawing. Whether you’re a beginner or an experienced illustrator, follow these instructions to bring your hand drawings to life with precision and flair.
Introduction to Pen & Ink Hand Drawing
Pen and ink drawing offers a unique way to capture the human form, emphasizing line work, shading, and contrast. The technique relies on building layers of ink to define form and depth, making it ideal for detailed studies like hands. This tutorial breaks the process into clear stages, starting with basic geometric forms and progressing to a polished inked illustration. Gather your materials—pencils, erasers, fine-tip pens, and paper—and let’s begin.
Step-by-Step Tutorial
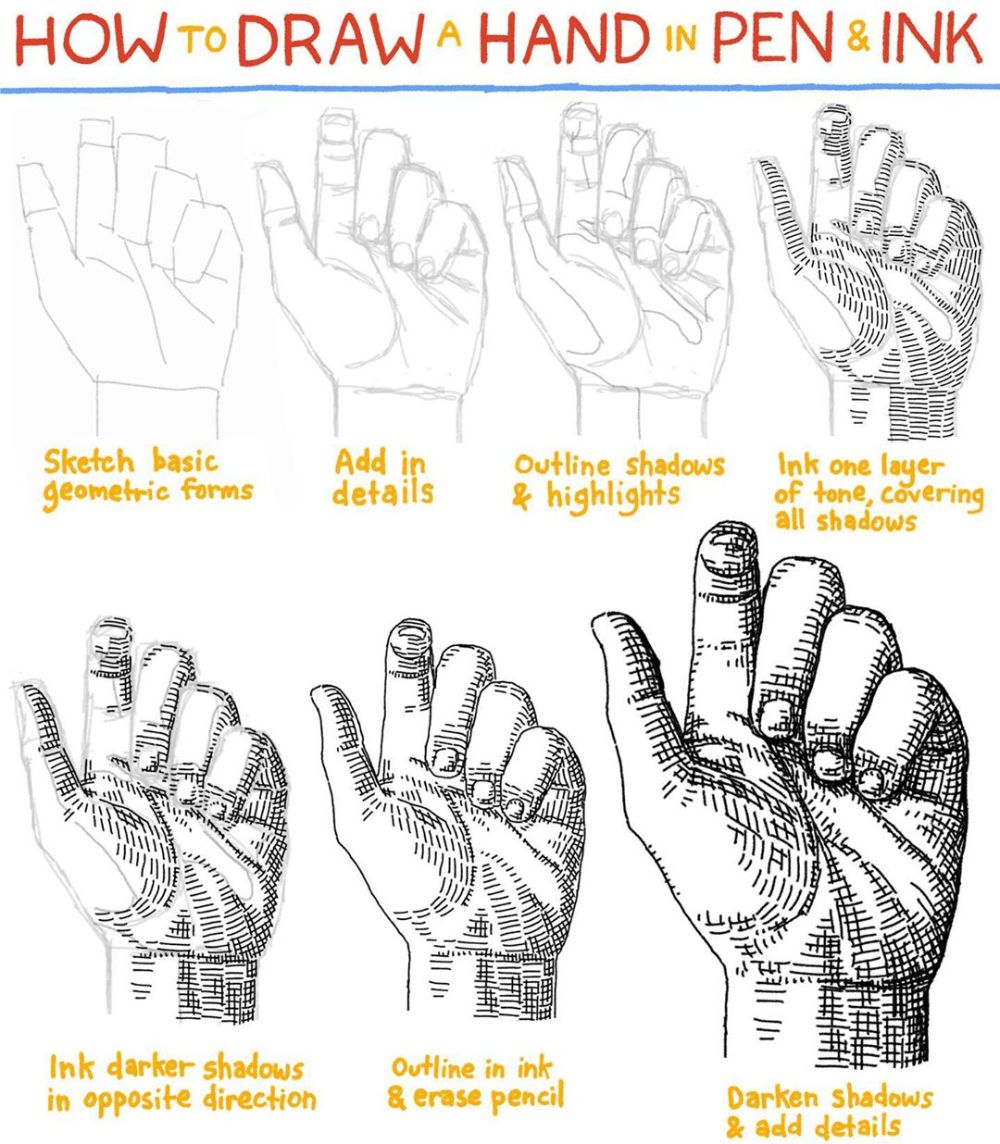
- Step 1: Sketch Basic Geometric Forms
- Start by lightly sketching the hand using basic geometric shapes to establish its structure. Use rectangles for the palm and fingers, and cylinders for the thumb and joints, as shown in the first image. Keep your lines faint and adjustable, focusing on the overall proportions and pose. This initial sketch serves as a blueprint, allowing you to refine the hand’s shape before adding details.
- Step 2: Add in Details
- Build on your geometric framework by adding details such as finger joints, knuckles, and wrinkles. Refine the outline of the hand, paying attention to the natural curves and bends, as depicted in the second image. Use light pencil strokes to suggest the skin’s texture and the subtle variations in finger length. This step adds realism and prepares the drawing for inking.
- Step 3: Outline Shadows & Highlights
- Begin the inking process by outlining the hand’s major features and indicating areas of shadow and highlight. Use a fine-tip pen to trace the pencil lines, adding weight to the contours where shadows fall, as seen in the third image. Identify the light source to determine where highlights will appear, leaving those areas lighter. This step transitions your sketch into a more defined ink drawing.
- Step 4: Ink One Layer of Tone Covering All Shadows
- Apply the first layer of ink shading by using cross-hatching or stippling to fill in the shadow areas, as shown in the fourth image. Work in the direction of the light source to maintain consistency, covering all shadowed regions with a light tone. This layer establishes the hand’s three-dimensionality, with denser lines indicating deeper shadows.
- Step 5: Ink Darker Shadows in Opposite Direction
- Enhance the depth by adding a second layer of ink to the darkest shadows, hatching in the opposite direction to create texture, as illustrated in the fifth image. Focus on areas like the spaces between fingers and under the thumb, using tighter, more concentrated lines. This cross-hatching technique adds richness and contrast to your drawing.
- Step 6: Outline in Ink & Erase Pencil
- Finalize the outline with bold ink lines, reinforcing the hand’s shape and details, as depicted in the sixth image. Once the ink is dry, gently erase the underlying pencil marks to reveal a clean ink drawing. This step ensures a professional finish, with the hand’s form standing out clearly against the page.
- Step 7: Darken Shadows & Add Details
- Complete your drawing by darkening the shadows further and adding fine details, such as fingernail edges and skin creases, as shown in the final image. Use varied line weights and additional cross-hatching to emphasize depth and texture. This final layer brings the hand to life, showcasing the full range of pen and ink techniques.
Practical Application
Practice this technique with different hand poses—open, closed, or gesturing—to build versatility. Start with light pencil sketches on scrap paper, then move to your final drawing surface. Use a lightbox or tracing paper if needed to transfer your sketch. Experiment with pen sizes (e.g., 0.1mm to 0.5mm) to vary line thickness, and consider a dip pen for more expressive strokes.
Tips for Success
- Work lightly with pencil to avoid indentations that ink can’t cover.
- Test your pen on scrap paper to ensure consistent ink flow.
- Patience is key—allow each ink layer to dry before adding more to prevent smudging.
- Study real hands or use a mirror to observe light and shadow patterns.
Conclusion
Drawing a hand in pen and ink is a skill that combines observation, patience, and technique. By following this step-by-step guide and practicing with the provided examples, you’ll develop the confidence to create detailed, expressive hand illustrations. This technique is perfect for comics, portraits, or standalone art pieces. Explore more drawing tutorials on our website, and share your progress with our community of artists. Start your pen and ink journey today!
Happy drawing!