Perspective Mastery: The Complete Guide to 1-Point, 2-Point, Multi-Point, Curvilinear, and Orthographic Systems for Artists & Designers

Demystify the fundamentals of linear and curvilinear perspective with this exhaustive, professional visual tutorial—your ultimate reference for creating immersive 3D scenes, architectural renders, concept art, and illustrations. Drawing from classical drafting techniques and modern applications (including fisheye and hemispherical views), this guide breaks down vanishing points (VPs), horizon lines, and axis convergence into clear, actionable diagrams.
Whether you’re a beginner tackling basic boxes or an advanced artist exploring 360° spherical projections, follow the annotated infographic above to build spatially accurate drawings from any viewpoint. Includes orthographic projections for technical precision and curvilinear methods for panoramic dynamism.
What You’ll Learn in This Tutorial
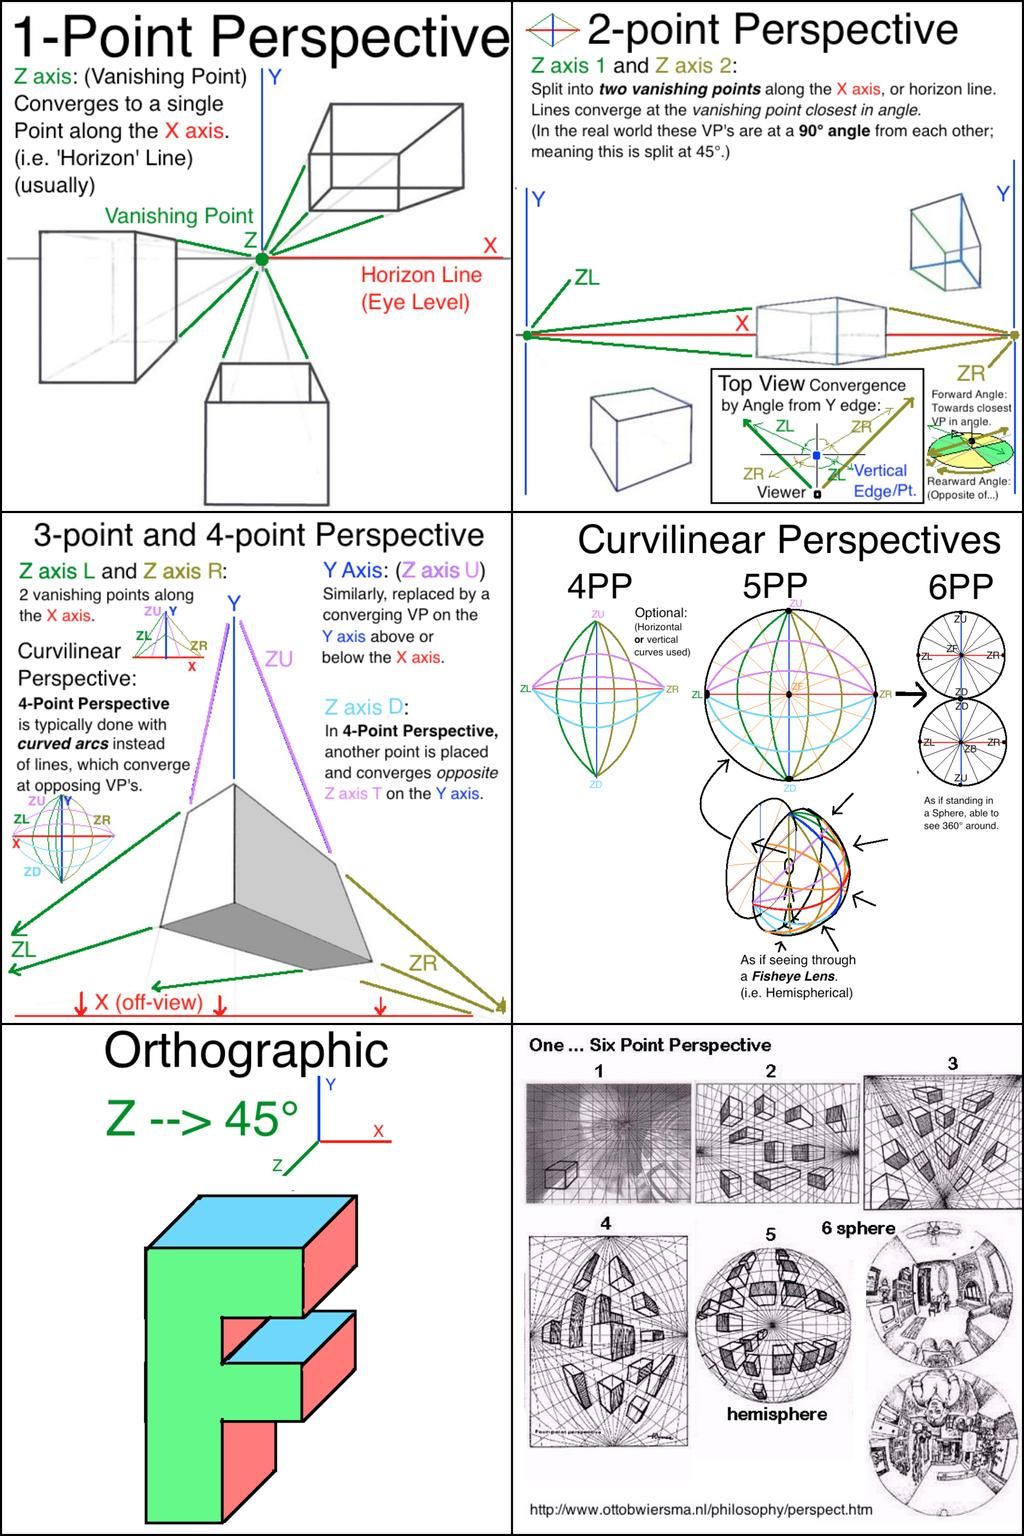
Core Concepts: Axes, Horizon, and Vanishing Points
- X-Axis: Horizontal (left-right), typically the Horizon Line (eye level).
- Y-Axis: Vertical (up-down).
- Z-Axis: Depth (forward-backward), converges to VPs.
- Horizon Line (HL): Represents viewer’s eye level; all VPs lie on this line in linear perspective.
- Station Point (Viewer): Your “camera” position—closer = more distortion.
Pro Rule: Parallel lines in 3D space converge to a shared VP in 2D projection.
Section 1: 1-Point Perspective (Beginner-Friendly)
- Setup: One VP on the Z-axis, directly ahead.
- Ideal For: Interiors, roads, railways—strong depth with minimal distortion.
- Key Features:
- Vertical lines (Y) remain parallel.
- Horizontal lines (X) parallel unless receding.
- All depth lines converge to single VP on HL.
- Step-by-Step:
- Draw HL at eye level.
- Place VP on HL.
- Sketch orthogonals (depth lines) from object edges to VP.
- Add transversals (parallel to HL) for width/height.
Section 2: 2-Point Perspective (Most Common for Exteriors)
- Setup: Two VPs (ZL & ZR) on X-axis, split at 45° angles.
- Ideal For: Buildings at angles, street corners—dynamic external views.
- Key Features:
- No true horizontal parallels except HL.
- Verticals remain parallel.
- Top-view convergence: Angles from Y-edge dictate VP placement.
- Step-by-Step:
- Establish HL and two VPs (e.g., 90° apart).
- Draw verticals for object height.
- Converge edges to nearest VP (closer angle = steeper lines).
- Use measuring points for accurate scaling.
Advanced Note: Real-world VPs at 90°; artistic license splits to 45° for visibility.
Section 3: 3-Point & 4-Point Perspective (Dramatic Angles)
- 3-Point: Adds third VP (ZU or ZD) above/below HL for bird’s-eye or worm’s-eye views.
- Ideal For: Skyscrapers, cliffs—extreme height/depth.
- Verticals converge; high drama.
- 4-Point: Curvilinear extension with opposing vertical VPs (ZU & ZD).
- Ideal For: Infinite verticals (e.g., looking straight up/down).
- Uses curved arcs instead of straight lines.
- Step-by-Step for 3-Point:
- Place two X-axis VPs.
- Add ZU (above) or ZD (below).
- Converge all non-parallel lines.
- Curve lines near edges for 4-point transition.
Section 4: Curvilinear Perspectives (Fisheye & Panoramic)
- Beyond Linear: Straight lines become curves for wide-angle lenses.
- 4PP: Optional horizontal/vertical curves.
- 5PP: Full fisheye—lines curve on a hemisphere.
- As if seeing through a fisheye lens.
- 6PP: 360° spherical mapping.
- Projects onto a sphere; rotatable for any angle.
- Applications: VR environments, game assets, surreal art.
- Step-by-Step for 5PP:
- Draw central VP.
- Map axes on a circle.
- Curve parallels based on distance from center.
- Distort edges exponentially.
Section 5: Orthographic Projection (Technical Drawing)
- No Perspective: Parallel projection at 45° to axes.
- Views: Front, top, side—multi-view blueprints.
- Key: Z-axis projected at 45°; no convergence.
- Ideal For: Engineering, CAD, isometric games.
- Step-by-Step:
- Align axes (X horizontal, Y vertical, Z 45°).
- Project equal measurements.
- No HL or VPs.
Section 6: One…Six Point Perspective Gallery
- Visual Examples:
- 1PP: Simple grid.
- 2PP: Cityscape.
- 3PP: Towering view.
- 4PP: Vertical infinite.
- 5PP: Fisheye hemisphere.
- 6PP: Full sphere wrap.
- Real-World: Architectural renders, sci-fi interiors.
Perspective Comparison Table
| Type | VPs | Best For | Distortion | Difficulty |
|---|---|---|---|---|
| 1-Point | 1 | Interiors | Low | Beginner |
| 2-Point | 2 | Exteriors | Medium | Intermediate |
| 3-Point | 3 | Dramatic | High | Advanced |
| 4-Point | 4 (curved) | Vertical extremes | Very High | Pro |
| 5PP/6PP | Multi (spherical) | Panoramic/VR | Extreme | Expert |
| Orthographic | 0 | Technical | None | Technical |
Pro Tips for Application
- Horizon Placement: High HL = worm’s-eye (powerful); Low = bird’s-eye (vast).
- Foreshortening: Closer objects larger; measure with diagonals.
- Common Errors: Inconsistent VPs → Fix with tracing paper overlays.
- Digital Tools: Use Clip Studio rulers, Procreate perspective guides, or Blender cameras.
- Practice Drill: Cube in all systems—rotate viewer position daily.
Tools & Materials
- Traditional: Ruler, T-square, French curves (for curvilinear).
- Pencils: HB (guides), 2B (finals).
- Digital: Infinite canvas apps with VP snapping.
- Reference: Grid paper, 3D models.
Downloadable Resources (Free with Tutorial)
- PDF Cheat Sheet: All diagrams + blank templates.
- PSD/Clip File: Layered VPs and grids.
- Exercise Pack: 20 scenes to perspectivize.
- Video Series: 30-minute breakdowns per system.
Ideal For:
- Concept artists & illustrators
- Architects & industrial designers
- Game environment artists
- Animation background painters
- Art students (foundation to advanced)
See the World in Perfect Depth. With this multi-perspective system, you’ll conquer any scene—from grounded realism to mind-bending panoramas. No more flat drawings or wonky angles.
Reference the comprehensive infographic above and start perspectivizing like a pro today.