How to Draw Trees: A Professional Step-by-Step Guide to Creating Realistic Tree Illustrations

Master the art of drawing trees with our comprehensive tutorial, “How to Draw Trees: A Professional Step-by-Step Guide to Creating Realistic Tree Illustrations.” Designed for artists of all levels, this detailed resource provides a structured approach to sketching lifelike trees, emphasizing form, volume, texture, and lighting. Enriched with hand-drawn illustrations and expert techniques, this guide ensures your tree drawings exhibit depth, realism, and artistic finesse.
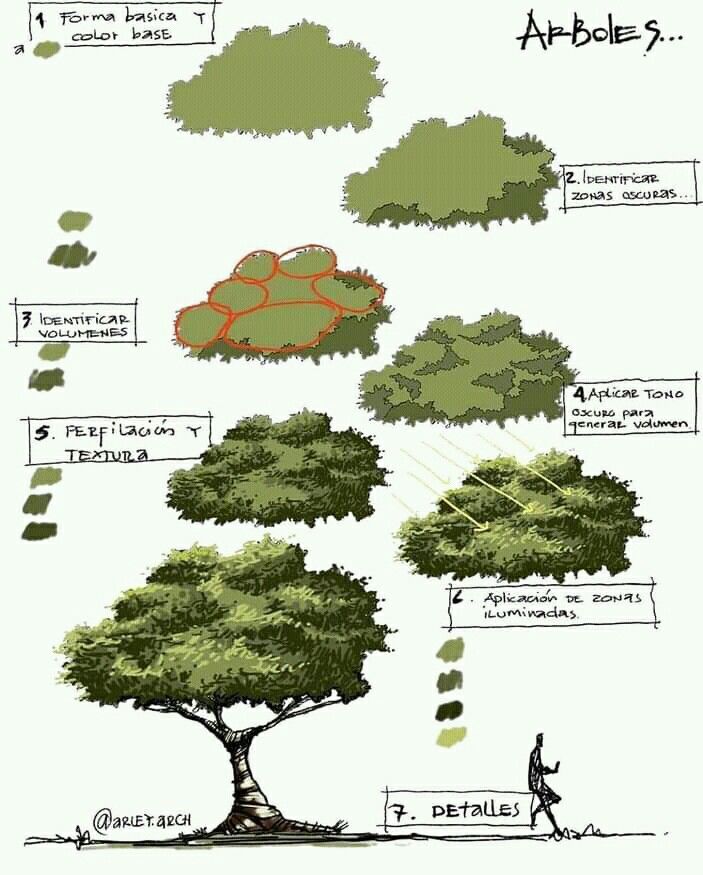
Step 1: Establishing the Basic Form and Base Color
Begin by sketching the basic form of the tree with a simple, cloud-like shape (1). Apply a base color using a light green tone to establish the foundation. This initial outline sets the stage for adding volume and detail, ensuring the tree’s overall structure is well-defined from the outset.
Step 2: Identifying Volumes
Identify the main volumes within the tree by outlining key areas with orange circles (2). This step helps define the tree’s natural growth patterns and prepares for shading. Simultaneously, identify darker zones (2) to create contrast, marking where shadows will fall to enhance the three-dimensional effect.
Step 3: Applying General Volume Tone
Apply a general tone to define the volume (4), using darker shades to emphasize the tree’s structure. This technique builds on the identified volumes, adding depth by layering tones that suggest the density of the foliage. The guide illustrates this process with a progression from a flat shape to a more sculpted form.
Step 4: Adding Texture and Definition
Incorporate texture by refining the edges and adding subtle variations in shading (5). Use a range of green tones—light, medium, and dark—to mimic the natural texture of leaves. This step enhances the tree’s realism, making it appear lush and detailed, as shown in the textured illustration.
Step 5: Applying Illuminated Zones
Introduce light by applying illuminated zones (6), using lighter shades where sunlight hits the tree. The guide suggests using directional lines to indicate the light source, adding highlights that contrast with the darker areas. This step brings the tree to life, creating a dynamic interplay of light and shadow.
Step 6: Finalizing with Details
Complete the drawing by adding finer details (7), such as individual leaves, branches, and ground elements. Include a figure for scale to provide context, as depicted in the final illustration. Refine the trunk and base with texture, ensuring all elements align with the established light and shadow patterns for a cohesive finish.
This tutorial is supported by hand-drawn diagrams that illustrate each step, offering clear visual guidance. Perfect for artists seeking to master tree drawing or enhance their landscape skills, follow these steps to create stunning, realistic tree illustrations with professional quality and confidence!