
Tutorial: Mastering Tree Drawing from Bare Branches to Full Foliage
Welcome to this comprehensive step-by-step guide on drawing a tree, evolving from a simple bare branch structure to a lush, fully foliaged masterpiece. This tutorial is designed for artists of all levels, providing clear instructions and visual aids to help you develop your skills. Follow along with the five stages illustrated in the images to create a realistic and detailed tree drawing.
Introduction
Drawing a tree can seem daunting, but by breaking it down into manageable steps, you can achieve impressive results. The sequence provided showcases the progression from a minimalistic sketch to a detailed representation, emphasizing the importance of structure, texture, and shading. Gather your drawing materials—pencil, eraser, paper, and optional colored pencils or markers—and let’s begin.
Materials Needed
- Graphite pencils (HB, 2B, 4B)
- Kneaded eraser
- Drawing paper
- Colored pencils or markers (optional for foliage)
- Blending stump or cotton swab (for shading)
Step-by-Step Guide
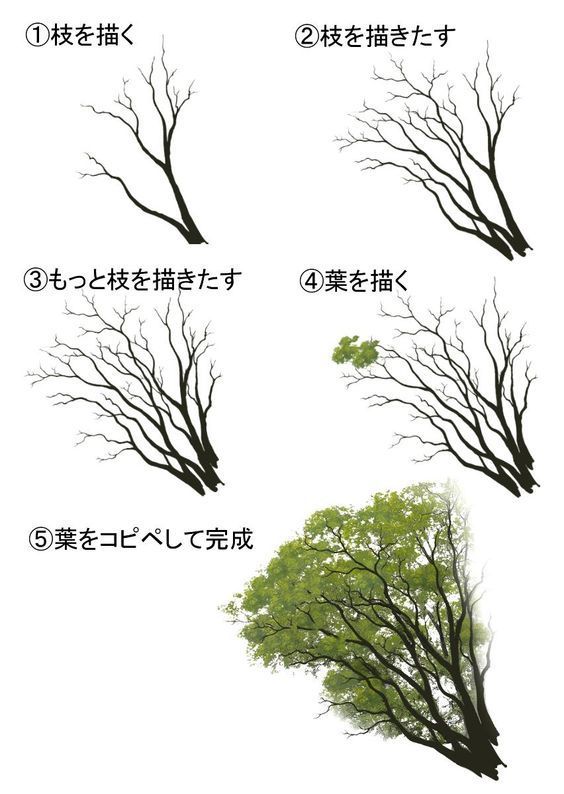
Step 1: Sketching the Bare Branches
- Objective: Establish the basic structure of the tree.
- Process: Start with a single, central line to represent the trunk. From this line, draw thin, irregular branches extending outward. Keep the lines light and sparse, mimicking the natural growth pattern of a tree in winter. Refer to the first image (①枝を描く) for guidance.
- Tip: Use short, quick strokes to create a natural, uneven look. Avoid symmetry to enhance realism.
Step 2: Adding More Branches
- Objective: Increase the complexity of the branch structure.
- Process: Build on the initial sketch by adding more branches. Extend thinner twigs from the main branches, curving them slightly to suggest natural movement. The second image (②枝を描きたす) shows this stage with a fuller but still bare framework.
- Tip: Vary the length and thickness of the branches to add depth and interest.
Step 3: Enhancing the Branch Structure
- Objective: Refine the tree’s skeletal form.
- Process: Darken the main branches and add finer details to the smaller twigs. The third image (③もっと枝を描きたす) illustrates a denser network of branches, giving the tree a more defined silhouette.
- Tip: Use a 2B pencil for darker lines and an eraser to clean up any stray marks.
Step 4: Introducing Initial Foliage
- Objective: Begin adding leaves to transform the tree.
- Process: Start with small clusters of leaves at the tips of the branches. Use light green or yellowish-green shades if coloring. The fourth image (④葉を描く) shows the initial addition of foliage, blending with the bare branches.
- Tip: Draw leaves in small, irregular groups rather than individual pieces to save time and maintain a natural look.
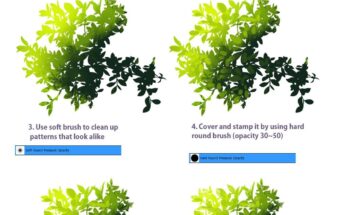
Step 5: Completing the Full Foliage
- Objective: Finalize the tree with a lush canopy.
- Process: Fill in the remaining branches with dense foliage. Use a variety of green shades to suggest depth and light variation. The fifth image (⑤葉をゴペして完成) depicts a fully foliaged tree with a rich, layered appearance.
- Tip: Add shading with a blending stump or pencil to create a three-dimensional effect. Highlight the edges with lighter colors for a realistic touch.
Final Touches
- Review your drawing for any gaps or inconsistencies.
- Add subtle details like bark texture on the trunk or small leaf variations.
- Sign and date your artwork to mark your progress!
Conclusion
Congratulations on completing your tree drawing! This tutorial has guided you through the transformation from a simple branch structure to a vibrant, full tree. Practice these steps regularly to refine your technique, and experiment with different seasons or tree types. Share your artwork with us or use it as a foundation for more complex landscapes.
Happy drawing!