Houses in Scenery Drawing: A Professional Guide to Architectural Landscapes

Elevate your artistic skills with our comprehensive tutorial, “Houses in Scenery Drawing: A Professional Guide to Architectural Landscapes.” This detailed resource is crafted for artists of all levels, offering a step-by-step approach to integrating houses into scenic landscapes with precision and depth. Featuring hand-drawn illustrations and expert techniques, this guide helps you master the depiction of architectural forms against natural backdrops, ensuring a harmonious and realistic composition.
Step 1: Conceptualizing the House Placement
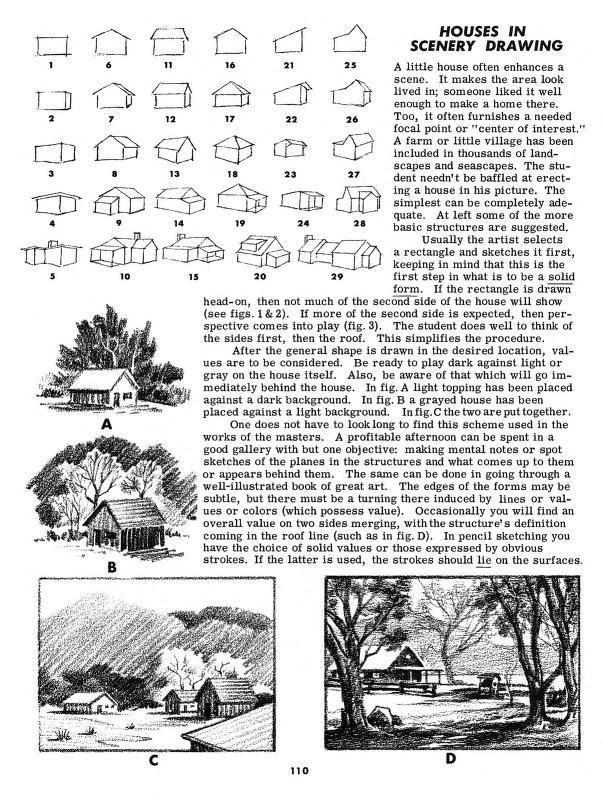
Begin by understanding the role of a small house in enhancing a scene. The tutorial notes that a little house often enhances a lived-in, well-loved area, whether it’s a village, farm, or countryside setting. Sketch a basic house outline from the provided grid (illustrations 1-10), selecting a head-on or slightly angled view. This initial step establishes the house’s position against a natural background, such as trees or fields.
Step 2: Establishing Basic Forms and Perspective
Draw the house using a rectangle as the foundation, as shown in illustrations A-D. The guide advises drawing the second side expected, then the roof first, followed by the sides. This simplifies the process and ensures proper perspective. Consider the head-on view (fig. 1 & 2) and adjust based on the light source, which will guide the placement of shadows and highlights.
Step 3: Applying Light and Shadow
Incorporate light and shadow to define the house’s volume. The tutorial suggests drawing against a dark background (fig. A) to emphasize the structure, or using a light topping against a dark ground (fig. C) for contrast. Illustrations C and D demonstrate how a proficient afternoon scheme can be spent on sketching, with mental notes on light placement enhancing the three-dimensional effect.
Step 4: Refining Details and Tones
Refine the sketch by adding details such as windows and rooflines. The guide recommends using pencil strokes to define the roof line (as in fig. D), ensuring they lie on the surfaces for a natural look. Experiment with tints and tones, as seen in the progression from A to D, to create a balanced composition that integrates the house with its surroundings.
Step 5: Finalizing the Scenic Composition
Complete the drawing by reviewing the overall perspective and tonal balance. Ensure the house’s edges are suggested by forms and values, with occasional variations in line thickness (fig. D) to define the structure. The tutorial emphasizes that a well-executed sketch, as shown in the final illustrations, should feel integrated with the scenery, enhancing the narrative of the landscape.
This tutorial is supported by hand-drawn diagrams that provide visual clarity at each stage, offering practical tips for achieving professional-quality results. Perfect for artists seeking to master scenic architectural drawing or refine their landscape techniques, follow these steps to create captivating and realistic house-in-scenery illustrations with confidence!