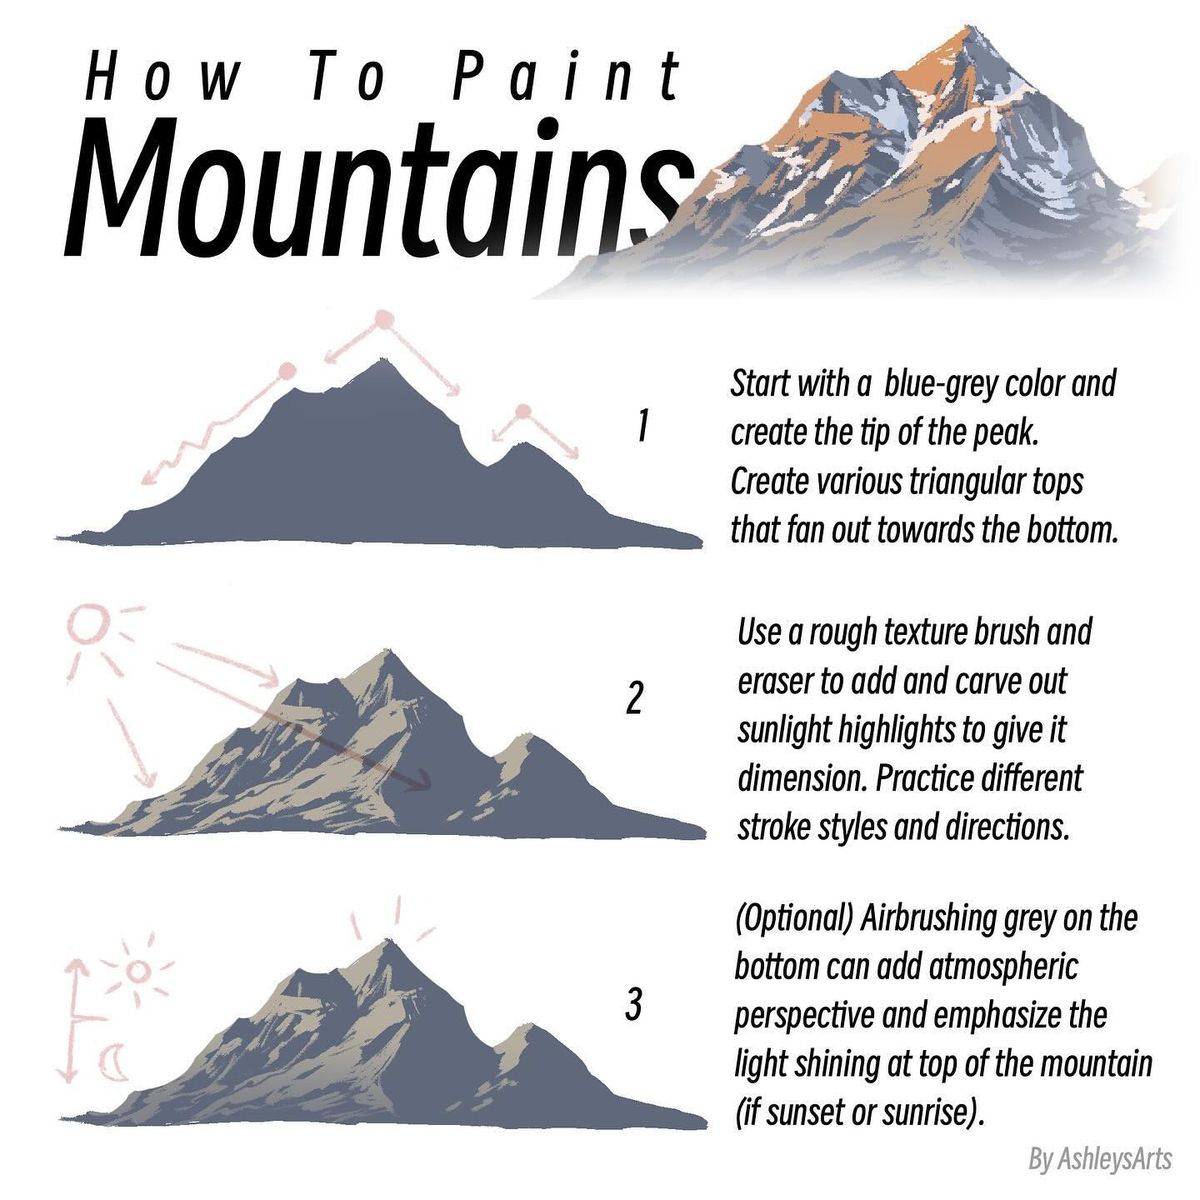
Step-by-Step Tutorial: Painting Realistic Mountains – Techniques for Shape, Texture, and Atmospheric Lighting
Painting mountains can be one of the most rewarding yet challenging aspects of landscape art, as they demand a keen understanding of form, light, and perspective to convey their majestic scale and rugged beauty. Whether you’re working in digital media (using software like Photoshop, Krita, or Procreate) or traditional mediums such as acrylics, oils, or watercolors, this tutorial provides a structured approach to creating convincing mountain ranges. Drawing from time-honored techniques seen in the works of artists like Bob Ross or contemporary digital painters, we’ll break down the process into three essential steps: establishing the base form, adding dimension through highlights and texture, and enhancing atmospheric effects. This method emphasizes starting simple and building complexity, ensuring your mountains feel grounded in reality while allowing room for creative interpretation.
The key to successful mountain painting lies in observing natural geology—mountains aren’t smooth; they’re fractured, eroded forms shaped by time. Always consider your light source early, as it dictates shadows, highlights, and color temperature. For beginners, practice in grayscale to master values before introducing color (e.g., cool blues for distant peaks, warmer earth tones for foreground). Tools recommended: A rough texture brush (digital) or fan brush (traditional), eraser or lifting tool for highlights, and a soft airbrush for gradients. Reference real photos of ranges like the Rockies or Alps for authenticity. Common pitfalls to avoid: Overly symmetrical shapes (nature is irregular), flat shading (always vary stroke direction), or neglecting perspective (distant mountains fade in detail and contrast).
Fundamental Principles of Mountain Painting
Before starting, internalize these core concepts:
- Shape and Silhouette: Mountains often form triangular or jagged profiles that fan outward at the base for stability. Vary peaks to avoid monotony.
- Lighting and Value: Assume a single light source (e.g., sun from the left). Highlights on sun-facing slopes, shadows in crevices; use value contrast to suggest depth.
- Texture and Brushwork: Rough, directional strokes mimic rock faces. Practice dry brushing for grit, wet-on-wet for blends.
- Atmospheric Perspective: Distant elements desaturate and lighten, creating depth. Add haze at the base to imply distance.
- Composition Tips: Place peaks off-center using the rule of thirds; layer multiple ranges for foreground-midground-background interest.
- Color Theory: Base with cool neutrals (blue-gray for snow-capped); warm up sunlit areas with ochres or siennas. For sunrises/sunsets, introduce pinks and oranges at peaks.
- Practice Advice: Thumbnail sketches first—small, quick versions to test composition. Scale up only when satisfied.
Now, let’s dive into the step-by-step process, illustrated with progressive examples.
Step 1: Building the Base Form (Creating the Peak and Silhouette)
The foundation of any mountain painting is a strong, varied silhouette that captures the essence of elevation and mass.
- Visual Breakdown: Begin with a simple, jagged outline in a mid-tone blue-gray to represent the rocky core. Form the tip of the peak as a sharp point, then create descending ridges that widen triangularly toward the base. Arrows indicate flow from peak to base, emphasizing outward fanning for a natural, stable shape.
- Technique: Select a medium-sized brush and lay down the base color in broad strokes. Focus on irregularity—avoid straight lines; incorporate subtle bumps and dips to suggest erosion. In digital tools, use a pressure-sensitive pen for varying line weight; traditionally, sketch lightly in charcoal before painting.
- Key Focus: This step is about mass, not detail. Create various triangular tops (e.g., one sharp, another rounded) to add interest. The blue-gray evokes distant haze, setting a cool tonal foundation.
- Tutorial Tip: If your peaks look too uniform, erase and redraw with reference to real mountains. Practice drawing 5-10 silhouettes varying in height and angle. For color variations, mix ultramarine blue with Payne’s gray; adjust opacity for layering potential. This establishes perspective early—taller peaks in back for depth.
Step 2: Adding Texture and Dimension (Incorporating Sunlight Highlights)
With the base in place, introduce texture and light to transform the flat shape into a three-dimensional form.
- Visual Breakdown: A sun icon from the left directs light rays onto the mountain, highlighting ridges while casting shadows in valleys. Use a rough texture to carve out facets, with lighter tones on sun-exposed areas and darker in recesses. The result is a craggy profile with defined planes.
- Technique: Switch to a textured brush (e.g., stipple or scatter) or an eraser for subtractive highlights. Gently erase or lift paint along light paths to reveal underlying white or lighter values, simulating sunlight. Vary stroke styles: Short, vertical for steep cliffs; horizontal for plateaus. Practice directional brushing—upward for ascents, downward for slopes.
- Key Focus: Dimension comes from contrast; sunlight gives it “pop.” Experiment with stroke directions to imply rock types (e.g., jagged for granite, smoother for sedimentary).
- Tutorial Tip: In oils or acrylics, use a palette knife for impasto texture; digitally, layer with multiply mode for shadows. Common error: Over-erasing—aim for subtle gradients. Test on scrap paper: Apply base, then highlight one side fully. For realism, observe how light wraps around forms, adding midtones where direct sun transitions to shadow.
Step 3: Enhancing Atmospheric Perspective (Optional Airbrushing for Depth and Light Effects)
Finalize the painting by adding atmospheric elements that emphasize distance and time of day, making the mountain feel part of a larger environment.
- Visual Breakdown: Introduce a soft gray haze at the base via airbrushing, fading the lower edges to suggest mist or distance. Highlight the peak with glowing light (sunrise/sunset indicated by a sun/moon icon), creating a rim light effect. The mountain now appears ethereal, with emphasized top shine.
- Technique: Use a soft airbrush or dry brush at low opacity to layer gray over the bottom, blending upward. For the peak, add warmer highlights (e.g., soft yellow or pink) where light hits directly. This is optional but transformative for mood—sunrise for warm optimism, sunset for dramatic warmth.
- Key Focus: Atmospheric perspective reinforces scale; the base fade pushes the mountain back in space. Emphasize light at the top to draw the eye upward, mimicking real-world optics.
- Tutorial Tip: Digitally, use Gaussian blur on lower layers; traditionally, glaze with thinned paint. If sunset, shift blues to purples. Practice integration: Paint a full scene with foreground elements (trees, lakes) to see how the mountain interacts. Avoid overdoing haze—keep contrast at peaks for focus. For advanced users, add snow: White dry brush on highlights, blue shadows for volume.
Conclusion: Refining Your Mountain Paintings and Next Steps
By following these steps—starting with a solid base, layering texture and light, and finishing with atmosphere—you’ll paint mountains that convey grandeur and realism. Remember, iteration is key: Critique your work by squinting to check values, or flip the canvas to spot imbalances. Experiment with scales (small studies vs. large canvases) and mediums to find your style. For inspiration, study artists like Ashley Arts (credited in the guide) or explore online resources for mountain references.
Apply this to broader landscapes: Combine with tree or cloud tutorials for complete scenes. Challenge yourself: Paint a range at different times of day, noting light shifts. Share your progress in our artist community—upload before-and-afters and get feedback. For more guides, check our series on landscape elements like rivers and skies. Keep painting, and watch your worlds come alive!