Mastering Hatching Techniques: A Professional Tutorial on Enhancing Drawings with Line Variations for Depth, Motion, and Design
In the intricate field of illustrative arts and technical drafting, hatching stands as a foundational technique that transforms simple line work into expressive, multidimensional compositions. This tutorial is inspired by an educational sketch page that explores the versatile applications of hatching—parallel or crossed lines used to denote shading, texture, and form. The image, presented in a handwritten, instructional style, breaks down hatching into practical examples: from adding atmospheric depth to a cubic form, creating swirling designs, implying movement through radial patterns, and experimenting with variations on cylindrical shapes to avoid monotony or enhance cohesion. These demonstrations encourage artists to “try and find other uses for hatch lines in drafting,” promoting creative exploration while grounding techniques in principles of visual perception and composition. Ideal for aspiring illustrators, graphic designers, architects, or educators, this guide offers a detailed, professional walkthrough to incorporate hatching into your workflow, elevating sketches from flat outlines to dynamic artworks. By mastering these methods, you’ll gain the ability to convey volume, emotion, and narrative through mere lines, with applications spanning comic art, product rendering, and fine art prints.

Core Principles of Hatching in Art and Drafting
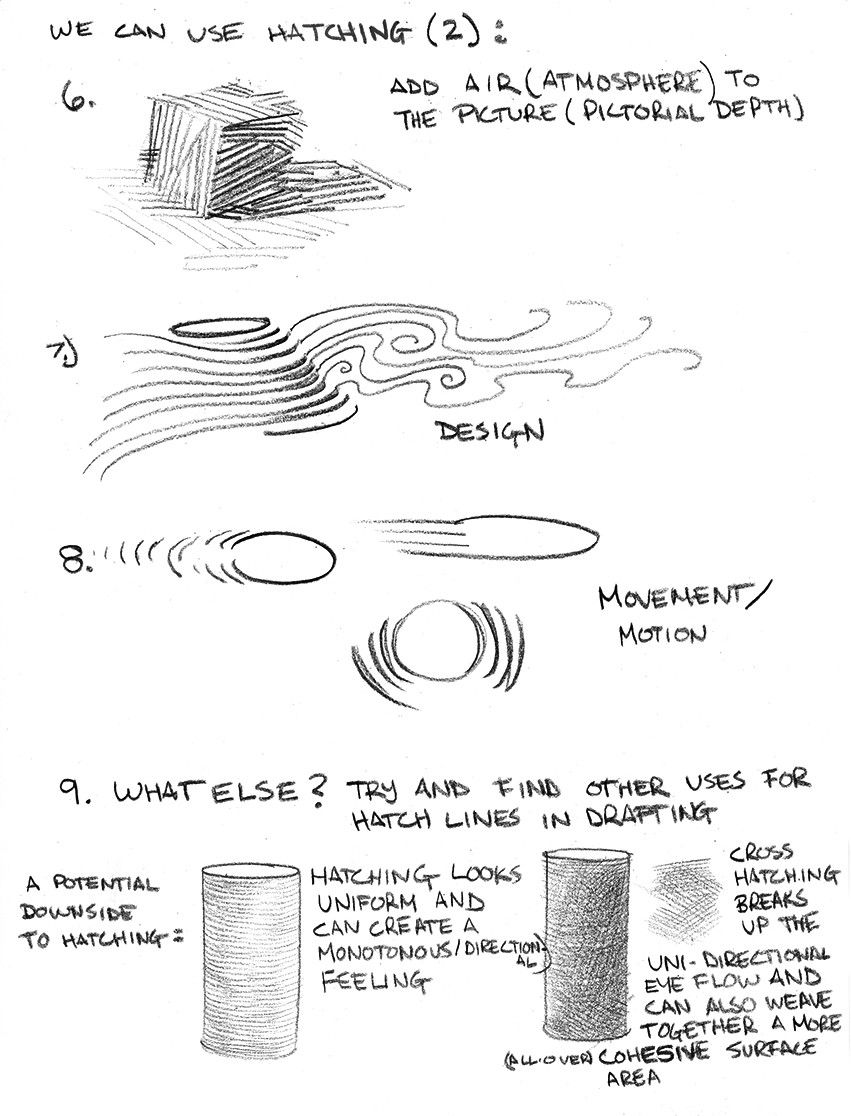
Hatching involves drawing closely spaced parallel lines to simulate tone, texture, or shadow, while cross-hatching layers intersecting sets for deeper values. As illustrated in the image, hatching extends beyond mere shading: it can infuse “air” or atmosphere for pictorial depth (e.g., fading lines to suggest distance), craft ornamental designs through patterned flows, evoke motion via directional emphasis, and innovate on forms to break uniformity or unify surfaces. Historically, this technique traces back to Renaissance masters like Leonardo da Vinci, who used it for anatomical studies, and modern applications in digital tools like Photoshop brushes emulate its effects. The image’s numbered sections—6 through 9—serve as a progressive lesson: starting with basic atmospheric addition, moving to aesthetic and kinetic uses, and culminating in experimental variations. Key takeaways include varying line density (closer for darker areas), direction (to follow contours), and intersection (for complexity), all while maintaining control to avoid visual clutter.
The inspirational sketches include:
- Section 6: A stacked cubic form with vertical hatching, labeled to “add air (atmosphere) to the picture (pictorial depth),” showing how graduated lines create a sense of recession and ambient light.
- Section 7: Wavy, horizontal hatches forming a fluid, ribbon-like pattern under “Design,” illustrating decorative potential.
- Section 8: Concentric and radial lines around ovals, denoting “Movement/Motion,” where diverging hatches suggest expansion or vibration.
- Section 9: Comparative cylinders demonstrating downsides like monotony in uniform hatching versus benefits of cross-hatching for flow, weave, and cohesion, with annotations urging further discovery.
This framework not only teaches technique but also encourages problem-solving, such as using hatching to integrate disparate elements into a “more cohesive surface.”
Recommended Materials for Professional Results
To replicate these hatching exercises with precision and finesse, use tools that allow for controlled line variation:
- Paper: Acid-free drawing paper (e.g., 90-140 gsm Strathmore) for smooth ink flow and erasability.
- Drawing Tools: Technical pens (e.g., 0.1-0.5 mm Sakura Pigma Micron) for consistent lines; graphite pencils (2H-4B) for preliminary sketches; optional dip pens for variable width.
- Accessories: Ruler or straightedge for parallel lines, eraser (kneaded for subtle lifts), and blending stumps for softening if blending hatches.
- Digital Equivalents: Graphics tablet with software like Adobe Illustrator or Krita; use custom brushes mimicking ink for hatching effects.
- Workspace Setup: Good lighting to judge tonal values; a tilted drafting table to reduce hand strain during repetitive strokes.
Begin by scanning or photographing the inspirational image for reference, zooming in on details like line spacing.
Step-by-Step Tutorial: Implementing Hatching for Expressive Drawings
This methodical guide progresses from foundational applications to advanced experimentation, mirroring the image’s structure. Each step includes timing estimates, pro tips, and error corrections for a polished outcome.
- Foundation: Adding Atmosphere and Depth (15-20 Minutes):
- Reference Section 6: Sketch a basic form like a cube or stack. Lightly outline in pencil, then apply vertical or diagonal hatches, starting dense at the base and spacing wider toward the top to simulate fading into atmosphere.
- Technique Focus: Use short, even strokes; vary pressure for subtle tone gradients. This creates “pictorial depth” by mimicking aerial perspective—distant areas appear lighter and hazier.
- Pro Tip: Hold your pen at a 45-degree angle for natural flow. If lines waver, practice on scrap paper with ruled guides.
- Common Pitfall: Overly uniform density flattens the form—solution: Observe real shadows and adjust spacing accordingly.
- Designing with Patterned Hatches (20-25 Minutes):
- Draw from Section 7: Create a freeform design, such as undulating waves or swirls. Hatch in parallel groups following the curves, clustering lines for emphasis on bends.
- Build Complexity: Layer sets at slight angles to form textures like fabric or wind patterns, enhancing aesthetic appeal.
- Application: Ideal for backgrounds or motifs in logos—experiment with symmetry for balanced compositions.
- Troubleshooting: If the design feels static, introduce directional changes to guide the viewer’s eye, as in the image’s flowing lines.
- Conveying Movement and Motion (25-30 Minutes):
- Inspired by Section 8: Outline circular or elliptical shapes, then radiate hatches outward or concentrically. For motion, curve lines to imply spin or expansion, with denser clusters at the core.
- Enhance Dynamics: Vary line length—short bursts for vibration, longer for flow. This technique animates static drawings, useful in storyboards or animations.
- Pro Tip: Rotate your paper as you draw to maintain consistent direction. Digitally, use radial gradient tools to preview effects.
- Avoid: Harsh intersections that disrupt flow—soften with feathering (gradually thinning lines).
- Exploring Variations and Innovations (30-40 Minutes):
- Based on Section 9: Draw cylinders or similar volumes. Start with “uniform and unidirectional” hatching for a baseline, noting its potential monotony.
- Introduce Alternatives: Apply cross-hatching at perpendicular angles to “break up the directional eye flow” and create weave-like textures. For cohesion, blend sets into unified areas, as annotated.
- Experiment Freely: Test “downside” scenarios like uneven spacing, then refine. Discover uses like implying materials (e.g., dense cross-hatch for metal, sparse for fabric).
- Pro Tip: Use a value scale (1-10 darkness levels) to plan tones. In digital, layer hatches on separate canvases for easy adjustments.
- Integration and Composition Building (20-25 Minutes):
- Combine Elements: Merge techniques—e.g., hatch a landscape with atmospheric depth in the background, motion in foreground elements, and designed patterns for accents.
- Scale Up: Create a full-page draft incorporating all sections, ensuring harmony through consistent line weight.
- Refine: Scan and critique digitally; adjust contrasts for print-ready quality.
- Advanced Refinements and Digital Adaptation (Ongoing Practice):
- Push Boundaries: Experiment with curved hatching for organic forms or stippling integration for hybrid textures.
- Digital Workflow: Import sketches into software; use vector paths for scalable hatches, applying filters like “noise” for realism.
- Portfolio Tip: Document iterations with before-after photos to showcase process.
Practical Applications and Advantages
Hatching proficiency enhances versatility across disciplines: in architecture for rendering blueprints, in illustration for comic shading, or in education for teaching value studies. Benefits include improved hand-eye coordination, better understanding of light behavior, and cost-effective shading without full color. Creatively, it allows for stylistic expression, from minimalist line art to intricate engravings.
Troubleshooting Common Issues
- Inconsistent Lines: Practice daily drills; use stabilizers in digital tools.
- Visual Monotony: Introduce variety in direction and density; reference the image’s warnings.
- Overworking: Step back frequently; set time limits per section.
Through this tutorial, harness the full potential of hatching to breathe life into your drafts. Dive in, experiment as encouraged, and elevate your artistic toolkit. For deeper dives, consider resources on chiaroscuro techniques or join online art communities to share your hatched creations!