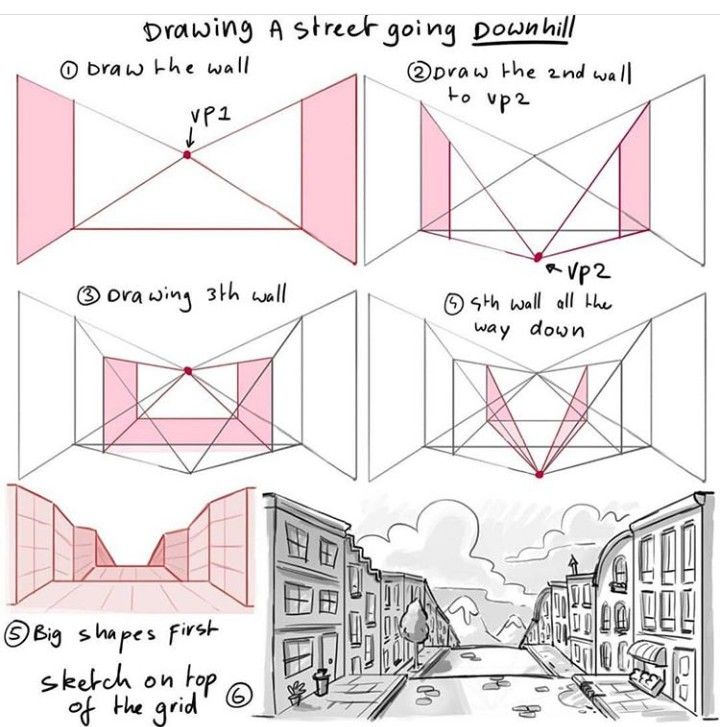
How to Draw a Convincing Downhill City Street in Two-Point Perspective – Step-by-Step Tutorial

Description (Perfect for a website blog post or tutorial page)
Learn how to draw a dramatic downhill city street that pulls the viewer’s eye deep into the scene using classic two-point perspective principles. This detailed, beginner-friendly tutorial breaks down the entire process into clear, manageable steps so you can achieve professional-looking results even if you’re new to perspective drawing.
What You’ll Learn in This Tutorial
- How to place two vanishing points (VP1 and VP2) correctly for a steep downhill angle
- How to construct perfectly converging building walls that follow the slope
- A reliable “grid-first” method that guarantees accurate proportions as the street descends
- How to layer multiple rows of buildings while maintaining consistent perspective
- Tips for turning your perspective framework into a finished, atmospheric cityscape illustration
Step-by-Step Breakdown
Step 1 – Establish the First Pair of Buildings and VP1 Begin with the horizon line and place your first vanishing point (VP1) on it. Draw the closest building fronts (vertical lines) and connect their top and bottom corners to VP1. These lines define the first “wall” of the street and set the steepness of the downhill slope.
Step 2 – Add the Second Vanishing Point (VP2) Place VP2 far to the right (or left) on the same horizon line. Draw the opposite building walls converging toward VP2. The wider the angle between VP1 and VP2, the sharper your downhill plunge will feel.
Step 3 – Build the Third Row of Buildings Using the same two vanishing points, draw the next set of buildings further down the hill. Notice how the vertical height of each successive row appears smaller because of the steep angle and distance.
Step 4 – Extend the Street Grid All the Way Down Continue adding rows of buildings, letting every horizontal edge (rooftops, windowsills, sidewalks) follow the same converging lines toward VP1 and VP2. This creates a strong rhythmic pattern that guides the viewer’s eye downhill.
Step 5 – Block in the Big Shapes First Before adding any details, roughly sketch the major silhouettes of rooftops, overhangs, and sidewalk levels directly on top of your perspective grid. Working big-to-small keeps proportions accurate and prevents getting lost in details too early.
Step 6 – Refine and Finish the Illustration Once the underlying structure is solid, start adding windows, doors, street lamps, trees, and other city elements. Because everything already follows the correct perspective lines, your details will look naturally integrated rather than floating or distorted.
Key Tips for Success
- Keep your vanishing points far off the page when possible — the farther apart VP1 and VP2 are, the more natural and less distorted the perspective becomes.
- Use lighter construction lines for the grid and darker lines for the final artwork to maintain clarity.
- The steeper you want the downhill effect, the lower you place VP1 relative to your buildings (or raise your eye level above the street).
- Add atmospheric perspective: objects farther down the hill should have less contrast, softer edges, and cooler colors to enhance depth.
This method works beautifully for urban environments, European old towns, San Francisco-style hills, or any fantasy city you want to give dramatic topography.
Whether you’re working traditionally with pencil and paper or digitally in Procreate, Clip Studio Paint, or Photoshop, these fundamental principles remain the same.
Ready to give your cityscapes real depth and excitement? Grab your ruler (or digital straight-line tool) and start drawing downhill streets that feel alive and immersive!