Mastering Basic Pencil Techniques: A Comprehensive Guide for Artists

Enhance your artistic skills with our detailed tutorial on mastering basic pencil techniques, a fundamental skill for creating stunning drawings with depth and texture. Pencils are versatile tools that allow artists to produce a wide range of effects through varying hand positions and shading methods. This guide provides a step-by-step approach, illustrated with the provided images, to help you understand and apply these techniques effectively. Whether you’re a beginner or an experienced artist, this tutorial will equip you with the knowledge to render everything from smooth complexions to intricate backgrounds with confidence.
Introduction to Pencil Techniques
Pencil drawing is an accessible yet powerful medium that relies on the interplay of hand position, pencil grip, and shading techniques to achieve desired effects. The way you hold your pencil and maintain its point can significantly influence your marks, making experimentation with different grips and leads essential. This tutorial explores two primary hand positions—the writing position and the underhand position—along with a variety of shading methods to help you create professional-quality artwork.
Step-by-Step Tutorial
- Step 1: Understanding Hand Positions
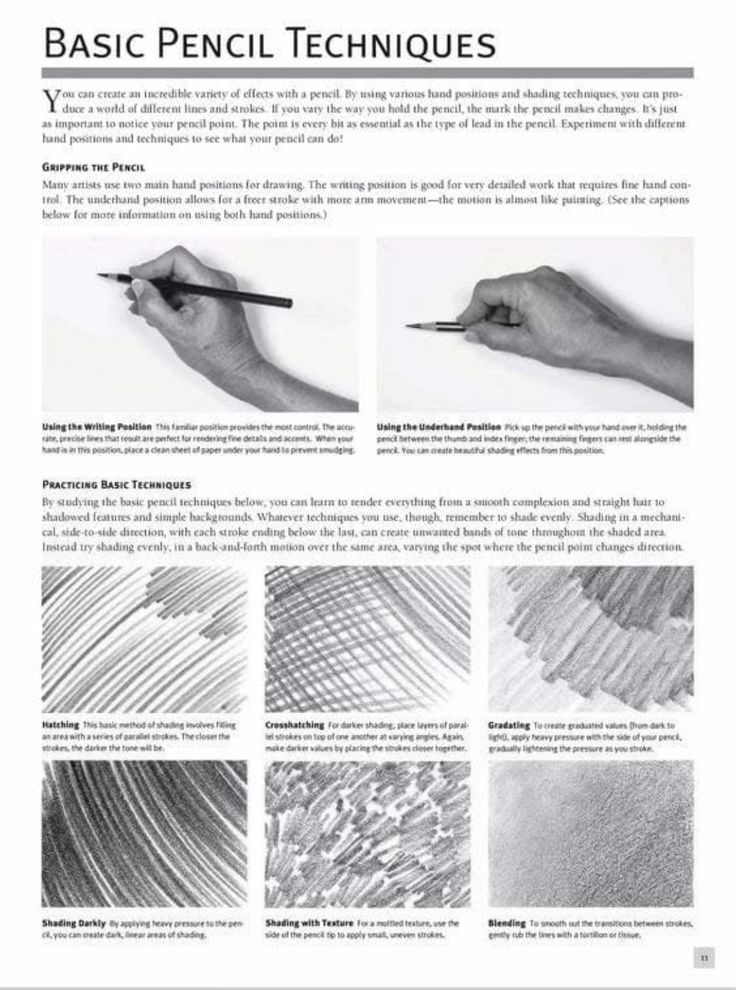
- Using the Writing Position: This familiar grip, shown in the first image, offers the most control, ideal for detailed work requiring precision. Hold the pencil as you would for writing, resting your hand on the paper with a clean sheet underneath to prevent smudging. Practice precise lines and refine your technique to ensure accuracy.
- Using the Underhand Position: Illustrated in the second image, this grip allows for a freer stroke with more arm movement, resembling a painting motion. Pick up the pencil with your hand over it, letting the thumb and index finger hold it while the remaining fingers rest alongside. This position is excellent for broader strokes and shading effects.
- Step 2: Practicing Basic Shading Techniques
- Mastering shading is key to adding depth and dimension to your drawings. Study the following techniques to render a variety of textures and tones:
- Hatching: Create tone with a series of parallel strokes. The closer the strokes, the darker the tone, as shown in the hatching example. Vary pressure to control intensity.
- Crosshatching: Build layers of parallel strokes in different directions to deepen shadows, depicted in the crosshatching image. Place strokes closer together for darker values.
- Grading: Achieve graduated values from dark to light by applying heavy pressure at the start and gradually lightening as you stroke, as illustrated in the grading example.
- Shading Darkly: Apply heavy pressure to create darker areas of shading, enhancing contrast in your work.
- Shading with Texture: Use the side of the pencil tip for a mottled texture with uneven strokes, adding a tactile quality to your drawing.
- Blending: Smooth transitions between strokes by gently rubbing with a tortillon or tissue, as shown in the blending image, for a seamless finish.
- Mastering shading is key to adding depth and dimension to your drawings. Study the following techniques to render a variety of textures and tones:
- Step 3: Applying Techniques Evenly
- When shading, maintain consistency by using a mechanical, side-to-side motion with each stroke ending below the last. This prevents unwanted bands of tone and ensures an even application. Vary the spot where the pencil point changes direction to avoid noticeable patterns, creating a polished look across your shaded areas.
Practical Application
Begin by practicing each technique on scrap paper to familiarize yourself with the effects. Start with the writing position for detailed sketches, then switch to the underhand position for broader shading. Experiment with different pencil leads (e.g., HB, 2B, 4B) and sharpen your pencil regularly to maintain a fine point. Try combining techniques—such as hatching with blending—to create complex textures like skin or fabric in your drawings.
Tips for Success
- Keep a clean sheet of paper under your hand to avoid smudging.
- Test your pencil pressure on a separate sheet before applying it to your final work.
- Use a kneaded eraser to lift graphite for highlights or corrections.
- Practice regularly to develop muscle memory and control over your strokes.
Conclusion
Mastering basic pencil techniques is the foundation for creating dynamic and expressive drawings. By following this step-by-step guide and practicing with the illustrated examples, you’ll gain the skills to render a wide range of subjects with professional finesse. Whether you’re sketching portraits, landscapes, or still life, these methods will enhance your artistic expression. Explore more drawing tutorials on our website, and share your progress with our community of artists. Start practicing today and unlock the full potential of your pencil!
Happy sketching!