Thinking in 3D: A Professional Tutorial on Visualizing and Rendering Organic Forms with Grid-Based Structures for Artists and Designers

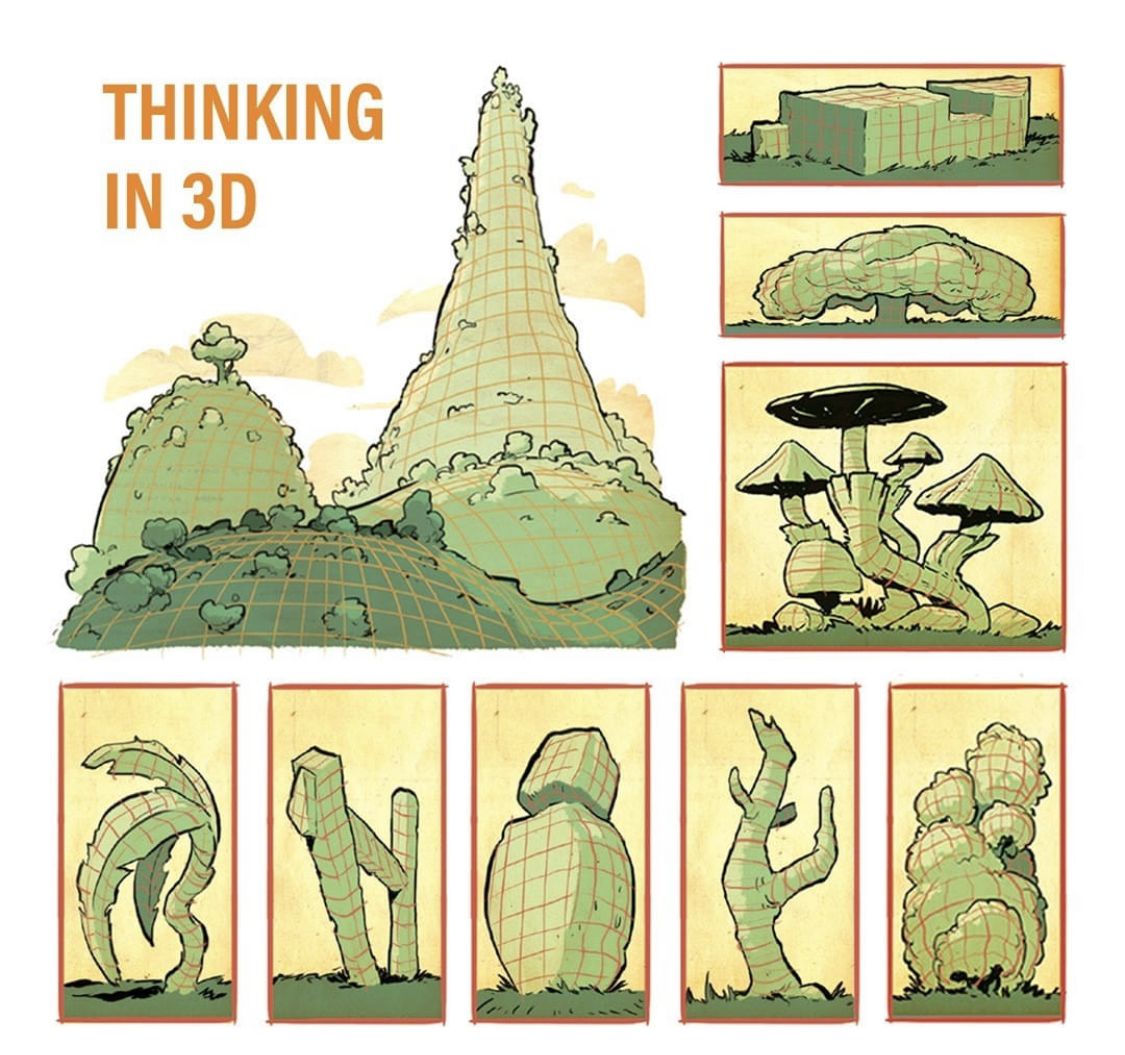
In the dynamic world of digital and traditional art, mastering the art of “thinking in 3D” is essential for creating immersive, volumetric illustrations that transcend flat representations. This tutorial is inspired by a captivating illustrative composition titled “Thinking in 3D,” which features a series of stylized, grid-overlaid organic forms rendered in a whimsical yet instructional style. The artwork showcases a central mountainous landscape with towering peaks, rolling hills, and scattered foliage, all enveloped in a green wireframe grid that emphasizes curvature, depth, and spatial relationships. Surrounding this are smaller vignettes depicting varied natural elements—a cubic structure, a sprawling tree, clustered mushrooms, twisted plants, angular rocks, bulbous forms, branching limbs, and fluffy bushes—each similarly gridded to highlight their three-dimensional anatomy. This visual approach, reminiscent of concept art from animation studios like Pixar or Blender tutorials, encourages artists to deconstruct complex shapes into manageable geometric frameworks, fostering a deeper understanding of form, perspective, and topology.
Whether you’re a concept artist developing fantastical environments, a 3D modeler transitioning from 2D sketches, a game designer prototyping assets, or an educator teaching spatial reasoning, this guide provides a comprehensive, step-by-step framework to replicate and expand upon these techniques. By incorporating grid overlays, you’ll learn to visualize hidden structures within organic shapes, improving accuracy in rendering and enabling seamless integration into digital workflows. The tutorial emphasizes professional practices, such as iterative refinement and cross-medium adaptation, to produce polished results suitable for portfolios, client presentations, or online tutorials. Through detailed exploration, you’ll not only recreate the inspirational image but also innovate your own 3D-thought illustrations, enhancing your ability to convey depth and volume in any medium.
Conceptual Foundation: The Power of Grid-Based 3D Thinking
At its core, “thinking in 3D” involves mentally mapping two-dimensional drawings onto three-dimensional space, using tools like grids to reveal underlying geometry. The inspirational image exemplifies this by applying a consistent, isometric-like grid (resembling a latitude-longitude mesh on a sphere) across diverse forms, which warps and conforms to each shape’s contours. This technique draws from principles in topology, where surfaces are analyzed as deformable meshes, and from industrial design, where wireframes aid in prototyping.
Key elements from the image include:
- Central Landscape: A majestic, cone-shaped mountain flanked by rounded hills, with a global grid suggesting planetary scale and atmospheric perspective through fading clouds.
- Cubic Form: A blocky, architectural element with a stepped cutout, gridded to demonstrate planar faces and edges.
- Tree and Branching Structures: A gnarled tree and twisted limbs, where the grid follows organic curves, illustrating how straight lines bend to imply growth and irregularity.
- Mushrooms and Plants: Clustered fungi with domed caps and serrated leaves on plants, using denser grid lines to accentuate rounded volumes and textural details.
- Rocks and Bushes: Angular, crystalline rocks and puffy bushes, with grids highlighting faceted vs. soft transitions.
- Color and Style: Predominantly green tones on a beige background, with subtle shading and outlines, evoking a vintage sketchbook aesthetic while maintaining modern clarity.
This method benefits professionals by bridging analog sketching with digital tools, reducing errors in 3D modeling software like Maya or ZBrush, and enhancing storytelling in visual narratives.
Essential Materials and Tools
To achieve professional-quality results, assemble these items tailored for both traditional and digital creation:
- Traditional Setup: High-quality sketchbook paper (e.g., Bristol board, 200 gsm for durability), fine-liner pens (0.3-0.8 mm for precise grids), colored pencils or markers (greens and earth tones), and a lightbox for tracing iterations.
- Digital Alternatives: Tablet and stylus (e.g., Wacom or iPad with Apple Pencil), software like Adobe Photoshop, Clip Studio Paint, or Blender for 3D previews; use grid brushes or wireframe modes.
- Reference Aids: Ruler, compass, or protractor for initial grids; optional 3D modeling apps for real-time visualization.
- Workspace Tips: Work under neutral lighting to avoid color distortion, and maintain a digital backup of sketches for versioning.
Prepare by studying the image: Print it out or zoom in digitally to analyze grid densities—note how lines cluster on curves for emphasis.
Step-by-Step Tutorial: Creating Grid-Overlaid 3D Organic Forms
This structured process builds from foundational sketching to advanced rendering, with each step including professional tips for efficiency and common pitfalls to avoid. Allocate 1-2 hours per session for iterative practice.
- Ideation and Composition Planning (15-20 Minutes):
- Brainstorm your subject: Draw inspiration from the image by selecting an organic form (e.g., a mountain or tree). Sketch thumbnails of 5-10 variations, focusing on silhouette and mass.
- Establish perspective: Decide on an isometric or one-point view to simplify 3D representation. Lightly draw a base grid (e.g., 1cm squares) on your canvas as a guide.
- Pro Tip: Use mind-mapping software like MindMeister to organize forms hierarchically—group similar elements (e.g., all branching structures) for cohesive compositions. Avoid overcrowding; aim for balance like the image’s layout.
- Outlining Basic Forms (20-30 Minutes):
- Block in shapes: Start with simple primitives—cylinders for trunks, spheres for hills, cones for peaks. In the image, the mountain begins as stacked ellipses tapering upward.
- Add organic variations: Introduce twists, bulges, or asymmetries. For the twisted plant, curve the outline dynamically while keeping proportions realistic.
- Incorporate details: Add secondary elements like leaves or rocks, ensuring they integrate spatially (e.g., foreground overlaps for depth).
- Troubleshooting: If forms feel flat, exaggerate foreshortening—shorten distant parts to enhance 3D illusion.
- Applying the Grid Overlay (30-45 Minutes):
- Map the grid: Draw horizontal and vertical lines conforming to the form’s surface, as in the image’s warped meshes. Space lines closer on curves (e.g., mushroom caps) to suggest convexity.
- Warp for realism: Bend straight lines to follow contours—use a French curve tool for smooth arcs. In digital, apply a “warp” filter or 3D projection.
- Vary density: Mimic the image by increasing grid resolution on focal points (e.g., the mountain’s peak) for emphasis, and sparsening in backgrounds.
- Pro Tip: For precision, calculate grid intervals mathematically—divide the form’s height by 10 for even spacing. In software, use grid generators like those in Illustrator’s “Perspective Grid” tool.
- Coloring and Shading for Volume (20-30 Minutes):
- Base colors: Apply a uniform green wash, layering lighter tones on highlights and darker on shadows, as seen in the image’s subtle gradients.
- Enhance with lines: Ink the grid in a contrasting shade (e.g., darker green) to pop against the base. Add hatching for texture on bushes or rocks.
- Atmospheric effects: Fade grids in distant areas with softer lines or reduced opacity, incorporating clouds or haze for depth.
- Digital Enhancement: Use layers— one for outlines, one for colors, one for grids—to allow non-destructive edits. Apply shaders in Blender to preview true 3D.
- Refining and Compositing Multiple Elements (15-20 Minutes):
- Assemble vignettes: Arrange smaller forms around a central piece, framing them with borders like the image’s rectangular panels.
- Iterate for cohesion: Adjust scales so elements feel part of a unified scene—e.g., scale mushrooms smaller relative to the mountain.
- Final polish: Erase guidelines, sharpen edges, and add titles like “Thinking in 3D” in a bold, orange font for a professional touch.
- Pro Tip: Scan or export at 300 DPI for web-ready files; use color correction tools to match the image’s warm, vintage palette.
- Advanced Techniques and Experimentation (Ongoing):
- Hybrid Approaches: Export sketches to 3D software—extrude grids into meshes for animation tests.
- Variations: Try different grid types (e.g., hexagonal for organic flow) or themes (e.g., underwater forms).
- Critique Session: Compare your work to the original; seek feedback via online forums like ArtStation.
Professional Applications and Benefits
This tutorial equips you with skills transferable to industries like animation (e.g., environment design for films), gaming (asset conceptualization), and education (teaching STEM via art). Benefits include improved spatial intelligence, faster ideation cycles, and enhanced portfolio appeal. Psychologically, grid-based thinking reduces creative blocks by providing structure amid organic chaos.
Potential Challenges and Solutions
- Grid Misalignment: Solution—Use alignment layers or rulers; practice on graph paper.
- Overly Rigid Forms: Solution—Soften with irregular spacing; study real nature photos for reference.
- Color Imbalance: Solution—Reference color theory; test swatches beforehand.
Embrace this process to elevate your artistry—start sketching today and unlock the third dimension in your work. For further inspiration, explore resources on topological art or 3D visualization techniques. Share your “Thinking in 3D” creations in the comments for collaborative insights!