Mastering Realistic Reflections on Glass and Reflective Surfaces: Avoid Common Mistakes and Draw Like a Mirror

Description:
Drawing reflections on glass windows, mirrors, or any shiny surface is a crucial skill for illustrators, concept artists, and realistic painters. A frequent beginner mistake is treating the reflection as a simple “ghost” overlay directly behind the glass, which results in unnatural, flattened images. This detailed tutorial, inspired by the clear and humorous reference sketch (credited to vk.com/risui_hudojnik), explains the fundamental rule: Reflections on flat surfaces behave exactly like mirrors. The angle of incidence equals the angle of reflection, creating a virtual image that appears behind the surface at the same distance as the real object is in front. We’ll break down the reference image, explore the optics principle, and provide a professional step-by-step guide to drawing convincing reflections in scenes like characters looking out windows or self-portraits in mirrors.
Analyzing the Reference Image: Wrong vs. Right
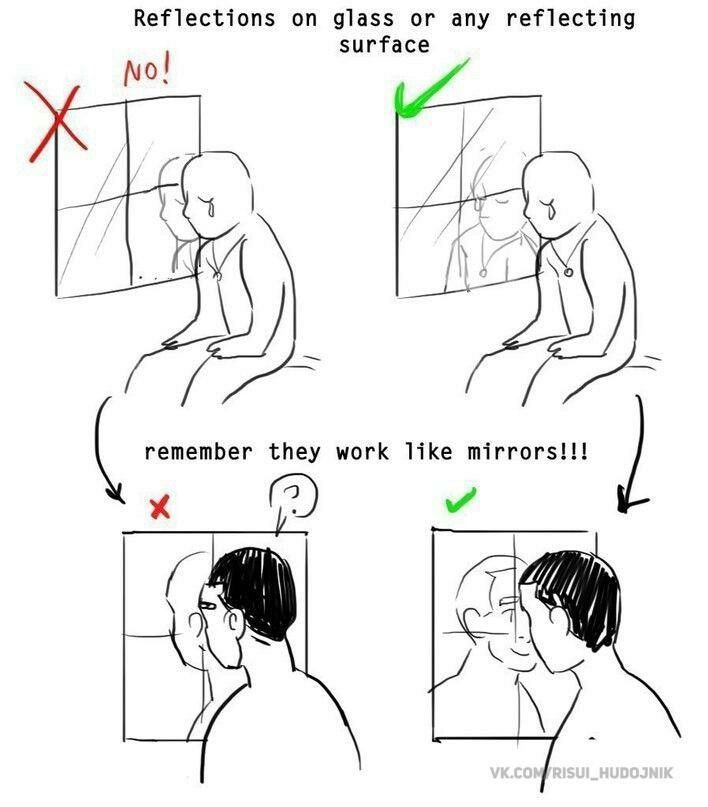
The reference illustration uses simple line drawings to highlight a classic error and its correction:
- Top Section: A person sitting and gazing downward.
- Wrong (Red X, “No!”): The reflection shows the person’s face visible through the window as if the glass is semi-transparent, with the head aligned directly opposite—impossible on a flat reflective surface.
- Correct (Green Check): The reflection is flipped and positioned as a mirror image, showing the back/side of the head from the viewer’s perspective, with subtle distortions for realism.
- Bottom Section: Emphasizes the key reminder: “remember they work like mirrors!!!”
- Wrong (Red X): Two characters facing each other across the glass—one sees the other’s face directly, implying see-through glass without reflection.
- Correct (Green Check): The viewer sees their own mirrored reflection superimposed or positioned accurately, with the other person’s reflection behaving as if in a virtual space behind the glass.
This clever comparison drives home that glass reflections aren’t transparent overlays—they reverse laterally and maintain symmetrical distance. Ignoring this leads to awkward, unbelievable artwork, especially in environmental scenes like rainy windows, shop displays, or vehicle glass.
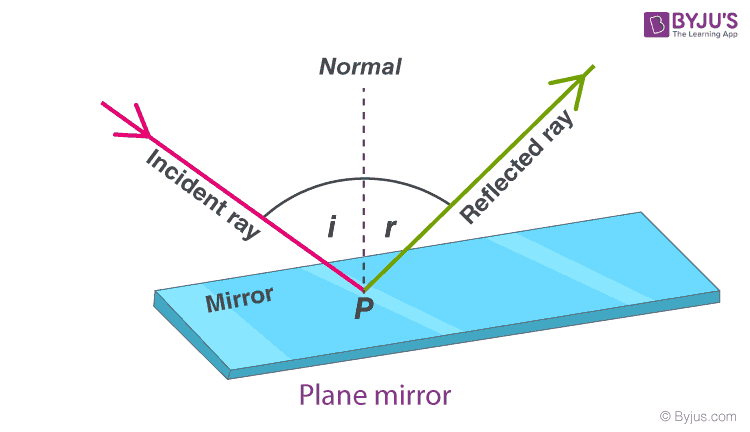
Understanding the Optics: Why Reflections Act Like Mirrors
The law of reflection states that light bounces off a surface at the same angle it arrives (angle of incidence = angle of reflection). For flat glass or mirrors:
- The reflected image appears behind the surface, equidistant from the real object.
- It’s laterally inverted (left-right flip).
- For windows, reflections often blend with transmission (what’s behind the glass), but strong reflections dominate in certain lighting.
In art, simplify by “extending” the room symmetrically behind the surface or flipping a duplicate layer digitally.


Step-by-Step Tutorial: Drawing Accurate Glass Reflections
Suitable for pencil, ink, digital (Procreate/Photoshop/Clip Studio), or painting mediums.
- Plan Your Composition and Surface:
- Sketch the glass plane (window frame, mirror edges) first.
- Decide lighting: Strong directional light increases reflection visibility; backlighting emphasizes transparency.
- Pro Tip: Use perspective lines—glass is often vertical, so reflections follow vanishing points.
- Draw the Real Subject:
- Position characters, objects, or environment in front of (or behind) the glass.
- For a window scene: Draw the interior figure and exterior view separately.
- Create the Mirror Image:
- Traditional Method: Lightly draw a perpendicular line from key points (eyes, nose, shoulders) to the glass, then extend the same distance behind to plot reflection points.
- Digital Method: Duplicate the subject layer, flip horizontally (Edit > Transform > Flip Horizontal), lower opacity, and position so the contact points (e.g., hands on glass) align perfectly.
- Invert left-right: What’s on the subject’s left appears on the right in reflection.
- Adjust for Realism:
- Fade or distort the reflection slightly (glass isn’t perfect).
- Add transparency: Blend with what’s visible through the glass (lower reflection opacity 30-60%).
- Include environmental reflections: Sky, lights, or surroundings on the pane.
- Common Mistake to Avoid: Matching the pose exactly without flipping—always mirror it!
- Add Details and Effects:
- Highlights: Sharp white streaks where light hits.
- Distortions: Slight waviness for old glass.
- Overlaps: Foreground elements (raindrops, dirt) obscure parts.
- Shading: Reflections are cooler/darker than direct light.
- Finalize and Critique:
- Check symmetry: Measure distances from the surface.
- Reference real photos or hold a mirror to test.
Professional Tips and Applications
- For curved surfaces (bottles, eyewear): Distort the reflection more—use warped transforms digitally.
- In storytelling: Reflections add mood (e.g., ghostly self-portraits) or symbolism.
- Practice: Sketch subway windows, storefronts, or puddles.
- Resources: Study artists like Kim Jung Gi for environmental reflections, or tutorials on painting glass in acrylics/oils.
By internalizing “they work like mirrors!!!”, your reflective surfaces will gain depth and credibility. This principle elevates urban scenes, portraits, and fantasy art. Download the reference for practice, try the steps, and share your before/after results below! For advanced techniques, explore optics in art books like “Light for Visual Artists” by Richard Yot.