Mastering the Art of Rotating a Cube on Its Edge: A Step-by-Step Drawing Tutorial

Unlock the secrets of advanced perspective drawing with our comprehensive tutorial on rotating a cube on its edge, a key technique for creating dynamic and realistic three-dimensional illustrations. This guide, divided into two parts, provides a detailed, step-by-step process to help artists of all levels master the transformation of a cube using ellipses and vanishing points. Illustrated with the provided images by Joel Wennerstrom, this tutorial is perfect for illustrators, designers, and animators looking to enhance their spatial drawing skills. Gather your pencils, rulers, and paper, and let’s dive into the process.
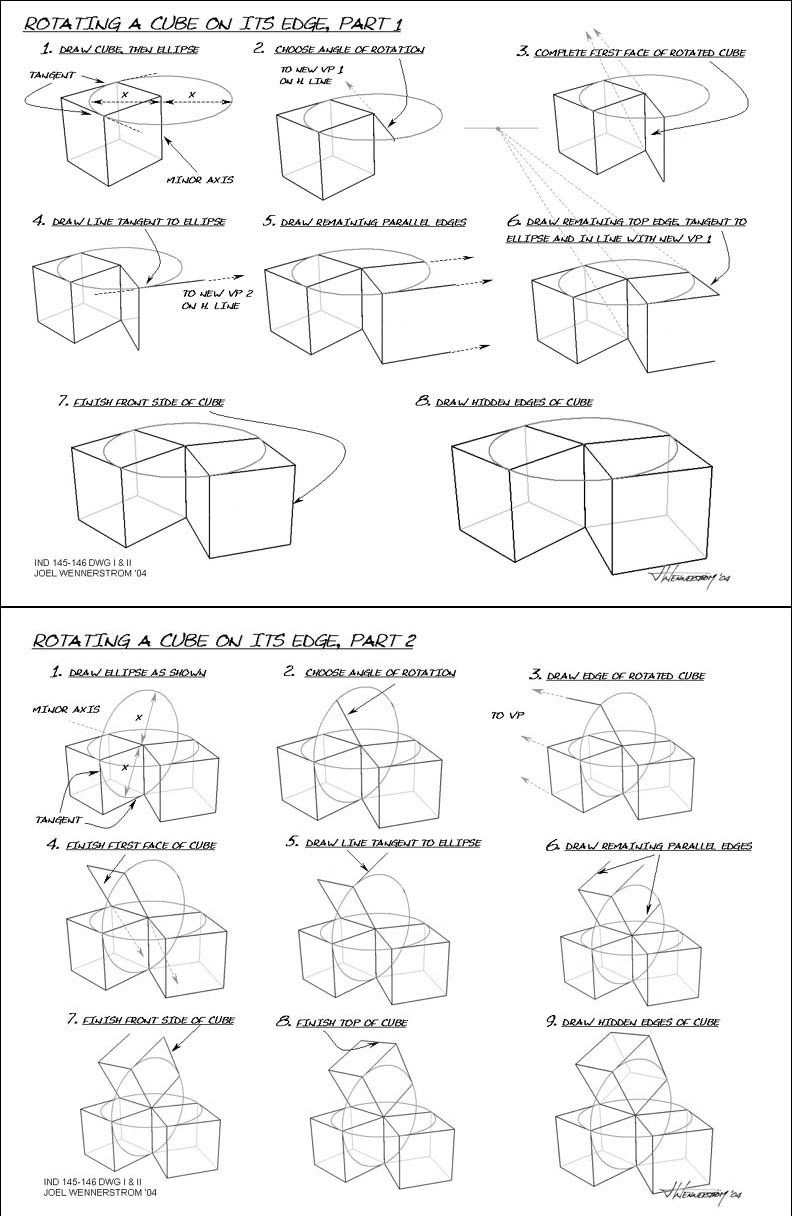
Introduction to Rotating a Cube
Rotating a cube on its edge involves applying principles of perspective to depict a three-dimensional object in a tilted or rotated state. By using ellipses to represent the cube’s faces and aligning them with vanishing points, you can create the illusion of depth and movement. This technique is essential for architectural sketches, industrial design, and dynamic figure compositions. The images guide you through each stage, from initial drawing to final detailing, ensuring a thorough understanding of the process.
Step-by-Step Tutorial
Part 1: Initial Rotation and Basic Structure
- Step 1: Draw Cube Then Ellipse
- Begin by sketching a basic cube in its upright position. Overlay an ellipse on one face, aligning the minor axis with the cube’s vertical center, as shown in the top left image. This ellipse will serve as the foundation for the rotation, with the minor axis indicating the tilt angle.
- Step 2: Choose Angle of Rotation to New VP 1 on H Line
- Select an angle of rotation and draw a new vanishing point (VP 1) on the horizon line (H line), as depicted in the second image. Use this point to guide the tilt of the cube, ensuring the ellipse aligns with the new perspective.
- Step 3: Complete First Face of Rotated Cube
- Complete the first face by extending lines from the ellipse’s edges to the vanishing point, forming the rotated face, as shown in the third image. This establishes the cube’s new orientation.
- Step 4: Draw Line Tangent to Ellipse to New VP 2 on H Line
- Draw a tangent line from the ellipse to a second vanishing point (VP 2) on the horizon line, as illustrated in the fourth image. This line will help define the side perspective.
- Step 5: Draw Remaining Parallel Edges
- Extend parallel edges from the initial face to both vanishing points, creating the cube’s side structure, as shown in the fifth image. Maintain consistency with the ellipse’s curvature.
- Step 6: Draw Remaining Top Edge Tangent to Ellipse and Align with New VP 1
- Add the top edge by drawing a tangent line from the ellipse, aligning it with VP 1, as depicted in the sixth image. This completes the top face’s rotation.
- Step 7: Finish Front Side of Cube
- Finalize the front side by connecting the edges and refining the cube’s form, as shown in the seventh image. Ensure all lines converge correctly.
- Step 8: Draw Hidden Edges of Cube
- Add dashed lines to indicate hidden edges, completing the cube’s structure, as illustrated in the eighth image. This step enhances the three-dimensional effect.
Part 2: Refining and Finalizing the Rotation
- Step 1: Draw Ellipse as Shown
- Start with a new ellipse on the cube’s face, aligning the minor axis as shown in the top left image of Part 2. This sets the stage for a different rotation angle.
- Step 2: Choose Angle of Rotation to VP
- Select a new angle and draw a vanishing point, guiding the rotation, as depicted in the second image. Adjust the ellipse to match this perspective.
- Step 3: Draw Edge of Rotated Cube
- Extend lines from the ellipse to the vanishing point to form the rotated edge, as shown in the third image. This defines the initial rotated face.
- Step 4: Finish First Face of Cube
- Complete the first face by connecting the edges, ensuring alignment with the ellipse, as illustrated in the fourth image.
- Step 5: Draw Line Tangent to Ellipse
- Add a tangent line from the ellipse to guide the side perspective, as depicted in the fifth image.
- Step 6: Draw Remaining Parallel Edges
- Extend parallel edges to the vanishing point, completing the side structure, as shown in the sixth image.
- Step 7: Finish Front Side of Cube
- Refine the front side by connecting edges and adjusting proportions, as illustrated in the seventh image.
- Step 8: Finish Top of Cube
- Complete the top face by aligning edges with the ellipse, as depicted in the eighth image.
- Step 9: Draw Hidden Edges of Cube
- Add dashed lines for hidden edges, finalizing the cube’s three-dimensional appearance, as shown in the ninth image.
Practical Application
Practice by sketching a cube on plain paper, then overlay an ellipse and follow the steps to rotate it. Use a ruler for straight lines and a compass for ellipses to ensure accuracy. Experiment with different angles and vanishing points to create varied perspectives, such as tilting the cube forward or sideways. Apply this technique to draw objects like boxes or buildings in your compositions.
Tips for Success
- Use a light pencil for initial sketches to allow for adjustments.
- Keep your ruler steady to maintain straight converging lines.
- Practice drawing ellipses freehand or with a template for consistency.
- Step back to check alignment with vanishing points regularly.
Conclusion
Mastering the rotation of a cube on its edge is a vital skill for creating realistic and dynamic perspective drawings. By following this step-by-step guide and practicing with the illustrated examples, you’ll gain the confidence to tackle complex spatial compositions. Whether you’re designing architectural sketches or illustrating 3D objects, this technique will enhance your artwork. Explore more drawing tutorials on our website, and share your progress with our community of artists. Start drawing today and unlock the full potential of perspective!
Happy sketching!