Mastering 1-Point Perspective Drawing: A Comprehensive Step-by-Step Tutorial

Dive into the art of perspective drawing with our detailed tutorial on mastering 1-point perspective, a foundational technique for creating realistic and engaging sketches. Whether you’re an aspiring artist, a game designer, or a storyboard artist, understanding 1-point perspective is essential for adding depth and dimension to your work. This guide walks you through the process from constructing a perspective grid to creating a detailed sketch, using the provided images as a visual roadmap. Follow these steps to elevate your drawing skills and bring your creative visions to life.
Introduction to 1-Point Perspective
1-point perspective is a technique where all lines converge toward a single vanishing point on the horizon line, simulating how the human eye perceives depth in a scene. This method is ideal for drawing interiors, streets, and scenes with a clear focal point, such as the bustling town square depicted in the example images. By breaking the process into manageable steps, this tutorial ensures you can confidently apply 1-point perspective to your artwork.
Step-by-Step Tutorial
- Step 1: Constructing the Perspective Grid
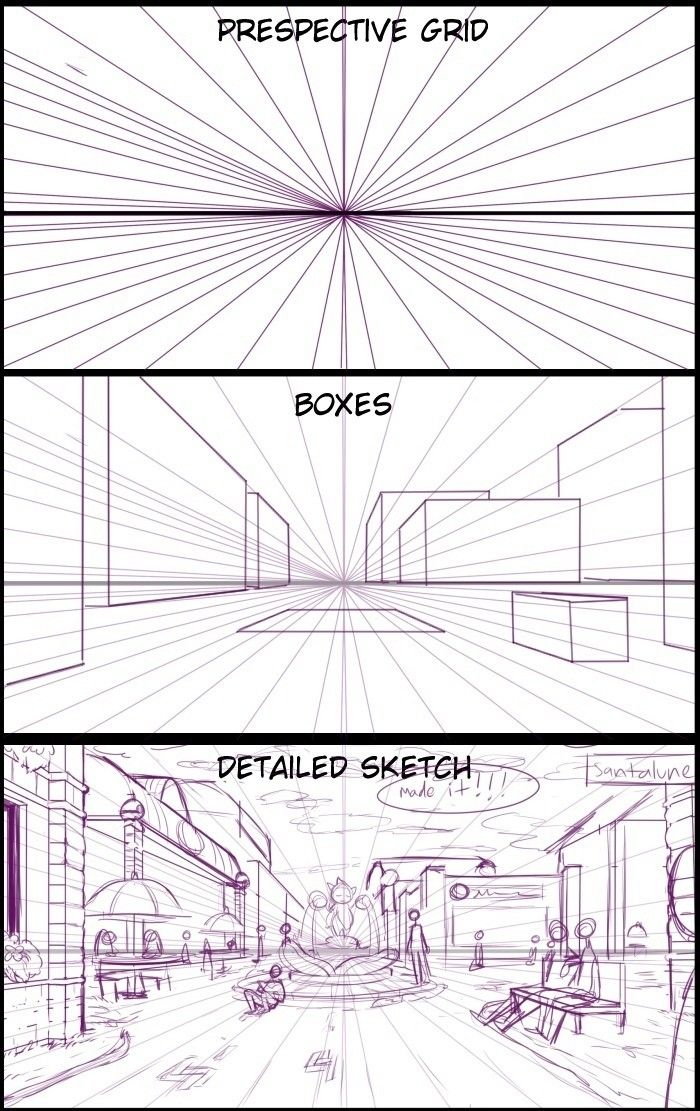
- Begin by establishing the foundation of your drawing with a perspective grid. Draw a horizontal line across your page to represent the horizon, and mark a single vanishing point at its center. From this point, extend radiating lines outward to create a network of guidelines, as shown in the “Perspective Grid” image. These lines will guide the placement of objects and help maintain consistent depth. Use a ruler for precision, and consider light pencil marks that can be erased later.
- Step 2: Adding Basic Shapes (Boxes)
- With the grid in place, start adding basic three-dimensional shapes, such as boxes, to define the spatial layout. Position these boxes along the converging lines, ensuring their sides align with the grid’s perspective. The “Boxes” image illustrates how to place rectangular forms at varying distances from the vanishing point, creating a sense of recession. Adjust the size and angle of the boxes to reflect their proximity to the viewer, with larger shapes in the foreground and smaller ones toward the vanishing point.
- Step 3: Developing a Detailed Sketch
- Transform your basic structure into a detailed sketch by adding intricate elements and details. Use the perspective grid and box outlines as a framework to draw buildings, streets, and figures. The “Detailed Sketch” image showcases a lively town scene with a fountain, shops, and characters, all aligned with the vanishing point. Incorporate architectural features like windows, doors, and roofs, and populate the scene with people or objects to enhance realism. Add shading and texture to emphasize depth, and include a horizon line to anchor the composition.
Practical Application
To apply this technique, select a simple scene to sketch, such as a street or room interior. Start with a light perspective grid, then build your composition with boxes before refining it into a detailed drawing. Experiment with the placement of the vanishing point—higher for a downward view or lower for an upward perspective—to alter the scene’s mood. The example images demonstrate a progression from abstract grid to a narrative-rich sketch, offering inspiration for your own projects.
Tips for Success
- Use a light touch with your initial lines to allow for adjustments.
- Keep the vanishing point consistent throughout your drawing to maintain perspective.
- Practice with different scenes to build confidence, gradually increasing complexity.
- Consider digital tools or tracing paper to refine your sketches if needed.
Conclusion
Mastering 1-point perspective opens up a world of creative possibilities, enabling you to create drawings with a convincing sense of space and depth. By following this step-by-step guide and studying the provided examples, you’ll develop a strong foundation in perspective drawing. Whether you’re crafting a comic panel, designing a game environment, or sketching for fun, this technique will enhance your artistic repertoire. Explore more drawing tutorials on our website, and share your masterpieces with our community of artists!
Start sketching today and watch your perspective skills grow!