Mastering 1-Point Perspective (Frontal Perspective) in Photography: A Step-by-Step Guide

Unlock the secrets of creating compelling photographic compositions with our comprehensive tutorial on mastering 1-point perspective, also known as frontal perspective. This technique is a fundamental skill for photographers and visual artists aiming to add depth, structure, and dynamism to their images. By deconstructing photographic views and identifying essential elements, you can transform ordinary scenes into captivating visual narratives. This guide provides a detailed, step-by-step approach to understanding and applying 1-point perspective, illustrated with practical examples and annotated images.
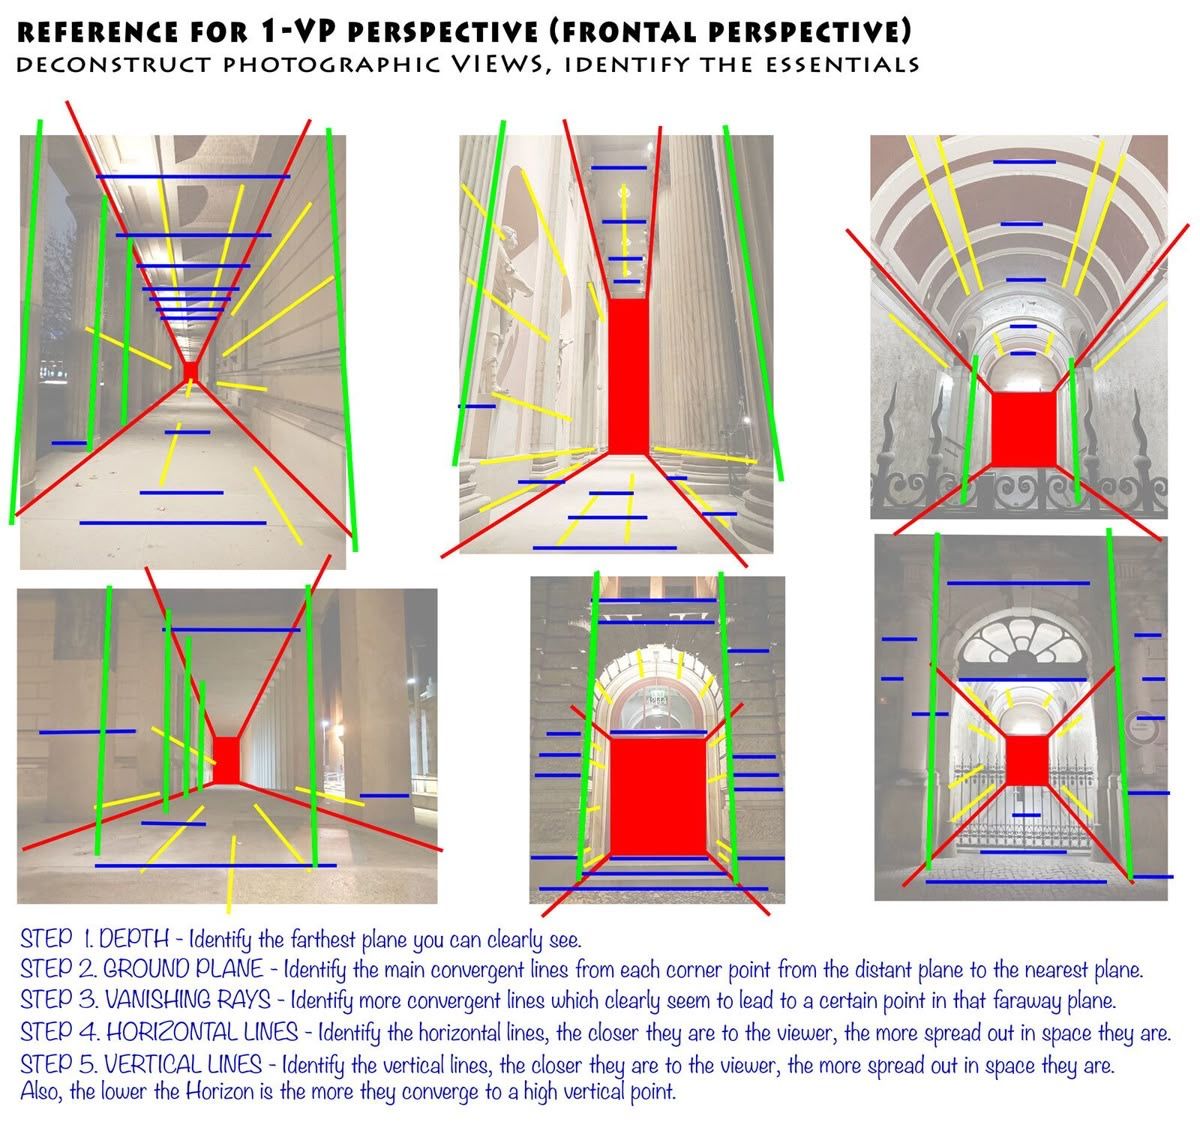
Introduction to 1-Point Perspective
1-point perspective is a drawing and photography technique that represents objects as they appear to converge toward a single vanishing point on the horizon. This method is particularly effective in architectural photography, urban landscapes, and interior shots where parallel lines, such as hallways, streets, or building facades, guide the viewer’s eye toward a central focal point. The following steps will help you identify and utilize the key components of 1-point perspective to enhance your photographic skills.
Step-by-Step Tutorial
- Step 1: Depth – Identify the Farthest Plane You Can Clearly See
- Begin by locating the farthest plane visible in your frame, which serves as the starting point for establishing depth. In the provided images, this is often the back wall or the end of a corridor. From each corner point of this distant plane, trace imaginary lines to the nearest plane to outline the spatial structure of your composition.
- Step 2: Ground Plane – Identify the Main Convergent Lines
- The ground plane forms the foundation of your perspective. Identify the primary convergent lines that recede from the foreground to the background. These lines, often the edges of floors, roads, or pathways, naturally draw the viewer’s eye toward the vanishing point. In the examples, notice how these lines converge subtly but consistently toward the center.
- Step 3: Vanishing Rays – Identify More Convergent Lines Leading to a Distant Point
- Enhance the depth by identifying additional convergent lines that clearly lead to the vanishing point. These vanishing rays can include architectural elements like columns, window frames, or ceiling beams. The images demonstrate how these lines create a sense of continuity and guide the viewer deeper into the scene, reinforcing the single-point perspective.
- Step 4: Horizontal Lines – Analyze the Spread Based on Proximity to the Viewer
- Observe the horizontal lines within your frame, such as the tops of walls or horizons. The closer these lines are to the viewer, the more they spread out in space, creating a wider visual field. As you move toward the vanishing point, these lines appear to compress, adding to the illusion of depth. The annotated images highlight this effect with green and blue lines.
- Step 5: Vertical Lines – Analyze the Spread Based on Proximity to the Viewer
- Similarly, examine the vertical lines, such as the edges of pillars or doorframes. The closer these lines are to the viewer, the more they spread out, while those nearer the vanishing point appear more aligned. Additionally, the lower the horizon line in your composition, the more the vertical lines converge toward a high vertical point, as seen in the red and yellow annotations.
Practical Application
To apply this technique, start by selecting a scene with strong linear elements, such as a hallway, a row of buildings, or an open plaza. Use your camera’s viewfinder to align the parallel lines toward a central point. Adjust your position and lens to emphasize the convergence, and consider the horizon line’s placement to control the perspective’s intensity. The provided reference images serve as a visual guide, showing how professional photographers deconstruct and reconstruct these elements to achieve stunning results.
Conclusion
Mastering 1-point perspective empowers you to create photographs with a powerful sense of depth and focus. By following these steps and practicing with the annotated examples, you’ll develop an intuitive understanding of how to manipulate perspective to suit your creative vision. Whether you’re a beginner or an experienced photographer, this technique will elevate your work, making your images more engaging and professionally polished.
Explore more photography tutorials and techniques on our website, and start applying 1-point perspective to your next shoot. Share your results with us and join our community of passionate photographers!