Mastering Realistic Water Caustics and Waves: A Step-by-Step Watercolor Tutorial

Capturing the mesmerizing play of light on water surfaces—such as the rippling caustics at the bottom of a pool, ocean floor, or shallow waves—can elevate your artwork to new levels of realism and depth. These light patterns, formed by refraction and reflection, create a net-like grid of bright lines and subtle shadows that mimic the dynamic movement of water. In this comprehensive tutorial, we’ll deconstruct a proven layered approach using watercolor techniques to build these effects progressively. Inspired by traditional Japanese art methods, this guide simplifies the process into nine actionable steps, allowing you to recreate sparkling turquoise waters with authenticity.
Ideal for intermediate watercolor artists or beginners eager to tackle transparency and light effects, this method emphasizes gradual layering to achieve luminosity without muddying colors. By starting with broad washes and refining with detailed lines, you’ll learn to simulate the fluidity and sparkle of water. Patience is key: allow each layer to dry fully before proceeding to prevent bleeding, and experiment with brush pressure for varying intensity.
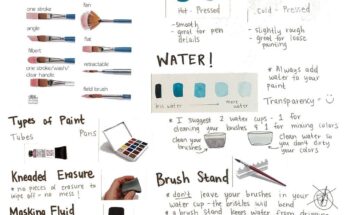
Materials You’ll Need
To achieve the best results, prepare these high-quality supplies:
- Watercolor Paints: A palette including light turquoise or cerulean blue (for base washes), deeper blues (e.g., ultramarine or Prussian blue) for shadows, gray for subtle tones, and white gouache or opaque white for highlights (watercolor white is semi-transparent, so gouache works better for opacity).
- Brushes: A large flat or mop brush for initial washes, medium round brushes (sizes 6-8) for lines and waves, and a fine detail brush (size 0-2) for precise highlights and shadows.
- Paper: Cold-pressed watercolor paper (300gsm or heavier) to handle wet layers without warping. Opt for a smooth surface if you prefer crisp lines.
- Additional Tools: Masking fluid (optional for preserving whites), a palette for mixing, clean water jars, paper towels for blotting, and a pencil for light sketching.
- Reference: Study photos of pool bottoms, ocean shallows, or caustics in natural light to observe how lines intersect and brighten.
Pro Tip: Work on a slanted board to control paint flow, and test colors on scrap paper. Maintain a wet-on-dry technique for sharp edges, or wet-on-wet for softer blends.
Understanding Water Caustics and Wave Dynamics
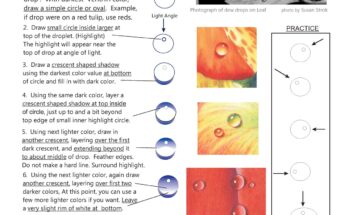
Water caustics are the bright, web-like patterns created when light rays bend through waves and focus on a surface below. They appear as intersecting lines of light (vertical and horizontal grids) with brighter nodes where rays converge. Waves add movement, introducing curved highlights and shadowed troughs. The “realism” comes from contrast: bright whites against cool blues, with gradients for depth. Light source matters—assume top-down sunlight for this tutorial, creating upward-fading intensity.
Observe nature: In shallow water, lines are sharper near the viewer and blurrier in the distance. Shadows hug the undersides of waves, while highlights crown the crests. This tutorial builds from a flat base to a textured, three-dimensional illusion.
Step-by-Step Tutorial: Rendering Water Caustics and Waves
Follow these steps in sequence, referencing the progressive visuals for guidance. Each builds on the last, starting broad and refining details.
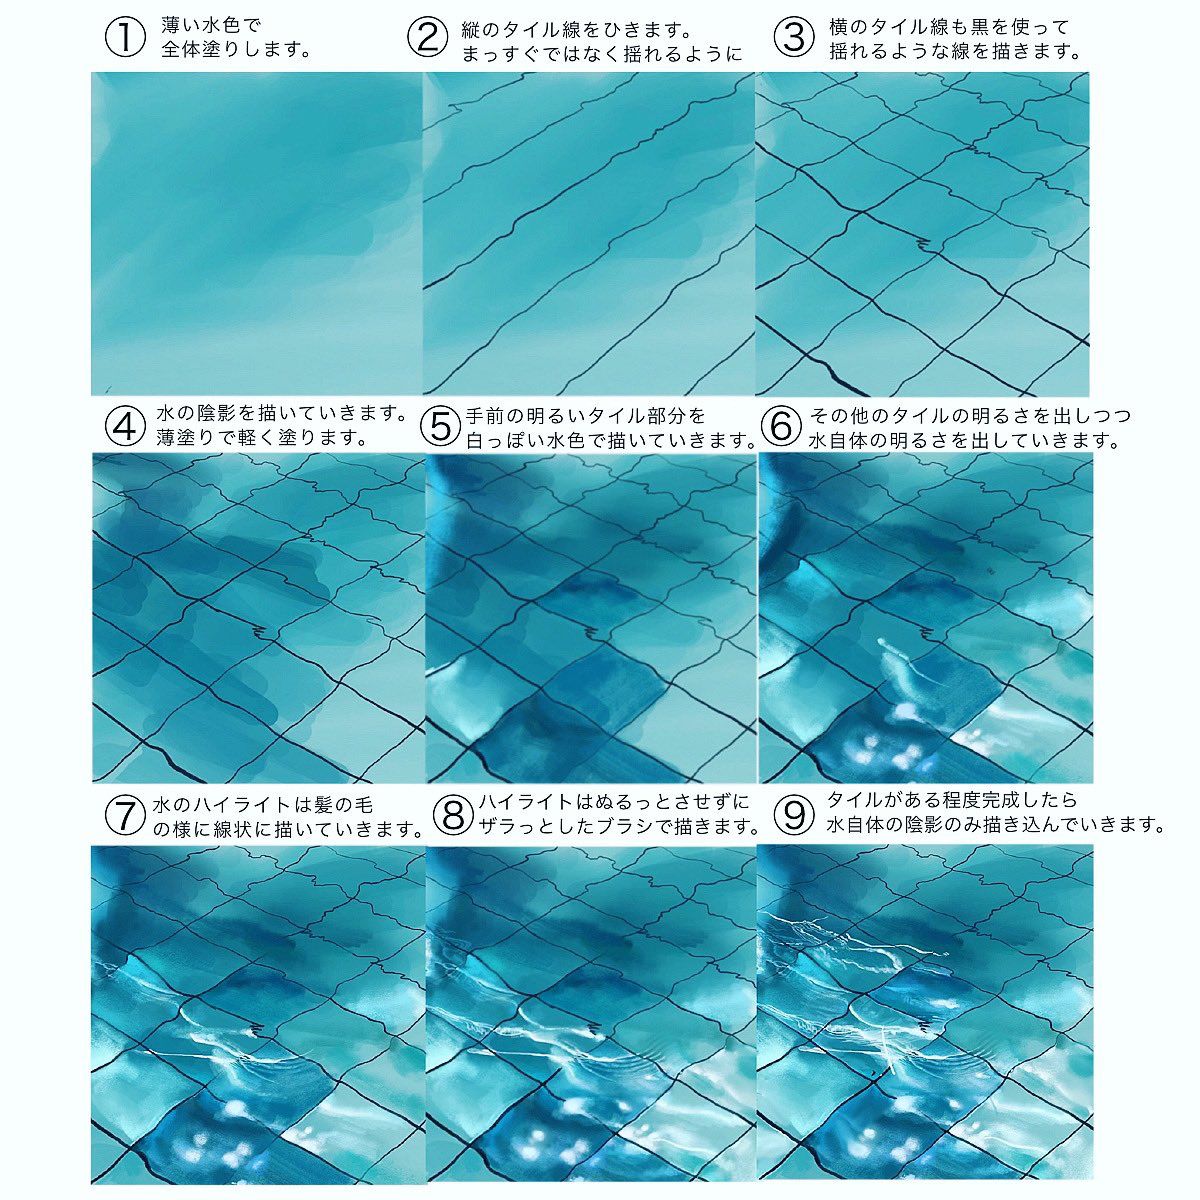
- Apply a Light Blue Base Wash
Begin by filling the entire surface with a thin, even layer of light turquoise or water blue. Mix your paint with plenty of water for translucency, and use a large brush to apply a smooth wash. Avoid streaks by working quickly and tilting the paper if needed. This establishes the overall tone of the water, representing the diffused light underwater. Let it dry completely to create a stable foundation.
Visual Result: A uniform, pale blue field—calm and untextured, like still water. - Introduce Vertical Lines
With a medium brush and slightly darker blue, start drawing vertical lines across the surface. Begin faintly, as if just emerging, then gradually make them clearer and more distinct by adding pressure or additional strokes. These lines simulate the initial refraction patterns from wave movements. Space them unevenly for natural variation—closer together in some areas for density. Keep them wavy rather than straight to suggest fluidity.
Pro Tip: Use the side of the brush for softer starts, transitioning to the tip for sharpness. Dry between additions if blending occurs. - Add and Strengthen Horizontal Lines
Now incorporate horizontal lines to intersect the vertical ones, creating a grid-like net. Use the same darker blue, drawing them in a way that embeds and reinforces the pattern—add extra strokes where lines cross to build intensity. This step forms the core caustic structure, making the water appear lit from below. Feather the lines slightly for softness, and vary thickness to mimic light concentration.
Visual Result: A crisscross mesh emerges, evoking the refractive web on a pool floor. - Develop the Water Pattern with Wavy Motions
Enhance the grid by bringing out the water’s motif through undulating strokes. Proceed with waving brush movements to curve the lines, adding depth and motion. Use a mix of medium and light blues to layer over intersections, darkening where shadows would naturally fall. This transforms the flat grid into a dynamic, rippling surface.
Technique Insight: Rotate your paper for comfortable curves; blot excess paint for controlled gradients. - Partially Fill Front Bright Lines with White
Focus on the brighter lines nearer the foreground (hand position). Using white gouache or a pale wash, partially fill these areas to create highlights. Apply sparingly—only in sections—to suggest light catching on wave edges. This adds luminosity, making the caustics pop against the blue base. Blend edges softly to avoid harsh cutoffs.
Common Mistake to Avoid: Over-filling can flatten the image; aim for subtle veiling. - Highlight Other Lines While Expressing Water’s Light and Shadow
Extend the brightening to remaining lines, using lighter blues or white to draw out their glow. Simultaneously, introduce tonal variations to represent the water’s inherent light and dark areas—darken troughs with deeper blue for shadows, and lighten peaks for reflections. This step balances the composition, giving the illusion of volume and transparency.
Advanced Variation: For deeper water, mute distant lines; for shallows, amplify contrasts. - Add Water Highlights Along Lines with Brush Tip
Refine highlights by drawing them along the existing lines using the fine tip of your brush (or “brush hairs” for precision). Apply white or very light blue in short, following strokes to accentuate where light focuses. This mimics specular reflections on wave crests, adding sparkle. Work after the base is dry to keep them crisp.
Finishing Tip: Layer thinly; multiple passes build intensity without opacity. - Sharpen Highlights and Add Shadows with Gray and Blue
Make the highlights more distinct by outlining or intensifying them with additional white touches. Then, introduce shadows using a mix of gray and blue—apply in the crevices between lines and under waves for depth. This creates contrast, grounding the caustics in a realistic environment. Blend subtly for smooth transitions.
Visual Cue: Shadows should follow the grid’s contours, darker in recessed areas. - Enhance Realism by Adding Shadows to White Areas
To make the lines feel more lifelike, add subtle shadows to the white or bright sections—use dilute gray or blue for faint undertones, suggesting subtle occlusion or wave undersides. This final refinement brings dimensionality, making the water appear turbulent yet translucent. Adjust based on your light source for coherence.
Pro Tip: Step back to assess balance; overdo shadows and risk dullness.
Practice Exercises and Variations
- Basic Practice: Create small swatches focusing on Steps 1-4, varying blue shades for different water depths (e.g., emerald for tropical seas).
- Advanced Applications: Incorporate foreground elements like rocks or fish, distorting caustics over them. Try nighttime versions with muted tones and moonlit highlights.
- Common Challenges and Solutions:
- Bleeding Colors: Ensure layers dry fully; use a hairdryer on low if impatient.
- Flat Patterns: Increase line variation and contrast for movement.
- Uneven Washes: Practice even brush loading; mask areas for protection.
With this technique mastered, you’ll confidently render any aquatic scene, from serene pools to crashing waves. Experiment freely—water’s beauty lies in its unpredictability. Share your results in the comments: What water scene inspires you most? For related guides, check our tutorials on sky reflections or underwater scenes. Happy painting!