Mastering Dynamic Action Poses: Advanced Figure Drawing Techniques Using Geometric Construction

Description:
In the world of figure drawing, capturing the essence of movement and energy is a skill that separates novice artists from masters. This tutorial delves into the art of rendering dynamic action poses using a geometric construction method, inspired by the intricate sketches featured in the accompanying reference image. Whether you’re an aspiring animator, comic book illustrator, or fine artist, understanding how to break down the human form into basic shapes like cylinders, spheres, and ellipses allows for more fluid, anatomically accurate depictions of motion. The reference image provided showcases a series of wireframe-like mannequins in high-energy stances, serving as a practical example to guide your practice. We’ll explore the step-by-step process of creating similar drawings, from initial gesture lines to refined shading, while incorporating professional tips for perspective, balance, and foreshortening.
Understanding the Reference Image
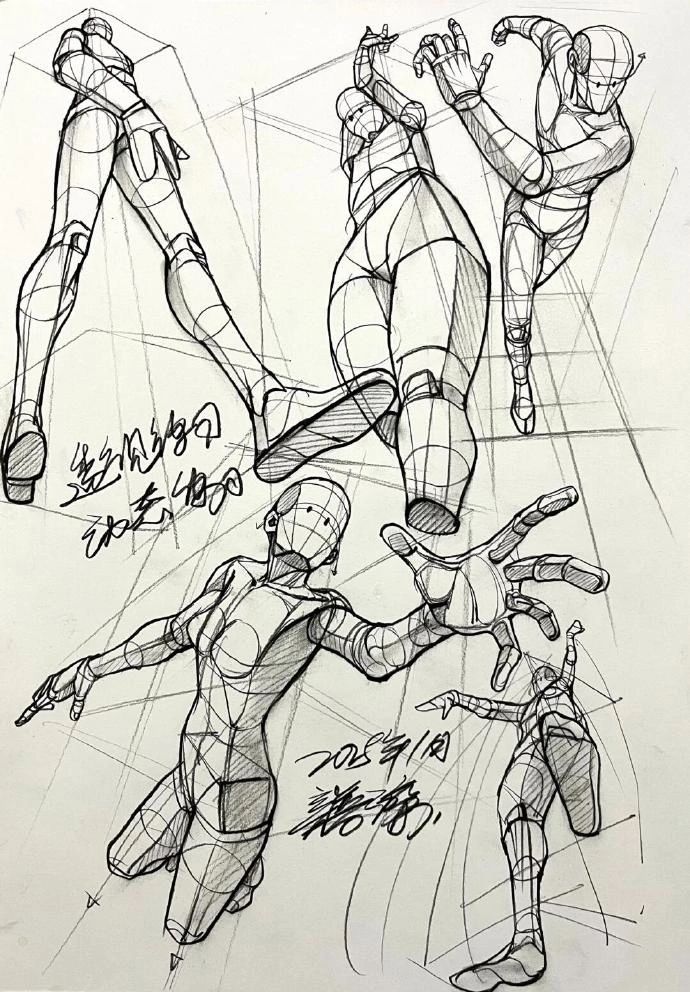
The reference image is a hand-drawn compilation of several human figures posed in dramatic, action-oriented configurations, rendered in a stylized mannequin format. This approach, often used in concept art and animation studios, emphasizes the underlying structure of the body to convey momentum and force. Let’s break it down visually:
- Top-Left Figure: A leaping pose with one leg extended backward and the other bent forward, arms raised in a defensive or striking motion. The torso is twisted slightly, highlighting spinal rotation. Geometric elements include cylindrical thighs and calves, spherical joints at the knees and elbows, and a simplified head as an ovoid shape. This pose suggests a mid-jump attack, with lines indicating trajectory and balance.
- Top-Right Figure: An airborne punch or thrust, where the figure is tilted forward with one arm extended fully and the other pulled back for counterbalance. The legs are splayed, one kicking upward, demonstrating extreme extension. Note the use of hatching lines to imply muscle tension and volume, particularly around the shoulders and hips.
- Bottom-Left Figure: A low crouch transitioning into a sweep or lunge, with knees bent deeply and one arm reaching forward while the other supports the body. The perspective is from a worm’s-eye view, exaggerating the foreshortening of the limbs. Chinese annotations, such as “起势起势” (translated roughly as “starting momentum” or “initiating force”), emphasize the kinetic energy buildup.
- Bottom-Center Figure: A reaching or grasping pose, with the arm extended dramatically and the body arched backward. This highlights hand anatomy, showing individual finger joints as small cylinders, and includes subtle shading to define form shadows.
- Bottom-Right Figure: A compact, coiled stance resembling a martial arts block or evasion, with legs crossed and arms positioned defensively. Additional smaller sketches focus on hand details, illustrating grip variations.
The overall composition is on a lightly gridded background, aiding in proportion and alignment. Handwritten notes in Chinese, like “702号18 常见错误” (possibly “Model 702-18 Common Errors”), suggest this is from an instructional sketchbook, pointing out frequent mistakes in pose construction such as improper weight distribution or joint alignment.
This image draws from influences like those seen in works by artists such as Kim Jung Gi or Bridgman’s anatomy studies, where simplification aids in rapid ideation. By studying it, artists can learn to prioritize gesture over detail in early stages.
Step-by-Step Tutorial: Creating Your Own Dynamic Action Poses
To replicate and expand upon this reference, follow this professional workflow. Use pencil on paper or digital tools like Procreate or Clip Studio Paint for best results. Aim for 20-30 minute sessions per pose to build speed and intuition.
- Gather References and Tools:
- Collect photo references of athletes, dancers, or martial artists in motion (e.g., from stock image sites or your own photoshoots).
- Tools: HB pencil for light sketching, 2B-4B for shading, eraser, and ruled paper for grids. Digitally, use layers for separation.
- Pro Tip: Start with a timer to encourage loose, expressive lines—avoid overthinking proportions initially.
- Establish the Gesture Line:
- Begin with a single, sweeping “line of action” that captures the overall flow of the pose. In the reference image, this is evident in the curved spines and extended limbs.
- Draw lightly: For a jumping pose, arc the line upward to convey lift. Measure against the head size (typically 7-8 heads tall for heroic figures).
- Common Error to Avoid: Stiff lines—keep them fluid, as noted in the image’s annotations.
- Build Geometric Structure:
- Break the body into primitives: Head as a sphere or egg, torso as a tapered cylinder or bean shape, limbs as cylinders with spherical joints.
- Refer to the image: Notice how thighs are thicker cylinders tapering to calves, and arms use ellipses for biceps/triceps volume.
- Incorporate perspective: Use vanishing points for foreshortened elements, like the extended arm in the bottom-center figure. Draw construction lines to connect joints.
- Pro Tip: Apply the “bean method” for the torso—two overlapping ovals for ribcage and pelvis—to allow for twisting, as seen in the top-left pose.
- Add Joints and Balance:
- Mark key joints (shoulders, elbows, hips, knees) with circles. Ensure weight distribution: In action poses, the center of gravity should align over the support leg or imply momentum.
- From the reference: The airborne figures show counterbalancing arms and legs to prevent visual “tipping.”
- Check Anatomy: Use resources like “Figure Drawing: Design and Invention” by Michael Hampton for accurate muscle attachments.
- Refine Contours and Details:
- Overlay organic curves on the geometrics: Smooth out cylinders into muscular forms, adding cross-contours for volume (e.g., hatching on thighs).
- Focus on hands and feet: As in the smaller sketches, break hands into blocky shapes before detailing fingers.
- Shading: Use light source consistency—side lighting in the image creates dramatic shadows on undersides.
- Incorporate Movement and Energy:
- Add motion lines or blur effects for speed, as implied in the leaping poses.
- Experiment with angles: Rotate your paper or canvas to draw from unusual viewpoints, enhancing foreshortening skills.
- Pro Tip: Practice “thumbnailing”—small, quick versions of the pose—to iterate ideas rapidly.
- Iterate and Critique:
- Compare your drawing to the reference: Scan for errors like uneven proportions or lost energy.
- Seek feedback: Post on art forums or use apps like Linearity Curve for overlays.
- Advanced Variation: Digitize the sketch and animate it frame-by-frame to test fluidity.
Benefits and Applications
Mastering these techniques not only improves your figure drawing but also enhances storytelling in illustrations. For instance, comic artists can use them for fight scenes, while game designers apply them to character rigging. Regular practice with references like this image will build muscle memory, allowing you to draw from imagination over time.
If you’re new to this, start with 5-10 poses daily. For more resources, explore books like “Dynamic Figure Drawing” by Burne Hogarth or online courses on platforms like Skillshare. Remember, the key to professional-level art is persistence—each sketch brings you closer to capturing that elusive sense of motion.
This tutorial, based on the provided reference image, is designed to be a comprehensive guide. Feel free to download the image for personal practice, and share your results in the comments below!