Mastering Bird’s-Eye View Perspective in Manga: Creating Dramatic Overhead Interior Scenes with Three-Point Perspective

Description:
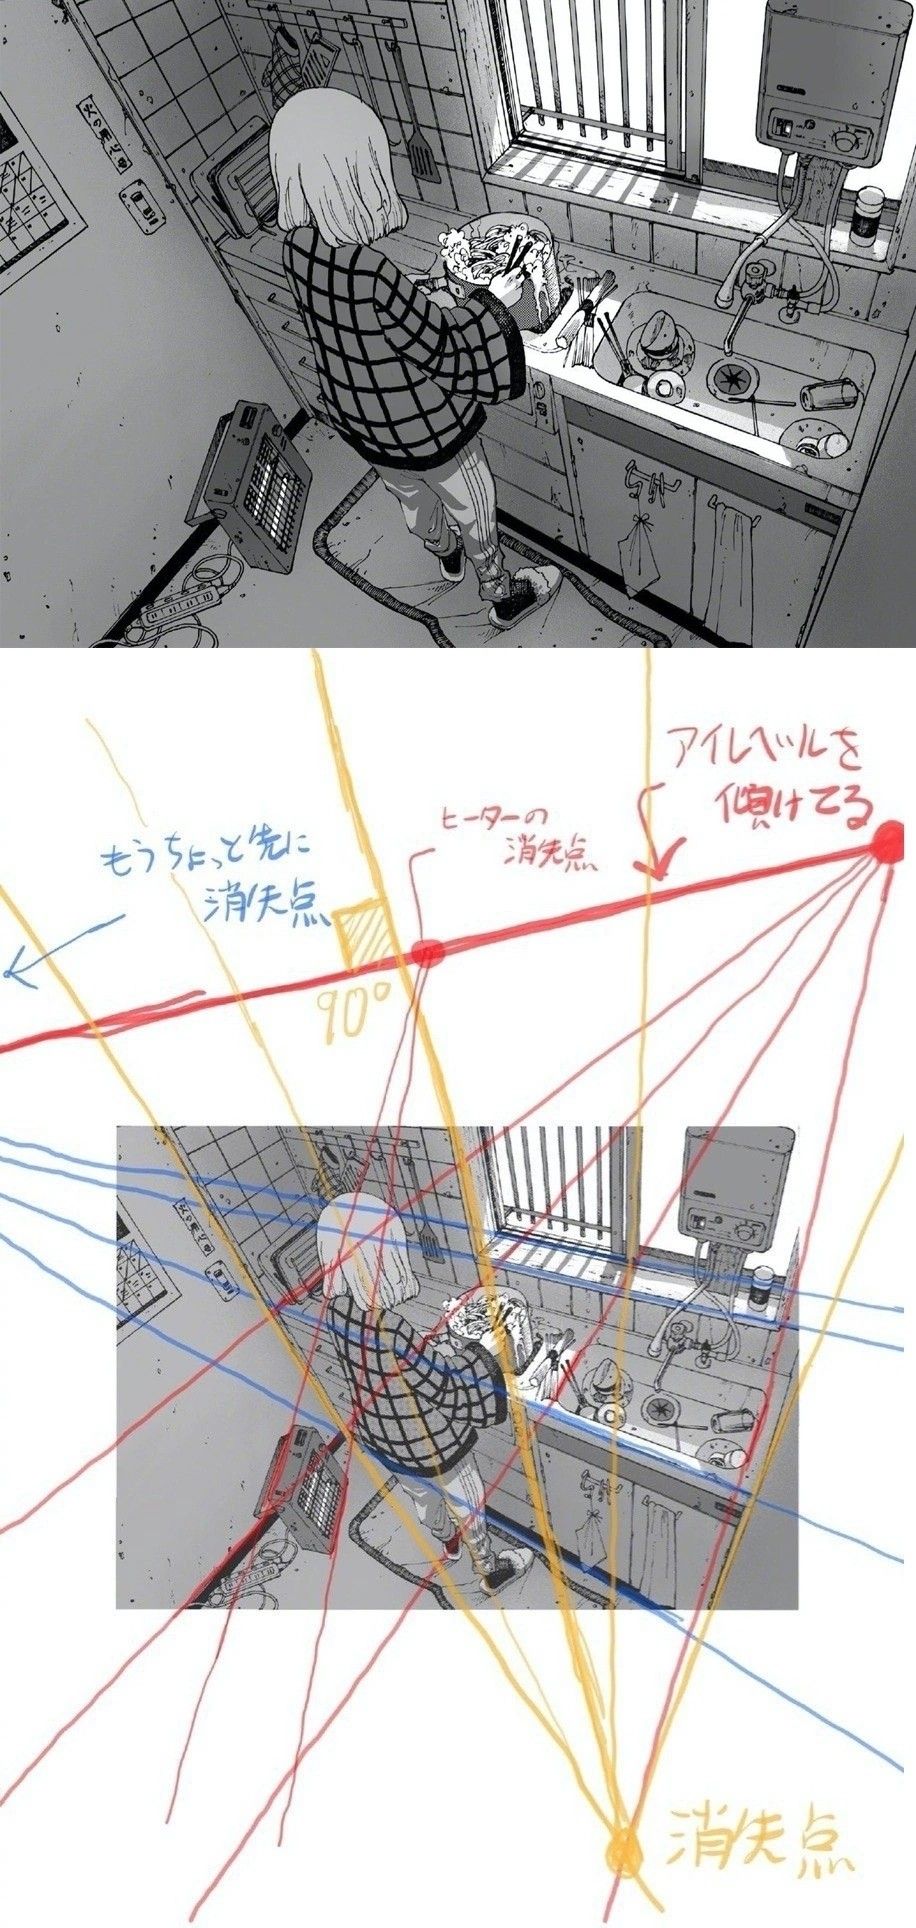
Achieving a compelling bird’s-eye view (overhead or high-angle perspective) is a powerful technique in manga and illustration, allowing artists to convey scale, depth, tension, and narrative distance in interior scenes. This tutorial breaks down a classic example: a monochromatic manga panel of a small, cluttered room—resembling a prison cell or modest kitchen—viewed from above, featuring a character with short white hair standing at a counter. The accompanying diagram overlays colored perspective lines (red, yellow, blue) converging to multiple vanishing points, demonstrating three-point perspective in action. Perfect for manga artists, illustrators, and concept designers, this guide explains how to construct dramatic downward angles, place vanishing points correctly, and integrate characters naturally into the environment. By understanding these principles, you’ll create immersive panels that draw readers into the scene with realistic foreshortening and spatial dynamics.
Introduction: Why Bird’s-Eye View Perspective Elevates Your Manga
In manga, camera angles dictate emotional impact. A bird’s-eye view (known as fukan in Japanese) positions the viewer above the subject, often evoking feelings of vulnerability, isolation, or oversight—ideal for tense moments in confined spaces like prisons, kitchens, or apartments. The example artwork shows a high-angle shot of a barred window room: the character faces away, surrounded by everyday objects (sink, phone, dishes, appliances), rendered in stark black-and-white line art for a gritty, atmospheric feel.
The lower diagram reveals the underlying structure with colored lines:
- Red lines for one directional set
- Yellow lines for another
- Blue lines for verticals or depth
Japanese annotations highlight key concepts:
- “消失点” (Vanishing Point) – marked at the bottom convergence
- “レーダーの消失点” (possibly Radar’s vanishing point or a specific directional VP)
- “アイレベルも傾けてる” (The eye level is also tilted)
- “70°” indicating a steep angle
- “もうちょっと先に消失点” (Vanishing point a bit further ahead)
This setup uses three-point perspective, where lines converge to three vanishing points: two on the horizon line (often off-page) and a third below for the downward view.
Step 1: Understanding Three-Point Perspective for Bird’s-Eye Views
Standard perspectives:
- One-point: Simple depth, frontal views
- Two-point: Angular views, common for buildings
- Three-point: Dramatic high or low angles
In bird’s-eye view:
- The third vanishing point is placed below the scene (often far off the page) to simulate looking down.
- Vertical lines (walls, furniture edges) converge downward.
- Horizontal lines converge to two vanishing points on a tilted or low horizon line (eye level).
Key Insight: The steeper the angle (e.g., 70° as noted), the closer the third vanishing point—creating extreme foreshortening. For subtler overhead views, place it farther away.
The diagram shows lines fanning upward from the bottom vanishing point, with secondary convergences for orthogonal directions.
Step 2: Setting Up Your Horizon Line and Vanishing Points
- Draw the Horizon Line (Eye Level): In bird’s-eye view, it’s often low or tilted. The annotation notes tilting it for dynamic effect.
- Place Two Primary Vanishing Points: Far left and right on/off the horizon for horizontal depths.
- Add the Third Vanishing Point (Below): This pulls verticals downward. In the example, it’s at the bottom, with lines radiating upward.
- Mark the Angle: Reference lines at 70° or adjust for desired steepness.
Pro Tip: Vanishing points are often outside the panel—extend your paper or use digital tools (Clip Studio Paint perspective rulers) to plot them accurately.
Step 3: Constructing the Interior Space
Start with the room grid:
- Floor, walls, ceiling edges follow convergence lines.
- In the artwork: Countertops, cabinets, and appliances align with red/yellow lines; barred window and sink with blue.
- Build from foreground (larger elements) to background (compressed).
Add details:
- Foreshortening: Objects higher in the frame (closer to viewer) appear larger.
- Overlaps: Character partially obscures counter—enhances depth.
The clean line art uses hatching for shadows and tone for a noir feel.
Step 4: Placing Characters in Overhead Perspective
Characters must “sit” on the perspective grid:
- Feet align with floor lines.
- Body foreshortens upward—head smaller relative to torso/feet in extreme views.
- In the example: The plaid-shirted figure stands naturally, back to viewer, integrated via overlapping counter and floor tiles.
Tips:
- Use a simple box mannequin first to plot pose on the grid.
- Tilt eye level (as annotated) for more cinematic angles.
- Scale: Closer characters larger; adjust for narrative focus.
Step 5: Refining and Common Pitfalls
- Verify Convergences: All parallel lines should meet at correct VPs.
- Avoid Flatness: Exaggerate downward pull for drama.
- Tilt for Impact: As noted (“eye level also tilted”), rotate the horizon for diagonal energy.
Common Errors:
- Inconsistent VPs → distorted room
- Ignoring third VP → verticals remain parallel (unnatural overhead)
- Overly steep angle without far VP → fish-eye distortion
Practical Applications in Manga
| Scene Type | Why Bird’s-Eye Works | Example Use |
|---|---|---|
| Tension/Isolation | Makes character small/vulnerable | Prison cells, solitary moments |
| Revelation | Shows full layout | Kitchen discoveries, room overviews |
| Action | Dynamic movement across space | Chases in confined areas |
| Atmosphere | Gritty monochrome + bars | Noir or dystopian stories |
Practice Exercises
- Recreate the example: Sketch the room without diagram, then overlay lines.
- Vary angles: Try 30°, 45°, 70° downward.
- Add multiple characters: Place 2-3 figures at different depths.
- Digital Tools: Use perspective rulers in Clip Studio or Procreate.
Conclusion: Elevate Your Panels with Confident Overhead Views
Bird’s-eye three-point perspective transforms ordinary interiors into captivating manga scenes, adding depth and emotion effortlessly. By mastering vanishing point placement, tilting eye levels, and integrating figures, you’ll create professional, immersive storytelling.
Recommended Resources:
- “How to Draw Manga Vol. 29: Putting Things in Perspective”
- Clip Studio Tips on perspective rulers
- Books on manga background techniques (e.g., Yoshida Seiji’s works)
Share your overhead panels below! Tag with #BirdsEyeMangaPerspective and inspire the community.
Art Tutorial Series © – Manga & Illustration Academy