How to Draw a Horse Head in Profile – Beginner-Friendly Step-by-Step Tutorial Using Simple Circles and Construction Lines
Description:
Master the elegant proportions of the horse head with this ultra-simple, construction-based tutorial designed for absolute beginners and intermediate artists alike. Using nothing more than circles, midlines, and a few guiding lines, you’ll go from basic geometric shapes to a clean, anatomically grounded profile sketch in under 10 minutes. This method—created and illustrated by artist Kaja—breaks down complex equine anatomy into foolproof steps, making it perfect for character designers, illustrators, animators, or anyone who loves drawing animals.
Whether you’re sketching for fun, prepping for digital painting, or building a foundation for realistic horse portraits, this tutorial emphasizes proportional accuracy, flow, and confidence without overwhelming details. Follow along with pencil and paper (or your favorite digital stylus) and watch how two overlapping circles transform into a noble horse head.
Why This Method Works
Horses have a uniquely long and tapered skull, but their structure follows predictable geometric relationships. This tutorial uses:
- Circle-based construction to lock in proportions
- Midline alignment for symmetry and balance
- Minimal landmarks (eye, nostril, mouth, ears) placed with precision
- Loose, confident line work to maintain energy
No prior anatomy knowledge required—just follow the steps exactly as shown.
Materials Needed
- HB pencil (or digital equivalent)
- Eraser
- Paper (or tablet)
- Optional: Fineliner for final cleanup
Step-by-Step Tutorial
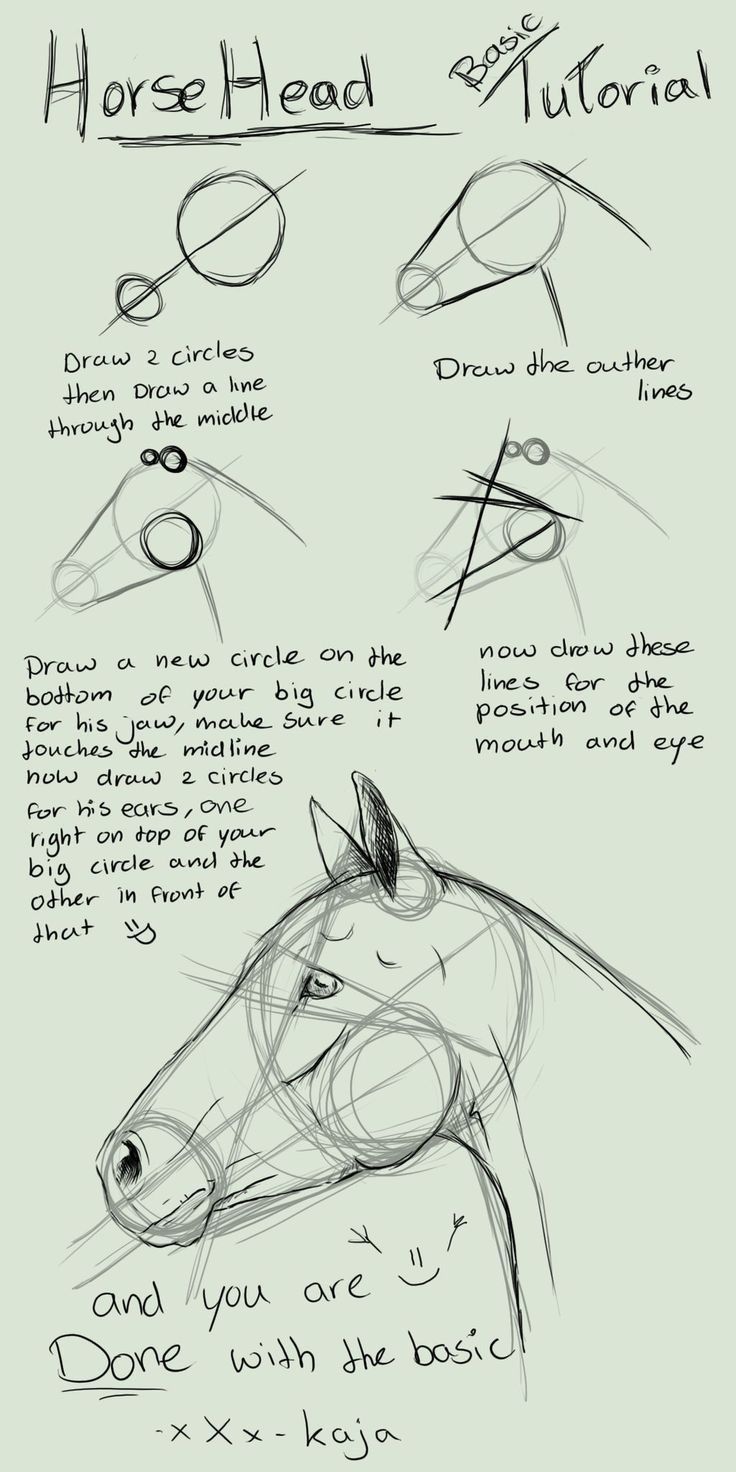
Step 1: Draw Two Circles and Connect with a Midline
“Draw 2 circles then draw a line through the middle”
- Draw a large circle — this will become the main mass of the head (cheek and jaw area).
- Draw a smaller circle to the left, overlapping the large one by about 1/3.
- This smaller circle represents the muzzle and nasal area.
- Draw a straight vertical line down the center where the two circles overlap.
- This is your midline — it ensures symmetry and guides facial feature placement.
Pro Tip: Keep your circles light! These are construction lines and will be erased later.
Step 2: Sketch the Outer Contour Lines
“Draw the outer lines”
- From the top of the large circle, draw a gently curving line upward and backward to form the crest of the neck.
- From the bottom of the large circle, draw a strong, angular line downward and forward to define the throat and jaw.
- Connect the small circle to the large one with smooth, flowing lines to shape the bridge of the nose and cheek.
Key Insight: The horse’s head is not round—it’s a tapered wedge. Think of it as a modified triangle built on circles.
Step 3: Add the Jaw Circle
“Draw a new circle on the bottom of your big circle for his jaw make sure it touches the midline”
- At the bottom front of the large circle, draw a medium-sized circle that:
- Touches the midline
- Sits below and slightly in front of the large circle
- This circle defines the bony structure of the lower jaw and gives the head its characteristic length.
Anatomy Note: Horses have a long premaxilla and mandible—this circle helps you avoid the common “puppy head” mistake.
Step 4: Place the Ears
“now draw 2 circles for his ears, one right on top of your big circle and the other in front of that”
- On the very top of the large circle, draw a small circle — this is the base of the back ear.
- Slightly forward and lower, draw another small circle — this is the front ear.
- The front ear appears in front due to perspective in profile view.
Ear Tip: Horse ears pivot and tilt—use these circles to experiment with expression later!
Step 5: Position the Eye and Mouth
“now draw these lines for the position of the mouth and eye”
- Draw a short horizontal line about ⅓ down from the top of the large circle — this marks the eye level.
- Draw a small diagonal line from the front of the jaw circle upward — this indicates the corner of the mouth.
- Add a tiny circle on the eye line for the eyeball.
- Sketch a nostril as an elongated oval near the front of the small muzzle circle.
Facial Triangle Rule: The horse’s eye, nostril, and mouth form a subtle triangle—use this to check balance.
Step 6: Refine and Clean Up
“and you are Done with the basic :)”
- Erase construction circles and midline (keep faint guides if needed).
- Strengthen the outer silhouette with confident, flowing lines.
- Add subtle details:
- Forelock (bangs) flowing from between the ears
- Throat latch curve under the jaw
- Cheek hollow indentation
- Nostril flare and eye crease
Optional Final Touches:
- Shade the eye with a dark pupil and highlight
- Add texture lines for mane direction
- Suggest muscle definition under the cheek
Common Mistakes & Quick Fixes
Mistake Fix Muzzle too short Extend the small front circle farther forward Ears too big/small Ears should be ~1/4 the height of the large circle Flat profile Exaggerate the S-curve from poll → nose → jaw Eye too high Eye sits below the midline of the large circle
Practice Challenges
Level Task Beginner Draw 10 heads using only construction circles Intermediate Rotate the head 3/4 view using the same circle method Advanced Add bridle, expression, or motion blur
Final Thoughts
This circle-based horse head method is more than a quick sketch trick—it’s a scalable framework. Once mastered:
- Adapt it for foals (larger cranium, shorter muzzle)
- Use it as an under-drawing for realistic rendering
- Apply it to unicorns, pegasi, or stylized characters
Artist Credit: Original tutorial sketch by Kaja — “-x x x – Kaja”
Download the Free Worksheet [Click here to get the printable step-by-step PDF with grid overlay] (Link placeholder)
Tag your practice sketches with #HorseHeadBasic and join thousands of artists improving daily!
Next Tutorial in Series: How to Draw Horse Legs in Action – Dynamic Poses Made Simple
© 2025 DrawingAcademy.com – All Rights Reserved
How to Draw a Horse Head in Profile – Beginner-Friendly Step-by-Step Tutorial Using Simple Circles and Construction Linesz