Mastering Human Head Construction: A Comprehensive Step-by-Step Tutorial for Artists on Anatomy, Proportions, and Muscle Structure

Description:
In the world of figure drawing and character design, constructing the human head accurately is a foundational skill that separates novice artists from professionals. This tutorial delves into the intricacies of head construction, drawing inspiration from classical methods such as those pioneered by Andrew Loomis, while incorporating anatomical landmarks, proportional divisions, and key muscle groups. Whether you’re a beginner seeking to build confidence in portraiture or an experienced illustrator refining your understanding of three-dimensional form, this guide will walk you through the process step by step. Based on detailed sketches that break down the head into manageable components, we’ll explore how to start with basic shapes, layer in proportions, integrate muscular anatomy, and achieve realistic views from multiple angles. By the end, you’ll have a solid framework to apply to your own artwork, ensuring balanced, expressive, and anatomically sound heads.
Step 1: Establishing the Basic Framework – The Egg Shape and Initial Gesture
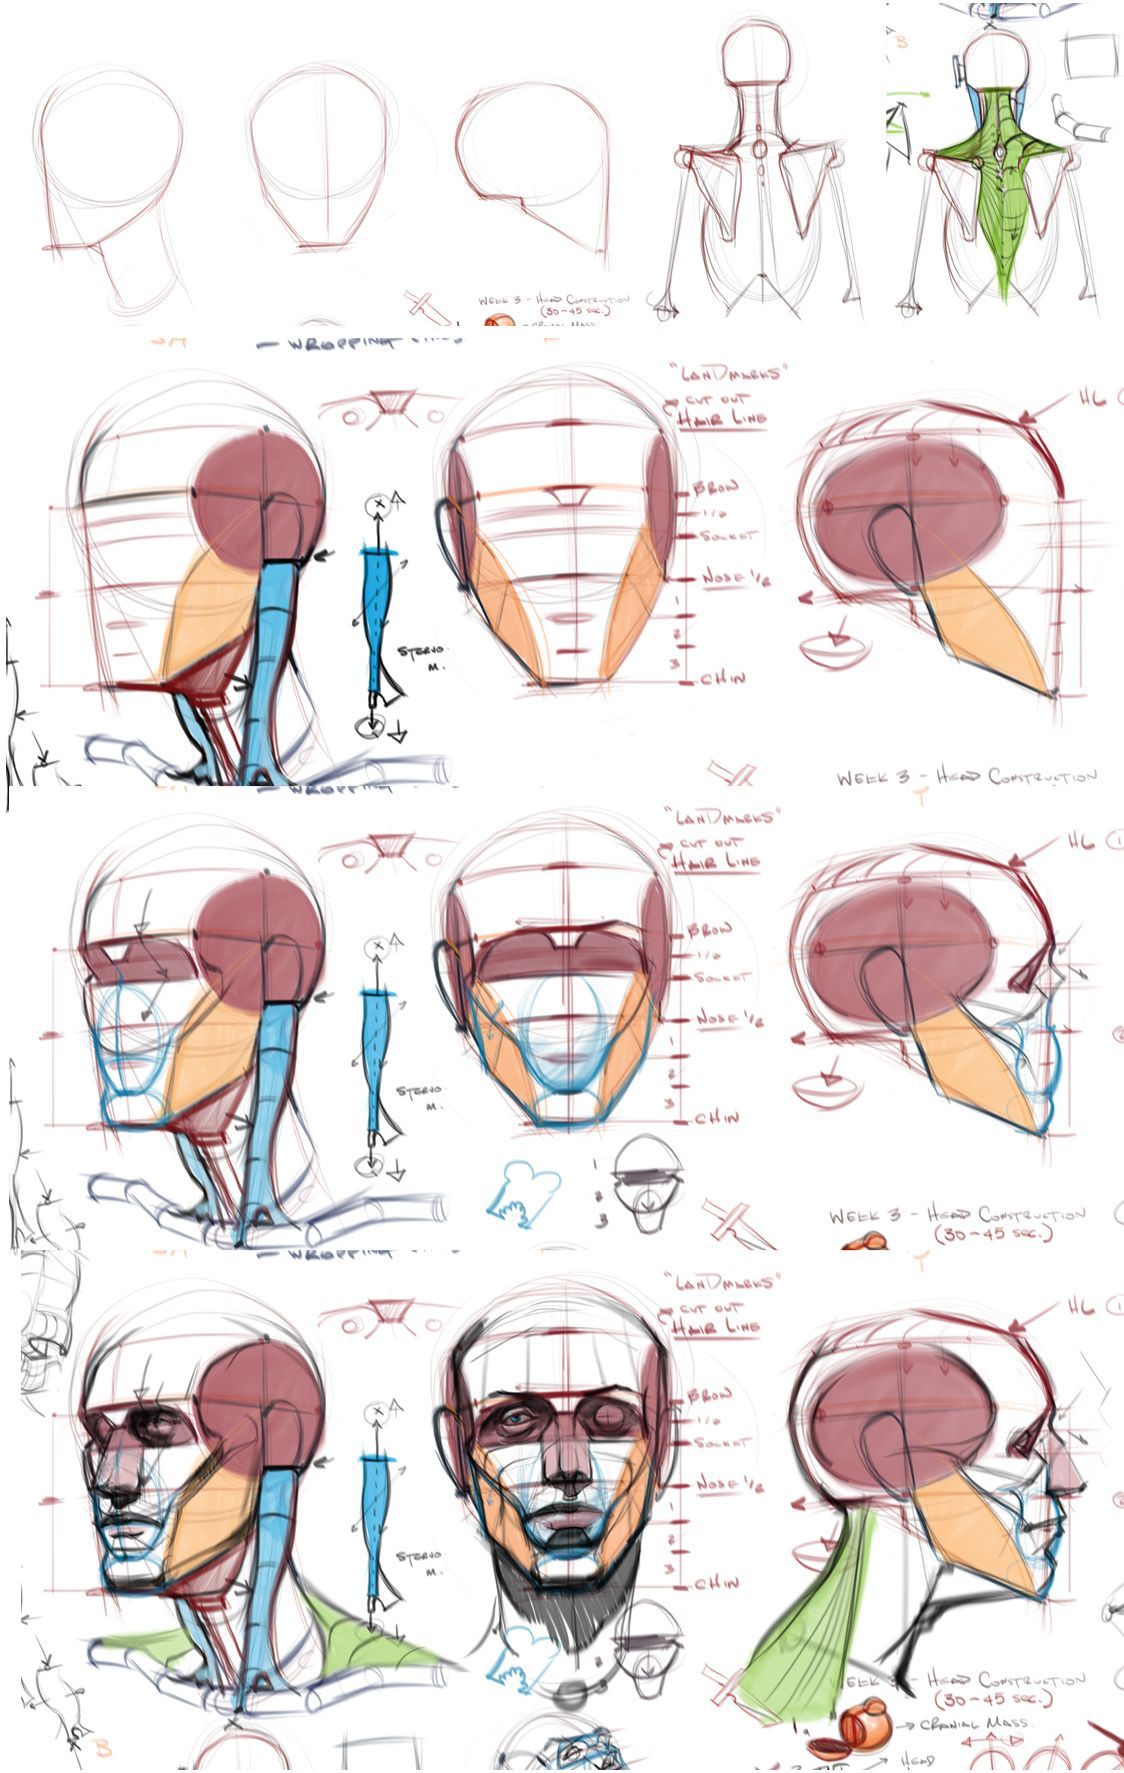
Begin with the most fundamental form: an egg-shaped oval representing the cranium and face. This simple yet versatile shape captures the overall volume of the head while allowing for flexibility in pose and perspective. In the initial sketches, you’ll notice a plain circle evolving into a slightly elongated egg, tilted to suggest the head’s orientation. Add a centerline down the middle to indicate the direction the head is facing—this acts as your axis for symmetry.
Next, incorporate the neck as a cylindrical extension from the base of the cranium. Sketch light guidelines for the shoulders and upper torso to ground the head in a believable posture. A key tip here is to visualize the head as sitting atop the spine; avoid making the neck too rigid by adding subtle curves that hint at underlying musculature. In the provided diagrams, this stage is illustrated with minimal lines, emphasizing gesture over detail—perfect for quick thumbnails or life drawing sessions.
Step 2: Defining Key Landmarks and Proportional Divisions
Once the basic shape is in place, divide the head into proportional sections to ensure anatomical accuracy. A standard approach is to use the “rule of thirds” for the face: from the hairline to the chin, the head is roughly divided into three equal parts.
- Upper Third (Brow Line): Start from the top of the cranium (often marked as the “hairline cut-out”) down to the brow ridge. This section houses the forehead and sets the foundation for the eye sockets.
- Middle Third (Socket to Nose): From the brow to the base of the nose, this includes the eye sockets and nasal bridge. Note the label “1/3 Brow Socket” in the sketches, which highlights the subtle indentation where the eyes will sit.
- Lower Third (Nose to Chin): Extending from the nose base to the chin, this encompasses the mouth and jawline. The diagrams show “Nose 1/2” and “Chin” markers, reminding artists that the mouth typically falls halfway between the nose and chin.
In side views, extend these divisions with horizontal lines across the profile: the brow line aligns with the top of the ear, the nose base with the earlobe, and so on. Use construction lines like the “Loomis ball-and-plane” method—depicted here as a sphere for the cranium intersected by a side plane for the face—to build volume. The sketches also introduce “landmarks cut-out line” for the hairline, which curves naturally around the forehead, avoiding a flat or unnatural edge.
Pro Tip: Always measure proportions relative to the overall head height. The average adult head is about 8-9 inches tall, with the eyes at the midpoint. Adjust for variations in age, gender, or ethnicity to add character—children’s heads, for instance, have larger craniums relative to the face.
Step 3: Integrating Muscular Anatomy – Focus on the Neck and Jaw
Anatomy brings life to your construction. The sketches highlight the sternocleidomastoid muscle (labeled “Sternomastoid M.” in blue), a prominent V-shaped muscle running from the base of the skull behind the ear, down to the collarbone and sternum. This muscle is crucial for head rotation and adds dynamism to poses. In the diagrams, it’s shown in profile and three-quarter views, with green shading for the trapezius muscle in the upper back, providing support and mass to the neck.
Build the jaw as a wedge-shaped form attaching to the cranium at the temporomandibular joint. The “cranial mass” (in reddish tones) represents the skull’s dome, while the “facial mass” (in yellowish hues) forms the cheeks and chin. Pay attention to the “neck pit” or suprasternal notch at the base, where the neck meets the chest—this subtle depression adds realism.
In the lower rows of the sketches, you’ll see progressively refined versions: starting with wireframe skeletons, then adding muscle overlays, and finally shading to indicate form. For example, the front view shows planar divisions on the face—flat planes for the forehead, cheeks, and muzzle area—to simplify shading and highlight.
Pro Tip: Study reference photos or mirrors to observe how muscles tense in different expressions. Tools like colored pencils (as used in these sketches—red for cranium, yellow for face, blue for sternomastoid) can help differentiate layers during practice.
Step 4: Refining Multiple Views – Front, Side, and Three-Quarter Perspectives
To master head construction, practice rendering from various angles. The tutorial sketches provide a progression:
- Side Profile: Emphasize the flat side plane of the face intersecting the rounded cranium. Mark the ear placement (aligned with the brow-to-nose line) and the angle of the jaw. The “30-45 deg” notation suggests tilting the head for dynamic views.
- Front View: Focus on symmetry. Draw the centerline, then add horizontal guides for features. The refined sketch here includes eyes, nose, and mouth, with subtle shading under the jaw for depth.
- Three-Quarter View: Combine elements of front and side. This is trickier due to foreshortening—note how the far side of the face compresses, and the sternomastoid wraps around the neck.
Incorporate cross-contour lines to convey volume, as seen in the diagrams with hatching along the cheekbones and neck. The “head construction (30-45 deg)” label indicates practicing tilted poses to understand perspective.
Pro Tip: Use a mirror or 3D modeling software to rotate a head model and compare against your sketches. This builds intuition for how forms overlap in perspective.
Step 5: Advanced Tips and Common Pitfalls
As you advance, layer in details like hair, expressions, and lighting. The sketches include notes on “wraparound” lines for the hairline, ensuring it follows the skull’s contour rather than floating arbitrarily.
Avoid common errors:
- Disproportionate features: Always double-check divisions with a ruler or proportional divider.
- Flatness: Build in planes and muscles to create 3D illusion.
- Stiff necks: Exaggerate the sternomastoid for movement.
Practice daily with timed gesture drawings (5-10 minutes per head) to internalize these steps. Resources like Loomis’s “Drawing the Head and Hands” or anatomy apps can supplement this tutorial.
This head construction method not only enhances your drawing skills but also informs digital sculpting, animation, and even medical illustration. Experiment, iterate, and soon you’ll construct heads effortlessly from imagination. For more tutorials, explore our series on figure anatomy and perspective drawing.