The Eye Decoded: A Precision Anatomy & Construction Tutorial for Hyper-Realistic Eye Drawing

Introduction: From Sphere to Soul
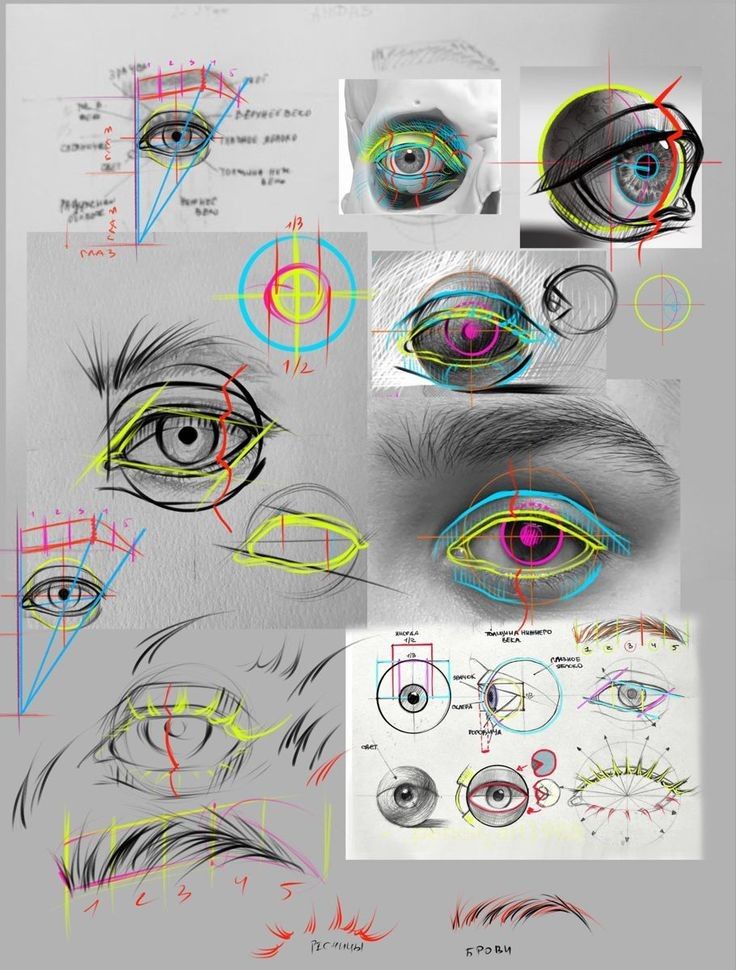
The human eye is the single most expressive element in portraiture. Yet, it is also one of the most technically demanding. This densely annotated master sheet—compiled from classical atelier methods, modern digital overlays, and anatomical overlays—breaks the eye into measurable, repeatable components using color-coded geometry, proportional grids, and step-by-step construction.
This tutorial transforms the raw study page into a professional, curriculum-grade lesson suitable for:
- Beginner artists learning accurate placement
- Intermediate illustrators refining realism
- Digital painters mastering subsurface scattering
- Instructors building structured eye-drawing modules
You will learn to draw an eye from any angle, in any medium, with anatomical accuracy and emotional impact.
Worksheet Overview: The 7-Layer Decoding System
The page is organized into seven color-coded zones using a consistent palette:
| Color | Meaning |
|---|---|
| Red | Structural axes & symmetry lines |
| Yellow | Proportional circles & golden ratios |
| Blue | Anatomical landmarks & muscle flow |
| Pink | Tear duct & caruncle detail |
| Cyan | Iris & pupil geometry |
| Green | Eyelid thickness & crease logic |
| Black | Final line & value |
Let’s dissect each zone.
Zone 1: The Eye as a Sphere in a Socket (Top Row)
Core Principle: The eyeball is a sphere, not a flat oval
Visual Aids: 3D skull overlay + cross-section
- Step 1 – Draw the Sphere
- Sketch a perfect circle (use compass or trace).
- Mark horizontal & vertical axes (red).
- Add 45° diagonals to track tilt.
- Step 2 – Place in Socket
- The sphere sits forward in the orbital cavity.
- Corneal bulge: The iris/pupil plane is in front of the sphere’s equator.
- Eyelids wrap around this bulge like a visor.
Zone 2: The 1/2 – 1/3 Proportional Grid (Middle Left)
Yellow Overlay: “1/3” and “1/2”
The Golden Rule of Eye Width
- Iris diameter = 1 unit
- Visible white (sclera) on each side = 1/2 unit
- Total eye width = 1 + 1/2 + 1/2 = 2 units
Vertical Proportions
- Upper lid crease → 1/3 above iris top
- Lower lid → 1/3 below iris bottom
- Tear duct → aligns with inner corner of iris
Exercise: Draw a 2cm iris. Measure everything in multiples of that.
Zone 3: Eyelid Thickness & Overlap Logic (Middle Center)
Green & Cyan Overlays
Eyelids Are Thick Planes, Not Lines
| Part | Thickness Rule |
|---|---|
| Upper lid | Thickest at crease, tapers to lash line |
| Lower lid | Thin, but casts shadow on eyeball |
| Lash line | Overlaps iris edge (never under) |
The “Eyelid Wrap” Technique
- Draw upper lid as a curved plane wrapping the sphere.
- Lower lid indents slightly under the bulge.
- Add eyelid crease as a shadow trench, not a line.
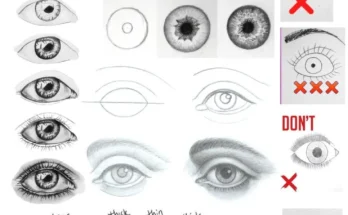
Zone 4: Iris & Pupil Geometry (Middle Right)
Cyan & Pink Overlays
Iris Construction (6-Step Precision)
- Outer circle – Full iris (11.5–12mm real size)
- Inner circle – Pupil (2–8mm, contracts in light)
- Radial lines – 12–16 spokes from pupil to edge
- Stromal pattern – Crypts & furrows (use reference)
- Limbal ring – Dark band at iris-sclera border
- Highlight – Place opposite light source
Digital Tip: Use polar grid in Procreate/Photoshop for perfect radials.
Zone 5: Tear Duct & Caruncle (Bottom Left)
Pink Highlight
The Forgotten Corner
- Lacrimal caruncle: Small pink fleshy bump
- Tear duct: Tiny dark crescent
- Lower lid curve: Dips inward here
Common Mistake: Drawing a sharp “V”. Use a soft “C” shape.
Zone 6: Eyebrow Flow & Muscle Integration (Bottom Center)
Blue Lines
Eyebrows Follow Orbital Rim
- Start at medial canthus (inner corner)
- Peak at 2/3 along eye length
- Taper toward temple
Muscle Influence
- Orbicularis oculi: Circular muscle → creates crow’s feet
- Corrugator supercilii: Pulls brow down → “11” lines
Zone 7: Final Integration & Stylization (Bottom Right)
Black & White Studies
From Construction to Finish
- Erase guidelines (keep faint axes)
- Render values:
- Sclera: Cool gray, darker toward corners
- Iris: Radial gradient + texture
- Eyelids: Warm skin tones, subtle veins
- Add lashes:
- Upper: Thick, curved, group in 3s
- Lower: Sparse, straighter
Step-by-Step Tutorial: Draw a Hyper-Realistic Eye
Materials
- Smooth Bristol paper
- HB, 2B, 4B pencils
- Kneaded eraser
- Blending stump
- White gel pen (optional)
Phase 1: Sphere & Socket (5 min)
- Draw circle (3cm diameter).
- Add red cross (horizontal + vertical).
- Sketch orbital rim (almond shape around sphere).
Phase 2: Proportional Lock-In (3 min)
- Mark iris circle (1.2cm) centered on horizontal.
- Add 1/2 unit sclera on both sides.
- Draw upper/lower lid planes using yellow 1/3 guides.
Phase 3: Eyelid Wrap (5 min)
- Upper lid: Thick plane from crease to lash.
- Lower lid: Thin plane under bulge.
- Add tear duct C-shape.
Phase 4: Iris & Detail (10 min)
- Draw pupil (0.4cm).
- Add 12 radial lines.
- Shade limbal ring dark.
- Texture with crypts (small Y-shapes).
Phase 5: Lashes & Skin (7 min)
- Upper lashes: Group in 3s, curve outward.
- Skin: Subtle veins, eyelid crease shadow.
- Highlight: White gel dot on iris.
Phase 6: Final Polish (5 min)
- Deepen sclera corners.
- Soften eyelid edges.
- Add catchlight reflection in tear duct.
Advanced Variations
| Style | Key Adjustment |
|---|---|
| Anime | Enlarge iris to 70% of eye width |
| Elderly | Dropped upper lid, visible lower sclera |
| Side View | Sphere 60% visible, heavy lid overlap |
| Digital Painting | Use “Round Hard” brush for lashes, “Gouache” for skin |
Common Mistakes & Fixes
| Mistake | Fix |
|---|---|
| Flat almond shape | Start with sphere |
| Symmetrical iris | Offset pupil slightly |
| Lashes like spider legs | Group & taper |
| No eyelid thickness | Draw planes, not lines |
Why This Method Works
This system trains:
- Proportional accuracy (1/2 – 1/3 grid)
- 3D understanding (sphere in socket)
- Anatomical logic (muscle flow)
- Expressive control (angle, age, emotion)
Master this eye, and you’ve mastered 30% of portrait expressiveness.
Your Challenge: The 30-Minute Eye
- Set timer for 30 minutes.
- Draw one eye using this tutorial.
- Then draw its mirror opposite from memory.
- Post both with #EyeDecoded
Downloadable Resources
- Printable Eye Proportion Grid (PDF)
- 4K Reference Pack: 50 Eye Angles
- Procreate Brush Pack: Realistic Lashes & Iris
- Next Lesson: Drawing Expressive Mouths
Anatomical Studies Compiled from École des Beaux-Arts, Loomis, and Contemporary Digital Atelier | Tutorial by [Your Art Academy] – Precision Drawing Since 2025