Mastering Spatial Drawing Patterns: A Comprehensive Tutorial on Creating Three-Dimensional Effects Through Line and Form Exploration

Title: Mastering Spatial Drawing Patterns: A Comprehensive Tutorial on Creating Three-Dimensional Effects Through Line and Form Exploration
Description:
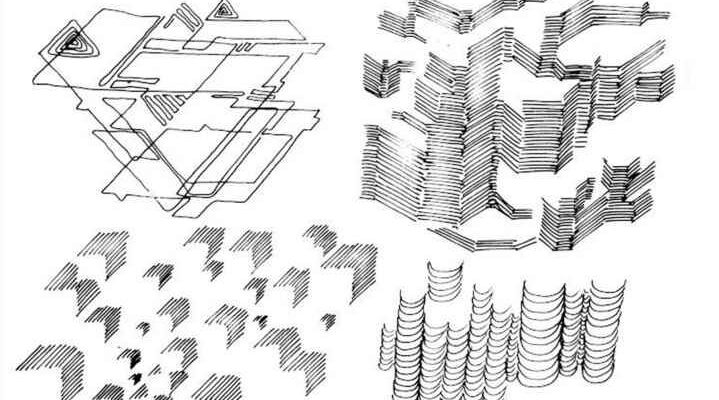
In the realm of visual arts and design, the ability to infuse two-dimensional surfaces with the illusion of depth and space is a transformative skill that bridges traditional sketching with optical innovation. This tutorial draws inspiration from a classic illustrative page featuring a diverse array of hand-drawn patterns, each designed to encourage creative experimentation while demonstrating how simple lines, shapes, and repetitions can produce compelling three-dimensional (3D) effects. These patterns, often rooted in principles of perspective, shading, and repetition, allow artists to “see into” the artwork, evoking a sense of volume, movement, and spatial complexity on a flat plane. Whether you’re a beginner artist seeking to expand your repertoire, a graphic designer exploring visual textures, or an educator incorporating drawing exercises into your curriculum, this guide will provide a professional, step-by-step approach to recreating and innovating upon these patterns. By the end, you’ll not only understand the underlying techniques but also be equipped to generate your own spatial illusions, fostering a deeper appreciation for how patterns can manipulate perception.
Understanding the Concept of Spatial Patterns
Spatial patterns in drawing refer to compositions that simulate depth through visual cues, without relying on photorealistic rendering. The foundational idea, as highlighted in the inspirational image, is to encourage “fun by drawing some ideas of your own,” where even abstract marks can yield 3D effects. These effects leverage human visual perception—our brains interpret converging lines as receding space, overlapping forms as layers, and varying line densities as shadows or textures. Historically, such techniques echo the works of artists like M.C. Escher, who mastered impossible geometries, or op-art pioneers like Bridget Riley, who used patterns to create kinetic illusions. In practical terms, these patterns are versatile: they can enhance illustrations, product designs, architectural sketches, or even digital graphics in tools like Adobe Illustrator.
The image showcases approximately 12 distinct pattern types, arranged in a grid-like layout for easy reference. They range from organic, fluid forms to structured, geometric arrangements, all rendered in black ink on white paper. Key themes include:
- Organic Waves and Squiggles: Fluid, looping lines that suggest undulating surfaces or rippling water.
- Connected Networks: Dot-to-line connections forming web-like structures, implying connectivity and depth through branching.
- Layered Stacks: Horizontal or angled lines piled in sequences, creating stair-step or architectural illusions.
- Perspective Convergences: Radiating lines that draw the eye inward, mimicking vanishing points in linear perspective.
- Shaded Clusters: Hatched or cross-hatched shapes that add tonal variation, enhancing the perception of volume.
- Abstract Forms: Irregular polygons and zigzags that, when repeated, form emergent 3D shapes like pyramids or tunnels.
These examples serve as a springboard, emphasizing that spatial effects arise from repetition, variation in line weight, and strategic placement—principles we’ll break down in the tutorial steps below.
Materials You’ll Need
To replicate these patterns effectively, gather the following professional-grade tools:
- Paper: Smooth, heavyweight sketch paper (e.g., 100-140 gsm) to prevent bleed-through and allow for precise line work.
- Drawing Instruments: Fine-tip pens (0.1-0.5 mm, such as Micron or Staedtler) for clean lines; optional pencils (HB-2B) for initial sketching.
- Rulers and Guides: A straightedge for geometric patterns and a French curve for organic waves.
- Erasers and Blending Tools: Vinyl eraser for corrections and tortillons for subtle shading if extending to tonal effects.
- Optional Digital Alternatives: If adapting for digital, use software like Procreate or Krita with pressure-sensitive brushes to mimic ink variations.
Ensure your workspace is well-lit and ergonomic to maintain focus during detailed drawing sessions.
Step-by-Step Tutorial: Creating Your Own Spatial Patterns
Follow this structured process to build from basic to advanced patterns, inspired directly by the image. Each step includes tips for troubleshooting common issues like uneven spacing or lack of depth.
- Preparation and Warm-Up (10-15 Minutes):
- Begin by studying the image closely. Identify one pattern to start with—perhaps the top-left wavy loops, which resemble contour lines on a topographic map.
- On a practice sheet, doodle freely for 5 minutes without judgment. This aligns with the image’s encouragement to “have fun,” loosening your hand and mind.
- Sketch a light grid (e.g., 4×4 inches) to contain your pattern, ensuring symmetry if desired. Tip: Use faint pencil lines that can be erased later for a clean final ink rendering.
- Building Basic Organic Patterns (e.g., Waves and Squiggles):
- Draw a series of parallel, undulating lines starting from the left edge of your grid, curving gently up and down like sine waves. Vary the amplitude (height of curves) to create depth—tighter curves in the “foreground” and looser ones “behind.”
- Add intersections by overlaying perpendicular squiggles, as seen in the image’s central examples. This creates nodes that suggest overlapping planes.
- Enhance spatiality: Thicken lines in the foreground and thin them out toward the background. Result: A rippling surface that appears to recede into infinity.
- Pro Tip: If lines feel flat, introduce subtle hatching (short parallel strokes) in curved areas to imply shadows, transforming 2D waves into 3D forms.
- Constructing Network and Connected Patterns (e.g., Dot-to-Line Webs):
- Scatter 10-20 dots randomly across your grid, mimicking the image’s dotted networks.
- Connect them with straight or curved lines, forming triangles or polygons. Vary line lengths to imply perspective—shorter lines near the “viewer” and longer ones extending away.
- To achieve 3D effect: Add dangling endpoints or branches, as in the image’s right-top examples, suggesting extension beyond the page.
- Troubleshooting: If the pattern looks chaotic, group connections into clusters, creating “foreground hubs” with denser links and sparser ones in the “distance.”
- Developing Layered and Stacked Structures (e.g., Stair-Steps and Pyramids):
- Start with horizontal base lines, then stack progressively shorter ones above, offsetting them slightly to the side—like building a ziggurat.
- Incorporate angles: Tilt lines at 30-45 degrees, as in the image’s lower-left stacked forms, to suggest inclines or ramps.
- Add depth with shading: Use cross-hatching on lower layers to darken them, making upper ones appear elevated.
- Variation: For the image’s perspective stacks (bottom-right), draw converging lines from a central vanishing point, creating a tunnel or cityscape illusion.
- Pro Tip: Measure intervals with a ruler for even spacing, but introduce minor irregularities for a hand-drawn, organic feel.
- Incorporating Shaded and Textural Elements (e.g., Hatched Clusters and Curves):
- Draw irregular shapes (e.g., arrowheads or blobs from the image’s bottom-left) and fill with directional hatching—lines slanted to follow the form’s contour.
- Cluster them in groups, overlapping slightly to build volume. The image’s examples show how dense hatching creates shadowy depths.
- For curved patterns (bottom-center waves), layer concentric loops, tightening toward the center to form a vortex-like depth.
- Enhance professionalism: Blend hatches with a tortillon for gradient effects, simulating light falloff in 3D space.
- Advanced Integration and Experimentation (20-30 Minutes):
- Combine elements: Merge a web network with stacked layers, as hinted in the image’s composite sketches.
- Experiment with scale: Enlarge one pattern to dominate the composition, using smaller ones as “background” to amplify depth.
- Test optical illusions: Rotate your paper to view from different angles, adjusting lines to maintain the 3D pop.
- Digital Adaptation: Scan your sketch and import into software; use layers for non-destructive edits, applying filters like “emboss” for enhanced spatiality.
- Refinement and Finalization:
- Review for balance: Ensure no area feels overcrowded—spatial patterns thrive on negative space.
- Ink over pencil lines for a polished look, erasing guides.
- Critique: Step back 5 feet; does the pattern invite “seeing into” it? Adjust contrasts if needed.
- Document: Photograph your work for your portfolio, noting techniques used.
Benefits and Applications
Mastering these patterns not only hones technical skills but also boosts creativity and problem-solving. In professional contexts, apply them to textile designs (repeating waves for fabrics), UI/UX elements (layered icons for depth in apps), or educational tools (teaching geometry through art). Psychologically, such drawing fosters mindfulness, as the repetitive process can be meditative.
Common Mistakes to Avoid
- Overcomplicating early: Start simple to build confidence.
- Ignoring proportion: Uneven scales flatten the illusion—use guides.
- Neglecting variation: Monotonous lines reduce depth; always modulate thickness and direction.
By following this tutorial, you’ll transform the inspirational image’s ideas into your own masterpieces. Experiment boldly, and remember: the true magic lies in how these patterns reveal hidden dimensions within the ordinary. Share your creations in the comments below for community feedback! If you’d like variations or advanced extensions, explore related resources on optical art techniques.


