Mastering Perspective Drawing: A Tutorial on Eye Level Views and Vanishing Points for Realistic 3D Illustrations

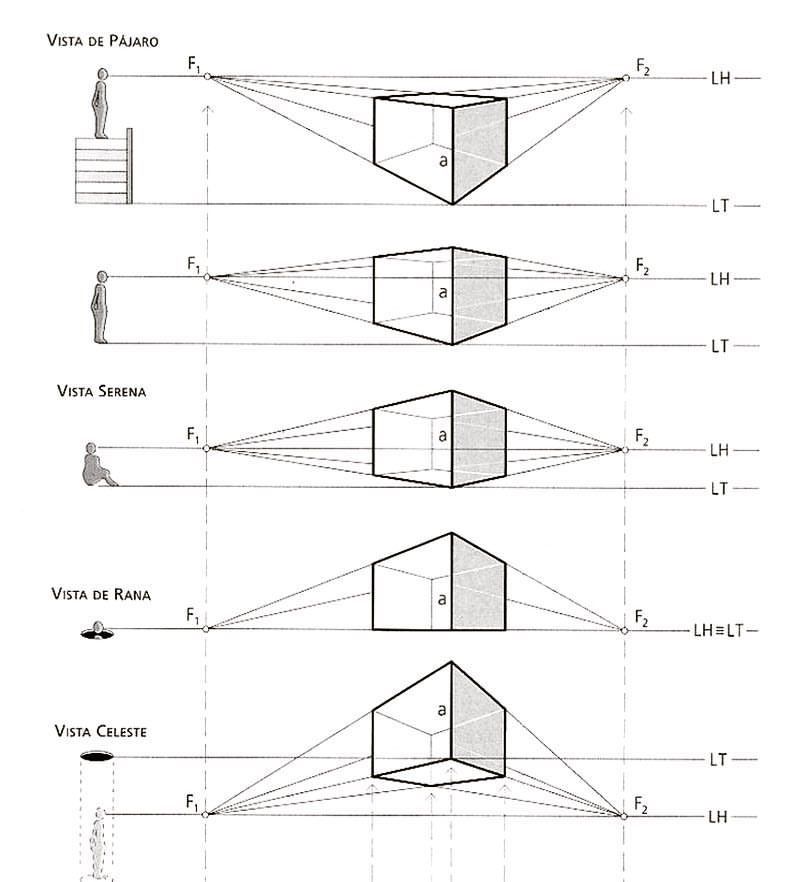
Perspective drawing is a cornerstone of visual arts, enabling artists to create the illusion of depth and three-dimensional space on a two-dimensional surface. By understanding how eye level influences the perception of objects, you can transform flat sketches into immersive scenes that mimic real-world optics. This tutorial, inspired by classical perspective techniques from artists like Leonardo da Vinci and modern architectural illustrators, explores four key viewpoints: Bird’s Eye (Vista de Pájaro), Serene (Vista Serena), Frog’s Eye (Vista de Rana), and Celestial (Vista Celeste). These views demonstrate how the position of the observer relative to the subject alters vanishing points, horizon lines, and object distortion. Using a simple cube as the subject, we’ll break down the principles of two-point perspective, where lines converge at focal points (F1 and F2) on the horizon line (LH) or station line (LT). This guide is perfect for beginners in pencil drawing, digital artists using tools like Clip Studio Paint or Blender, or anyone refining their spatial awareness in illustration.
The illustrations highlight the relationship between the viewer’s eye level and the object’s appearance: High viewpoints compress the top, low ones elongate the base, and eye-level views provide balance. Key concepts include the horizon line (LH, where sky meets ground at eye level), the station line (LT, the ground plane), and vanishing points (F1 and F2, where parallel lines converge). Always start with a defined eye level to ensure consistency. Tools needed: Ruler for precise lines, HB pencil for guidelines, 2B-4B for shading, eraser for corrections, and graph paper for practice. Work in one or two-point perspective initially; avoid common pitfalls like inconsistent vanishing points (causing “wobbly” forms) or ignoring foreshortening (flattening depth). Reference real-world observations: Stand at different heights and note how buildings or boxes appear.
Core Principles of Perspective Views
Before sketching, internalize these fundamentals:
- Eye Level and Horizon Line (LH): The horizon is always at the viewer’s eye height. Above it, you see undersides; below, tops. In the guide, LH shifts with the observer’s position.
- Vanishing Points (F1, F2): In two-point perspective, horizontal lines converge at two points on the horizon. Vertical lines remain parallel unless in three-point (e.g., extreme angles).
- Station Line (LT): Represents the ground or base plane; objects sit on it.
- Foreshortening: Closer parts appear larger; distant ones smaller, creating taper.
- Viewpoint Variations: Bird’s eye (high, looking down), serene (eye-level, neutral), frog’s eye (low, looking up), celestial (extreme low/high, dramatic).
- Shading for Depth: Use gradients—darker near viewer, lighter afar—to enhance illusion.
- Mathematical Basis: Perspective follows projective geometry; vanishing points are at infinity in parallel lines.
- Artistic Tips: Exaggerate for drama (e.g., worm’s eye for grandeur); combine with composition rules like thirds for focus.
Practice thumbnails: Draw a cube from memory in each view, then compare to references.
Step 1: Bird’s Eye View (Vista de Pájaro) – High Angle Looking Down
This top-down perspective compresses height, ideal for aerial maps or overhead scenes.
- Visual Breakdown: The observer stands elevated (e.g., on a platform), eye level above the cube. Lines from the cube’s edges converge downward to F1 and F2 below the horizon (LH above the cube). The top face is visible, sides taper inward, creating a “pyramidal” effect.
- Technique: Draw the horizon line (LH) high on your page. Place the cube below it on the station line (LT). Extend horizontal edges to vanishing points F1 (left) and F2 (right) on a lower line. Vertical lines shorten due to foreshortening. Shade the sides darker for recession.
- Key Focus: Emphasis on the top plane; vanishing points are low, making the view “diving” downward.
- Tutorial Tip: Use a ruler for convergence lines. Practice: Sketch a cityscape from a bird’s eye, placing buildings on LT and converging streets to F1/F2. Digitally, use perspective grids. Common error: Forgetting to keep verticals parallel—tilt only if adding three-point.
Step 2: Serene View (Vista Serena) – Eye-Level Neutral Perspective
A balanced, everyday view where the horizon aligns with the observer’s eyes, suitable for portraits or interiors.
- Visual Breakdown: The seated observer’s eye level is midway on the cube. Horizon (LH) cuts through the middle; vanishing points F1 and F2 are on LH, with sides converging horizontally. Top and bottom faces are hidden or minimally visible, sides equal.
- Technique: Set LH at mid-page. Draw the cube straddling LH (part above, part below). Extend left edges to F1 (left vanish), right to F2 (right). Vertical lines remain straight. Add subtle shading on away faces for depth.
- Key Focus: Symmetry and stability; no extreme distortion, making it “serene.”
- Tutorial Tip: Align your own eye level with a real box; sketch it. Exercise: Draw a room interior, placing furniture along LT with walls to F1/F2. For realism, add texture—hatch sides following perspective lines.
Step 3: Frog’s Eye View (Vista de Rana) – Low Angle Looking Up
This bottom-up perspective elongates forms, evoking power or intimidation, common in hero shots or architecture.
- Visual Breakdown: Observer low (e.g., sitting or lying), eye below the cube. Horizon (LH) low; vanishing points F1 and F2 above, on a higher line. Bottom face prominent, sides taper upward, roof-like.
- Technique: Place LH low. Cube above on LT. Converge horizontal edges upward to elevated F1/F2. Verticals parallel but foreshortened at top. Shade undersides darker, tops lighter for height illusion.
- Key Focus: Underside visibility; view “expands” upward, with LH=LT noted for ground-level.
- Tutorial Tip: Lie on the floor viewing a table; replicate. Challenge: Illustrate a towering building from frog’s eye, exaggerating convergence for drama. Avoid over-tilt—check with plumb line.
Step 4: Celestial View (Vista Celeste) – Extreme Low or High Angle
An exaggerated perspective for surreal or divine effects, blending bird’s and frog’s views at extremes.
- Visual Breakdown: Observer extremely low (celestial implying skyward gaze). Horizon very low; F1 and F2 far apart, high. Cube appears sharply tapered, almost pointed, with heavy foreshortening.
- Technique: LH at bottom. Cube high on LT. Extend edges to distant vanishing points. Add three-point if needed (third vanish for verticals). Gradient shade from dark base to light top.
- Key Focus: Dramatic distortion; suitable for fantasy or emphasis.
- Tutorial Tip: For celestial up, imagine viewing stars; down for abyss. Practice hybrid: Combine with serene for transitional scenes. Digitally, warp tools simulate extremes.
Integrating Views: Creating Cohesive Scenes
Apply multiple views in one composition: Foreground frog’s eye for drama, background bird’s for overview. Steps:
- Choose primary eye level; draw LH.
- Place objects on LT; assign F1/F2.
- Converge lines; check consistency.
- Shade for unity—consistent light source.
- Refine: Erase guides, add details.
Exercises:
- View Shift Series: Draw one object in all four views.
- Scene Build: Compose a landscape mixing serene and frog’s.
- Perspective Walk: Observe outdoors, sketch varying heights.
Conclusion: Elevating Your Drawings with Perspective Mastery
These viewpoints unlock realistic depth, turning sketches into believable worlds. Practice daily to internalize—soon, you’ll intuitively place vanishing points. For advanced, explore curvilinear or atmospheric perspective. Reference texts like “Perspective Made Easy” by Ernest Norling. Share your perspective studies in our forum; tag #PerspectiveTutorial for critiques. Embrace the views, and your art will soar!