Mastering Dense Background Silhouettes: How to Draw Crowded City Skylines and Forest Scenes Without Chaos

Description:
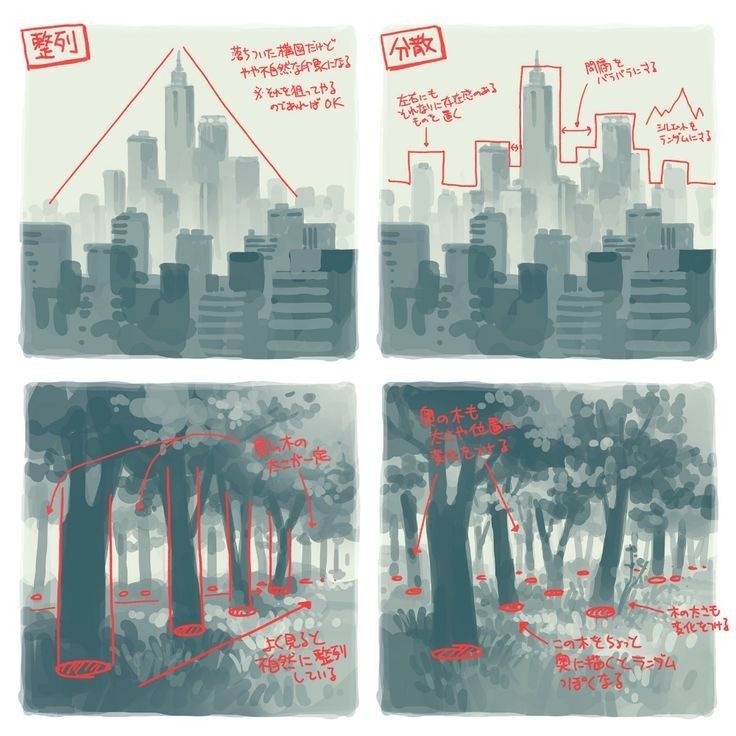
Creating convincing background elements like distant city skylines or dense forests is essential for illustrators, manga artists, concept designers, and landscape painters. The key challenge lies in handling overcrowding—too much detail creates visual noise, while too little looks empty. This professional tutorial, based on the insightful Japanese-style reference image, teaches the “grouping” and “silhouette layering” method to achieve depth, atmosphere, and readability in hazy, silhouetted backgrounds. The image divides into four panels demonstrating wrong vs. right approaches for buildings (“建築” – architecture) and trees (“木” – trees), emphasizing that individual details are unnecessary in distant views. Instead, focus on overall shapes, overlapping, and gradual density to evoke mood without overwhelming the viewer.
Analyzing the Reference Image
The reference uses muted teal-gray tones for atmospheric perspective (distant haze), with red handwritten annotations in Japanese highlighting principles:
- Top-Left (Wrong – Buildings): A single tall skyscraper dominates with clean lines converging to a high vanishing point. Annotation: “遠くのビル群は四角いシルエットが密集する感じでOK 細かく描かなくていい” (Distant building clusters feel like densely packed rectangular silhouettes—it’s OK not to draw details finely). This “wrong” example isolates one building, making the skyline feel sparse and unnatural.
- Top-Right (Right – Buildings): Multiple irregular rectangular silhouettes overlap, with jagged rooftops and varying heights. Annotations point to stepped outlines (“左上にギザギザ” – jagged on top-left) and mountain-like irregularity (“陶酔をバラバラにランダムに” – randomly scatter for intoxication/feeling). The result: a cohesive, chaotic urban mass resembling a distant metropolis.
- Bottom-Left (Wrong – Trees): Trees drawn with individual trunks and curved branches, but spaced out. Annotation: “木の木だけ一本一本” (Just individual tree trunks one by one), leading to a flat, unconvincing forest.
- Bottom-Right (Right – Trees): Dense trunks clustered at bases, with foliage as unified dark masses. Annotations: “葉の木も一本一本ではなく塊として考える” (Think of foliage not as individual trees but as clumps), “この木をちょっと奥に木をたくさん描きこむ” (Draw lots of trees a bit further back), and bases grounded with oval shadows/grass. Overlapping creates depth, with foreground trunks darker and background fading.
Overall theme: In backgrounds, group elements into masses rather than rendering individually. This mirrors real optical effects—atmospheric haze merges distant objects into silhouettes.
Key Principles for Dense Silhouettes
- Atmospheric Perspective: Distant elements are lighter, cooler (bluish-gray), less contrasted, and less detailed.
- Overlapping for Depth: Foreground dark/sharp; midground medium; background light/hazy.
- Grouping Over Detailing: Treat clusters as single shapes—jagged for cities, clumpy for forests.
- Silhouette Priority: Strong outer contours; internal details minimal or absent.
- Random Variation: Avoid uniformity—heights, widths, and edges should vary organically.
- Mood Enhancement: Dense grouping creates mystery, scale, or tranquility.
These align with manga/comic background techniques (e.g., from Adobe or Clip Studio resources) and landscape art fundamentals.
Step-by-Step Tutorial: Drawing Crowded Backgrounds
Work traditionally (pencil/ink on toned paper) or digitally (layers in Procreate/Clip Studio/Photoshop). Use soft brushes for haze.
- Establish Horizon and Atmosphere:
- Draw a faint horizontal line for the horizon.
- Fill the background with a light gradient (cool gray-blue fading upward for sky).
- Pro Tip: Lower opacity for distance—80% foreground, 40% mid, 20% background.
- Sketch Overall Mass (Grouping First):
- For cities: Draw an irregular horizontal band of connected rectangles—vary heights dramatically (one dominant skyscraper optional).
- For forests: Outline clumpy, cloud-like foliage masses with vertical trunk hints below.
- Avoid individuals—think “one big shape” subdivided randomly.
- Add Overlapping Layers:
- Foreground: Darker silhouettes, sharper edges (e.g., thick trunks or bold building outlines).
- Midground: Overlap foreground with slightly lighter shapes.
- Background: Hazy blobs merging into the mass.
- Reference the image: Step down building tops like stairs; clump tree foliage into ovals.
- Refine Silhouettes:
- Cities: Jagged rooftops (antennas, setbacks); no windows needed in distance.
- Trees: Curved trunks tapering upward; bases with grass/shadow ovals for grounding.
- Add randomness: Scatter peaks or gaps for interest.
- Enhance Depth and Texture:
- Darken overlaps for shadow.
- Lightly erase or lighten edges for haze.
- Optional: Subtle internal lines (e.g., faint building divisions) only in midground.
- Finalize with Mood:
- Adjust values: Cooler/darker for ominous; warmer/lighter for serene.
- Test: Squint—does it read as a unified mass?
Common Mistakes to Avoid (From Reference):
- Isolating elements (wrong panels)—causes flatness.
- Over-detailing distance—creates noise.
- Uniform spacing/heights—looks artificial.
Applications and Variations
- Manga/Comics: Use for quick, evocative panels—dense forests for mystery, cities for scale.
- Concept Art: Add fog layers digitally for epic environments.
- Landscapes: Combine both (city behind forest) for urban-nature contrast.
- Variations: Night (add window lights as dots); seasonal (pink clumps for cherry blossoms).
Practice daily with photo references—study real skylines (e.g., Tokyo) or forests for natural irregularity. Resources: Clip Studio Tips on silhouette brushes, or books like “Background Drawing Techniques” in Japanese art guides.
This grouping method, as shown in the reference, simplifies complex scenes while maximizing impact. Download the image for tracing, experiment with the steps, and share your results below! For more, explore atmospheric perspective in works by artists like Shinkai Makoto or traditional sumi-e ink paintings.