How to Draw Realistic Beard Growth: Step-by-Step Tutorial for Natural Facial Hair in Profile View

Description:
Drawing realistic facial hair, particularly a full beard, is a game-changer for portrait artists, character designers, and illustrators. Beards add texture, depth, and personality to male faces, but many beginners struggle with making them look natural rather than flat or patchy. This comprehensive tutorial breaks down the process of rendering beard growth in a side-profile view, based on the progressive sketch sequence in the provided reference image by @tatandrawing. The illustration cleverly demonstrates how beards “grow” gradually to cover the face, starting from stubble and building into a thick, flowing mane. We’ll explore anatomy, hair flow direction, layering techniques, and professional tips to achieve convincing volume and realism. Perfect for digital artists using Procreate or Photoshop, or traditional mediums like pencil and ink.
Analyzing the Reference Image
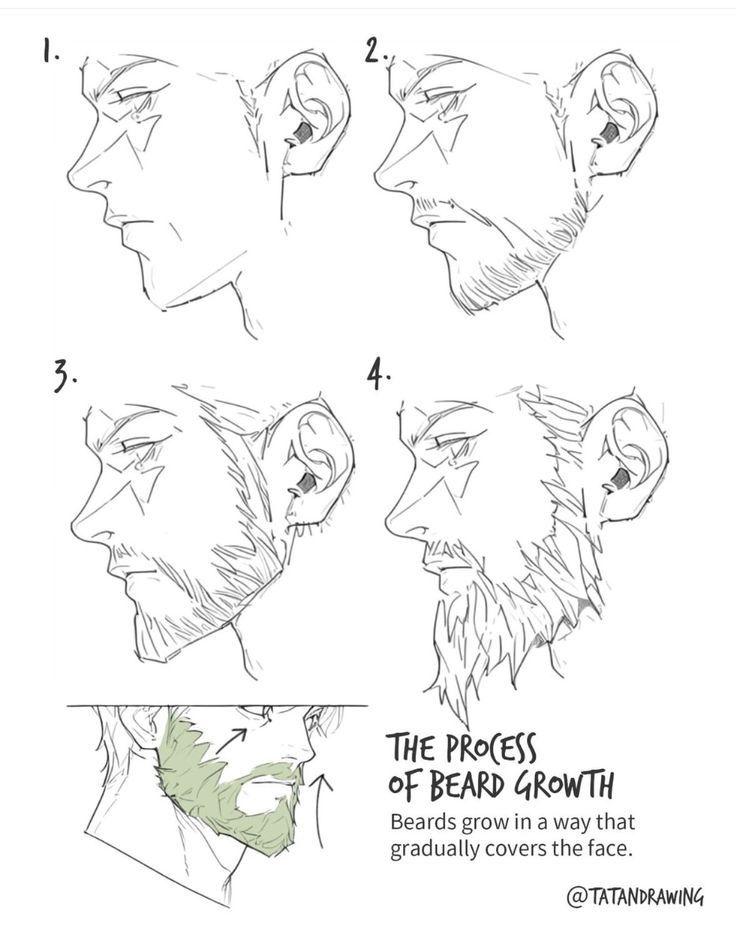
The reference image features a clear four-step progression of a male profile face (side view, facing left) with increasing beard density:
- Step 1: Clean-shaven base with basic facial structure—strong jawline, prominent nose, closed eye, and ear. Light hatching defines the cheek and neck, establishing skin tone and subtle shadows.
- Step 2: Initial stubble appears along the jaw and chin, with short, directional strokes following the contour of the face. Sparse hairs on the cheek suggest early growth.
- Step 3: Beard thickens, extending upward toward the sideburns and downward along the neck. Hatching becomes denser, creating mid-tone shadows and implying longer strands.
- Step 4: Full, mature beard with wild, flowing hair strands radiating outward. Heavy cross-hatching and varied line weights add volume, texture, and a sense of wildness.
A bonus inset at the bottom highlights the growth pattern: Arrows point from the chin upward and outward, showing how hair emerges from follicles and gradually envelops the lower face. The caption reads: “THE PROCESS OF BEARD GROWTH – Beards grow in a way that gradually covers the face.” This emphasizes organic expansion rather than uniform application.
This style draws from observational sketching, focusing on realism through incremental buildup—ideal for avoiding the common pitfall of drawing beards as a single mass.

Key Principles of Realistic Beard Drawing
Before diving into steps, understand these fundamentals:
- Hair Flow and Direction: Beard hairs follow the facial contours. On the chin, they grow downward; along the jaw, outward and down; on cheeks, toward the mouth or downward from sideburns. Reference diagrams show common patterns—hairs radiate from the chin like a fan.
- Growth Stages: Beards start patchy (stubble), fill in densely, then lengthen for volume. Density varies by area: thicker on chin, sparser on cheeks.
- Texture and Value: Use varied stroke lengths, thicknesses, and directions. Darker values in shadows under the chin/lips; highlights on protruding strands.
- Anatomy Integration: Beard overlays the jaw, chin, and neck—don’t flatten the face underneath.


Step-by-Step Tutorial: Drawing a Growing Beard in Profile
Use a light pencil (HB) for initial lines, darker (2B-4B) for hair, and an eraser for highlights. Digitally, work in layers: one for face, one for beard.
- Draw the Base Face Structure (Like Step 1):
- Sketch the profile: Cranium as a circle, jaw as a strong angle, nose bridge, ear placement.
- Add features: Eye (closed for simplicity), mouth line, neck.
- Lightly shade skin tones with soft hatching.
- Pro Tip: Use Loomis or Reilly method for accurate proportions—head height divides into thirds (hairline to brow, brow to nose base, nose to chin).
- Add Initial Stubble (Step 2):
- With short, light strokes, dot and dash along the jawline and chin.
- Follow contours: Strokes curve with the face shape.
- Keep sparse on upper cheeks; denser below mouth.
- Common Mistake to Avoid: Uniform dots—vary length and direction for natural patchiness.
- Build Density and Length (Step 3):
- Layer longer strokes over stubble, grouping hairs into clumps.
- Darken shadows under lip and chin for depth.
- Extend toward neck and sideburns, blending into hairline.
- Use cross-hatching for mid-tones.
- Finalize with Volume and Flow (Step 4):
- Add wild, overlapping strands: Vary thickness—thicker at base, tapering ends.
- Emphasize outward radiation from chin (as shown in the inset arrows).
- Create highlights by erasing or leaving white strands.
- Add flyaway hairs for realism.
- Refine and Shade:
- Establish a light source (e.g., from above-left) for consistent shadows.
- Soften edges where beard meets skin.
- Advanced: Use blending stumps (traditional) or smudge tools (digital) for smooth transitions.


Tips for Professional Results
- References: Study real photos of bearded profiles to observe unique growth patterns.
- Variations: For shorter beards, stop at Step 2-3; for styled, add grooming lines.
- Medium-Specific Advice: In ink, use pen pressure for thickness; in digital, custom brushes for hair texture.
- Common Errors: Overly symmetrical hair, ignoring underlying bone structure, or flat shading.
- Practice: Draw 10 profiles daily, varying ages and ethnicities for diversity.
This method, inspired by the @tatandrawing reference, teaches patience—building gradually mirrors real growth for authentic results. Ideal for character design in comics, games, or portraits.
Master this, and your male characters will exude maturity and ruggedness. Share your progress in the comments, and download the reference for practice! For more tutorials, explore resources like RapidFireArt or Proko videos.