Mastering Foreshortening and Perspective in Insect Drawing: A Step-by-Step Tutorial on Rendering Butterflies from Extreme Angles

Description:
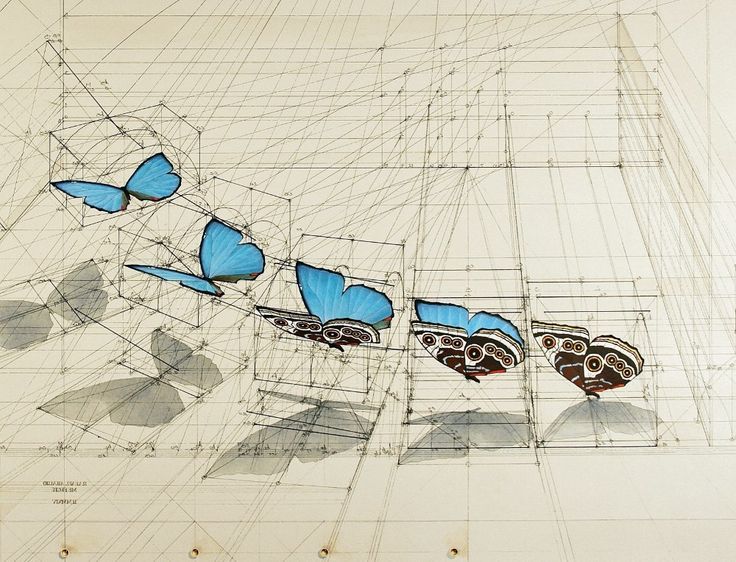
Capturing organic subjects like butterflies in strong perspective is a challenging yet rewarding skill for illustrators, scientific artists, and concept designers. This exquisite illustration demonstrates a masterful sequence: a series of butterflies transitioning from a vibrant blue Morpho (likely Morpho peleides) in the foreground to a detailed owl butterfly (Caligo species, known for eye-spot patterns) receding into the distance. Each butterfly is meticulously placed within transparent 3D construction boxes and grids, with converging lines establishing a rigorous two-point perspective system. Shadows, wing overlaps, and gradual size reduction enhance the illusion of depth and foreshortening. This tutorial breaks down the techniques used in this artwork, teaching you how to apply geometric construction to natural forms for realistic, dynamic results—perfect for scientific illustration, wildlife art, or fantasy creature design.

Why Perspective Matters for Drawing Insects and Butterflies
Butterfly wings are thin, planar surfaces—ideal for demonstrating foreshortening (compression when viewed at an angle). Without proper construction, wings can appear flat or distorted. The featured artwork uses:
- Perspective grids and boxes to position each butterfly in 3D space.
- Converging orthogonals to a vanishing point on the right.
- Progressive scaling and detail reduction for atmospheric depth.
- Subtle watercolor washes for color and cast shadows.
This method bridges technical drawing with naturalistic rendering, ensuring anatomical accuracy even in extreme views.
Step 1: Establish the Perspective Framework
Begin with a two-point perspective setup:
- Draw a horizon line (eye level).
- Place two vanishing points far off the page (one left, one right—as implied by the converging lines).
- Sketch lightweight construction lines radiating from these points.
In the artwork:
- Lines create a receding “tunnel” effect, pulling the eye from large foreground butterflies to smaller background ones.
- Transparent boxes enclose each butterfly, acting as 3D bounding volumes.
Pro Tip: Use a ruler for initial lines, then erase or lighten them. For organic subjects, keep the grid loose to avoid rigidity.

Step 2: Block In Basic Volumes with Construction Boxes
Treat each butterfly as a flat object in space:
- Draw a thin rectangular prism or open box for the body and wingspan.
- Position boxes along the perspective lines, decreasing in size toward the vanishing point.
- Align the butterfly’s central body axis with the depth lines.
Sequence in the artwork:
- Largest blue Morpho (closest)—wings nearly frontal, minimal foreshortening.
- Mid-ground butterflies—wings angled, showing overlap and compression.
- Smallest owl butterflies (farthest)—extreme foreshortening, eye-spots distorted into ovals.
This creates a natural “flight path” receding into space.
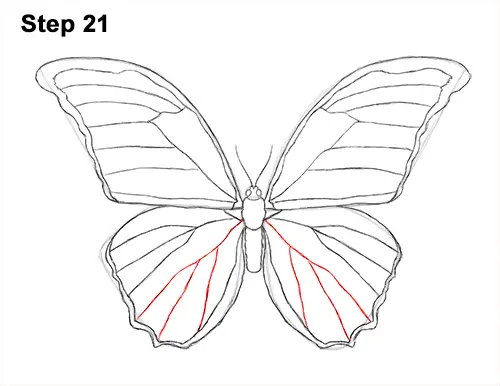
Step 3: Refine Wing Shapes with Foreshortening
Butterfly wings are symmetrical but appear asymmetrical in perspective:
- Foreground: Wings spread wide, elliptical shapes nearly true.
- Mid-ground: Compress wing width; use ellipses for circular eye-spots.
- Background: Wings become narrow slits; details fade.
Key Techniques:
- Draw center line through body for symmetry.
- Project wing edges to vanishing points.
- Add vein patterns and colors last, reducing saturation with distance (aerial perspective).


Step 4: Add Shadows, Overlaps, and Final Details
Enhance depth:
- Cast shadows on “ground” planes within boxes.
- Overlap wings for occlusion.
- Use hatching or washes for texture—iridescent blue on Morpho fades to muted browns on distant owl butterflies.
The artwork’s subtle gray shadows ground the butterflies, making them feel suspended in real space.
Applications and Practice Tips
| Application | Benefit of This Technique |
|---|---|
| Scientific Illustration | Accurate scale and morphology in 3D views |
| Wildlife Art | Dynamic compositions with flying insects |
| Concept/Fantasy Art | Credible creature wings in action poses |
| Animation Layouts | Consistent perspective across sequences |
Exercises:
- Draw a single butterfly in a perspective box—rotate views.
- Create your own sequence: 5 butterflies receding.
- Try different species (e.g., Monarch to Swallowtail).
- Digital alternative: Use Clip Studio Paint or Procreate perspective guides.
Conclusion: Blend Precision with Beauty
This illustration exemplifies how rigorous perspective construction elevates organic subjects, turning a simple butterfly study into a captivating exploration of depth and form. Master these steps to confidently draw insects, birds, or any winged creature from imagination.
Recommended Resources:
- Animal Drawing: Anatomy and Action by Charles Knight
- Perspective Made Easy by Ernest Norling
- Drawabox.com lessons on organic forms in boxes
Try the challenge: Recreate this sequence with your favorite butterflies—share with #PerspectiveButterflies!
Scientific & Wildlife Illustration Academy ©