Mastering Fish Sketching: A Step-by-Step Tutorial on Proportion, Structure, and Evolving Wildlife Drawings

Sketching wildlife, particularly aquatic creatures like fish, cephalopods, and even marine mammals, requires a foundational understanding of anatomy, proportion, and simplification to capture their fluid, dynamic forms. This tutorial draws from classical drawing techniques, such as those used in observational art and concept design (inspired by artists like Andrew Loomis or modern wildlife illustrators), to guide you through deconstructing complex subjects into basic shapes and progressively refining them. Whether you’re an aspiring illustrator, concept artist, or hobbyist working in pencil, ink, or digital tools like Procreate or Photoshop, this method emphasizes starting with simplicity to achieve realistic, expressive results. We’ll focus on fish as the primary example, but the principles extend to related species like octopuses or dolphins, highlighting shared traits like streamlined bodies and skeletal structures.
The process revolves around four key pillars noted in the guide: Proportion and Simplicity (ensuring accurate scaling and minimalism), Organizing the Details (layering features logically), and Evolving the Sketch (iterating from rough to refined). By breaking the subject into geometric primitives—circles for craniums, strings for spines, and triangles for fins—you build a wireframe that evolves into a detailed rendering. This approach prevents common errors like disproportionate bodies or cluttered lines, promoting clean, confident sketches. Tools needed: Sketchbook or digital canvas, HB-2B pencils for light construction, 4B-6B for shading, eraser for refinements, and optionally a ruler for initial proportions. Practice on side views first, as they reveal silhouette variance effectively. Reference real specimens or photos from sources like National Geographic for accuracy, and aim for 15-20 minute sessions per step to build intuition.
Core Principles of Wildlife Sketching
Before sketching, internalize these essentials:
- Proportion: Maintain realistic ratios—e.g., a fish’s body length is often 3-5 times its height. Use guidelines to align features like eyes and fins.
- Simplicity: Start with basic shapes to capture gesture; avoid details until the foundation is solid.
- Organizing Details: Group elements (e.g., fins as triangles, body as ovals) and add them in layers: structure first, texture last.
- Evolving the Sketch: Iterate through stages—rough gesture, refined outline, shaded form—to allow corrections and enhancements.
- Silhouette Variance: Study side views to understand shape diversity; a strong silhouette ensures readability from afar.
- Perspective Basics: Incorporate 2D flat views and 3D constructions for volume, using circles and lines to suggest depth.
- Common Mistakes to Avoid: Overcomplicating early (leads to stiffness), ignoring flow (fish should feel hydrodynamic), or symmetrical perfection (nature is asymmetrical).
- Anatomical Notes: For fish/cephalopods: Focus on cranium (head balloon), spine (curving string), and fins (tapering triangles). Extend to mammals by adding limbs or bulkier forms.
Practice with gesture drawing: Quick 30-second sketches to loosen up, then refine. Let’s break it down into steps, aligned with the visual examples.
Step 1: Establishing Basic Shapes and Gesture (Foundation with Primitives)
Begin by simplifying the subject into geometric forms to capture essence and proportion without intimidation.
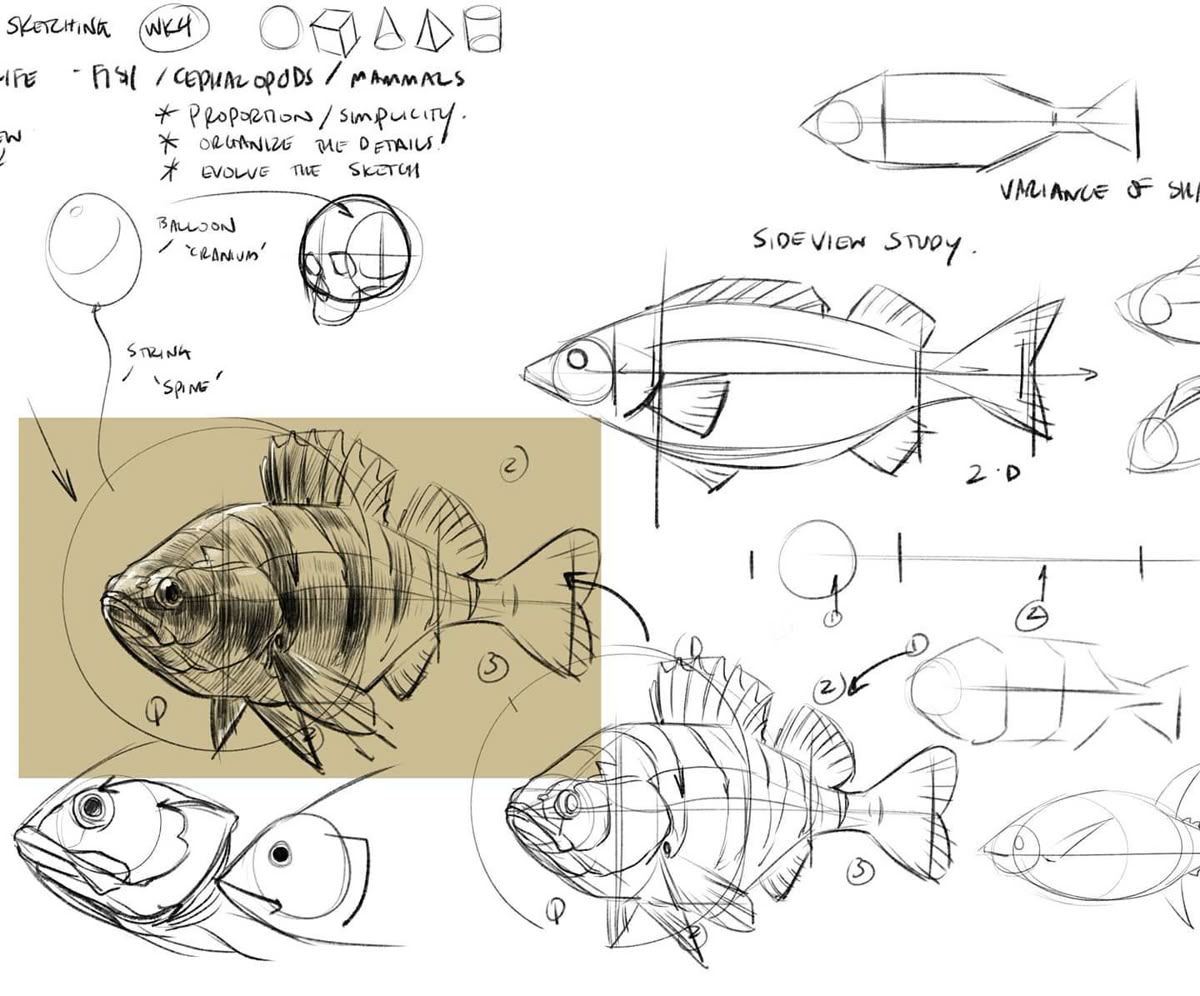
- Visual Breakdown: Use a circle for the “balloon cranium” (head), a curving line for the “string spine” (backbone), and basic shapes like triangles (fins) or cubes (body segments). Notes highlight “WK4” (perhaps week 4 of a course) and categories like fish/cephalopods/mammals.
- Technique: Lightly sketch a large circle for the head, then draw a fluid S-curve for the spine extending backward. Add ovals or triangles for the body and fins, ensuring the overall silhouette tapers toward the tail for hydrodynamic feel. Measure proportions: Head should be about 1/4 of body length.
- Key Focus: Simplicity here—ignore details like scales. This creates a “wireframe” that organizes future additions.
- Tutorial Tip: In digital, use low-opacity layers; traditionally, ghost lines with HB pencil. Vary shapes for species: Rounder for perch-like fish, elongated for eels. Practice 10 gestures, exaggerating curves for movement. This step aligns with “Proportion / Simplicity,” preventing distorted finals.
Step 2: Side View Study and Silhouette Variance (Exploring 2D Forms)
Transition to profile views to study shape diversity and refine the outline.
- Visual Breakdown: A sequence shows evolving side views—from a basic wedge (pointed nose, wide body) to more detailed contours. Labels like “Side View Study. Variance of Shape” and arrows indicate flow. Small diagrams illustrate 2D simplifications, like lines with circles for eyes.
- Technique: Trace over your Step 1 gesture with bolder lines, adjusting for variance: Make one sketch stocky (e.g., bass), another sleek (e.g., trout). Add eye placement (mid-head) and fin positions along the spine. Use horizontal guidelines for alignment.
- Key Focus: Emphasize silhouette—squint to check if it “reads” as a fish. Introduce subtle asymmetries for realism.
- Tutorial Tip: Rotate your paper or canvas to draw from different angles. For cephalopods, adapt by adding tentacles as wavy lines from the head circle. Build variance: Sketch 5 side views, altering body ratios (e.g., 3:1 vs. 5:1 length-to-height). This organizes details by prioritizing outline before internals.
Step 3: Adding Structure and Volume (3D Construction and Detailing)
Build depth by overlaying construction lines and evolving to three-dimensional forms.
- Visual Breakdown: A detailed fish with cross-contour lines (curving bands for volume), numbered elements (1: head, 2: body, 3: tail). Additional sketches show perspectives: Front views (circular), angled poses, and shaded forms. A highlighted rendered fish demonstrates hatching for texture.
- Technique: Draw ellipses or cross-sections along the spine to suggest roundness (e.g., wider at mid-body, tapering ends). Add fins as planes (triangles with veins), gills as slits, and scales as implied patterns. Use hatching or cross-hatching for shading: Darker undersides for shadow, lighter tops for light.
- Key Focus: Evolve the sketch—refine proportions, organize details like fin rays or mouth shapes. Introduce 3D by imagining the fish as stacked ovals.
- Tutorial Tip: Use construction lines (light grids) to maintain perspective; erase them later. For mammals like seals, add flippers as modified fins. Practice shading gradients: Soft for smooth skin, textured for scales. Iterate: Redraw Step 2 sketches with volume, comparing to references for accuracy.
Step 4: Final Refinement and Rendering (Polishing for Realism)
Complete the sketch by enhancing details, texture, and expression while preserving simplicity.
- Visual Breakdown: Bottom sketches show progressive builds—from wireframe to fully hatched fish, with multiple angles (e.g., open mouth, curved body). A shaded example on tan paper adds tonal depth.
- Technique: Strengthen outlines, add fine details like eye reflections or fin membranes. Render with value: Build form through layering (light to dark). For digital, use brushes for texture; traditionally, blend with tortillon.
- Key Focus: Balance detail—don’t overcrowd; let the structure shine. Evolve by comparing iterations side-by-side.
- Tutorial Tip: Add environment hints (bubbles, water lines) for context. For advanced: Incorporate motion blur or multiple poses for animation studies. Critique: Step back, flip the image to spot flaws. Adapt for cephalopods (tentacle clusters) or mammals (whiskers, blubber curves).
Conclusion: Applying These Techniques to Your Wildlife Art
This tutorial equips you to sketch fish and similar creatures with confidence, evolving from basic shapes to detailed masterpieces. Regular practice—daily 30-minute sessions—will internalize proportion and flow, extending to broader wildlife. Experiment with media: Ink for bold lines, charcoal for soft tones. For inspiration, study aquatic artists like those in “The Art of Animal Drawing” by Ken Hultgren. Share your sketches in our community gallery, tagging progress from gesture to final. For more tutorials, explore our series on bird or mammal anatomy. Dive in and let your sketches swim!