Chapter 13: Understanding Circles, Cylinders, and Cones in Perspective Drawing
Mastering the Illusion of Depth: How Circles Transform into Ellipses Through Foreshortening

Tutorial Overview
In technical illustration, architectural rendering, and fine art drawing, accurately depicting three-dimensional circular forms on a two-dimensional surface is a fundamental skill. This comprehensive tutorial, drawn from Chapter 13: Circles, Cylinders, and Cones, explores the critical concept of foreshortening — the visual compression of circular shapes when viewed at an angle. Far from being random distortions, these transformations follow precise geometric principles governed by the observer’s line of sight, pivot axes, and spatial orientation.
Whether you’re a beginner learning to sketch realistic objects or an advanced artist refining mechanical precision, this guide will equip you with both conceptual understanding and practical techniques to render circles convincingly in perspective.
Core Principle: Circles Become Ellipses in Perspective
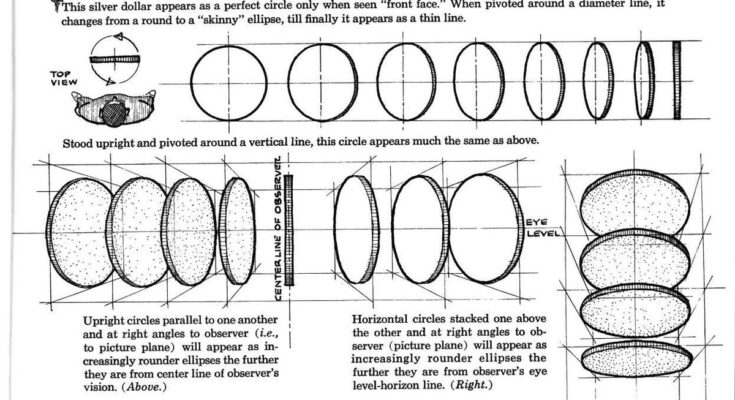
“Circles and ellipses: Circles, except when they are parallel to the observer’s face, will foreshorten and appear as ellipses.”
This foundational rule underpins all accurate depictions of round forms in space.
Key Insight
A perfect circle appears only when viewed directly face-on (i.e., the plane of the circle is perpendicular to the viewer’s line of sight). Any tilt or rotation around a diameter causes foreshortening, compressing the circle into an ellipse — and in extreme cases, a thin line.
Demonstration 1: The Pivoting Silver Dollar
Objective: Visualize how a single circular plane changes appearance when rotated.
Setup
- A U.S. silver dollar (or any flat circular disk) is held edge-on initially.
- It is pivoted around a fixed diameter line (the “pivot line”).
Visual Sequence (Top View & Side Views)
| Stage | Appearance | Explanation |
|---|---|---|
| 1 | Full circle (front face) | Plane of circle ⊥ to line of sight |
| 2 | Wide ellipse | Slight tilt begins foreshortening |
| 3 | Narrower ellipse | Increased angle compresses vertical axis |
| 4 | Very thin ellipse | Near edge-on view |
| 5 | Thin line | Circle seen exactly edge-on |
Note: The minor axis of the ellipse always aligns with the direction of tilt, while the major axis remains perpendicular to it.
Demonstration 2: Vertical Circle Pivoted Around a Vertical Axis
Setup: A circle stands upright and rotates around a vertical pivot line.
Result
The sequence mirrors the silver dollar example — transitioning from full circle → wide ellipse → thin ellipse → line.
Practical Tip: Use this method when drawing standing wheels, clock faces, or vertical rings in perspective.
Demonstration 3: Multiple Upright Circles in a Row (Parallel Planes)
Setup: Several identical circles aligned vertically, all parallel to each other and perpendicular to the ground, placed at varying distances from the observer.
Observed Effect
- Circles closer to the center line of vision appear rounder.
- Circles farther away (left or right) appear as increasingly flattened ellipses.
Why?
The angle of view increases with lateral distance. Even though all circles are identical and upright, perspective convergence causes greater foreshortening off-center.
Pro Tip: Always measure the minor axis of each ellipse relative to its distance from the center line of vision (CLV).
Demonstration 4: Stacked Horizontal Circles
Setup: Circles lie flat (parallel to the ground), stacked vertically above the observer’s eye level.
Observed Effect
- Lowest circle (nearest eye level): nearly a line
- Middle circles: progressively rounder ellipses
- Topmost circle: almost a full circle
Geometric Rule
The degree of roundness increases with height above or below eye level, because the viewing angle approaches 90° to the plane.
Demonstration 5: Horizontal Circles in a Row (Rigorous Mechanical Perspective)
Challenge: Draw multiple horizontal circles (e.g., tabletops, coin stacks) at different depths.
Common Mistake
Artists often draw all circles as identical ellipses, even when some are far left or right of the center line.
Correct Method
Despite being in the same horizontal plane:
- Circles directly in front of the observer appear as true ellipses (foreshortened in depth).
- Circles far to the left or right must be drawn with additional lateral distortion — their visible portions become asymmetric and mechanically accurate only through proper projection.
Advanced Technique: Use perspective grids or auxiliary vanishing points to plot the true elliptical contour of off-center circles.
Practical Applications in Drawing
| Object | Real Geometry | Perspective Appearance | Key Drawing Tip |
|---|---|---|---|
| Wheel | Circle | Ellipse (unless face-on) | Minor axis aligns with axle direction |
| Cylinder (side view) | Two circles + rectangle | Two ellipses + converging lines | Top/bottom ellipses match in width |
| Coin on table | Circle | Ellipse | Tilt determines minor axis length |
| Stack of plates | Multiple circles | Nested ellipses | Roundness increases with height from eye level |
Step-by-Step Guide: Drawing a Foreshortened Circle
- Establish the Plane Determine whether the circle is horizontal, vertical, or tilted.
- Locate the Center Line of Vision (CLV) Draw a horizontal line at eye level across your composition.
- Define the Pivot or Tilt Axis This is the minor axis of the resulting ellipse.
- Measure the Viewing Angle
- Face-on = 90° → full circle
- Edge-on = 0° → line
- In-between → ellipse
- Construct the Ellipse
- Draw major axis ⊥ to tilt direction
- Draw minor axis = foreshortened diameter
- Use 4-center method or trammel for accuracy
- Check Alignment Ensure all related circles (e.g., top/bottom of cylinder) share consistent ellipse ratios.
Tools & Techniques for Precision
- Ellipse Templates: Match minor/major axis ratios
- French Curves: Smooth elliptical arcs
- Perspective Grids: Pre-drawn horizon + vanishing points
- Digital Aids: Procreate, Adobe Illustrator (ellipse tool + transform)
Summary: Key Takeaways
| Concept | Rule |
|---|---|
| Face-on circle | Appears as perfect circle |
| Tilted circle | Becomes ellipse; minor axis = direction of tilt |
| Distance from CLV | Greater lateral offset → flatter ellipse |
| Height from eye level | Higher/lower → rounder ellipse |
| Mechanical accuracy | Off-center horizontal circles require asymmetric projection |
Downloadable Resources
- PDF Worksheet: Ellipse Construction Grid
- Video Tutorial: Drawing Cylinders in 1, 2, & 3-Point Perspective
- Printable Reference: Foreshortening Angle Chart
Master perspective. Draw reality. From Chapter 13: Circles, Cylinders, and Cones — Essential Technical Illustration Series
Perfect for art students, industrial designers, animators, and architects. Share this tutorial with your peers and elevate your drafting skills today!


