Essential Tutorial on Gesture Drawing for the Female Figure in a Fitted Dress: Analyzing Poses, Joints, and Proportions with Overlay Guides

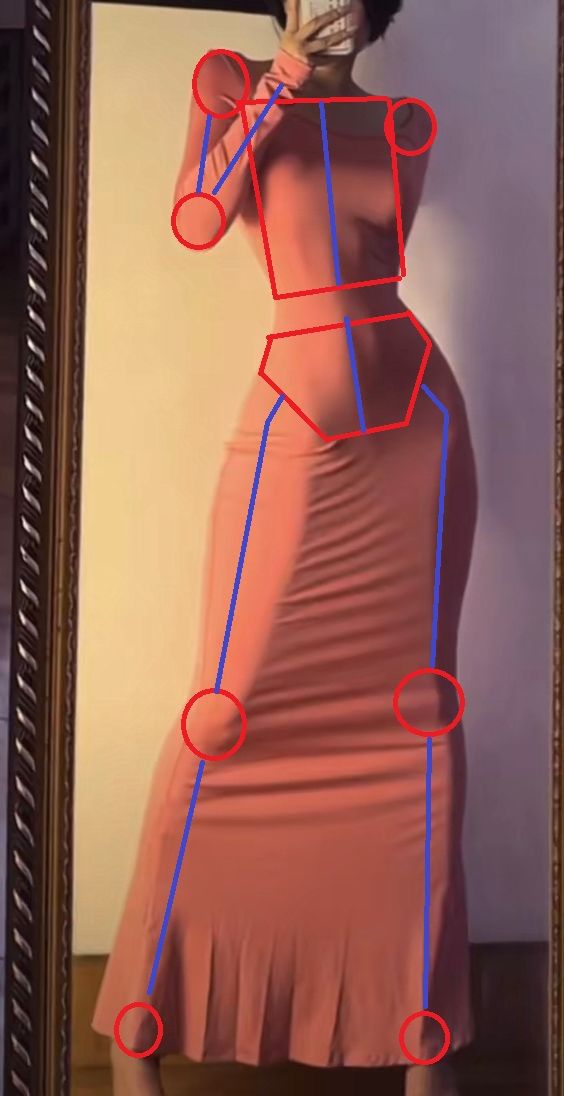
Capturing the elegance and fluidity of the human form, especially in motion or posed attire, is a fundamental skill for artists specializing in figure drawing, fashion illustration, or character design. This comprehensive tutorial is inspired by a reference photograph of a woman taking a mirror selfie in a form-fitting pink midi dress, overlaid with strategic red and blue construction lines to highlight gesture, joints, and anatomical structure. The image depicts a three-quarter view pose with the subject’s right arm raised (holding a phone for the selfie), left arm relaxed at her side, and a subtle hip shift creating an S-curve in the spine for dynamic balance. Red circles mark key joints (shoulders, elbows, hips, knees, ankles), blue lines trace the centerline and limb axes, and red polygons outline the torso and pelvis for proportional guidance. This setup serves as an excellent tool for breaking down complex poses into manageable elements, emphasizing how clothing conforms to the body while maintaining natural flow.
Whether you’re a beginner honing basic anatomy or an advanced artist refining gesture sketches, this guide will walk you through replicating and applying these overlays in your work. We’ll divide the tutorial into sections based on the reference’s visual breakdown: upper body construction, torso and hip integration, lower body flow, and final refinements. Use this for traditional sketching with pencils on paper or digital tools like Procreate or Adobe Fresco, where layers can separate guidelines from final renders. Key principles include using gesture lines for overall energy, joint markers for articulation, and proportional checks to ensure realism. By practicing with this pose—a common “selfie” stance that conveys confidence and curves—you’ll develop an eye for how fabric like a smooth, stretchy dress drapes over muscles and bones, avoiding stiff or disproportionate figures. Gather your materials: light blue/red pencils for non-reproducible guidelines, an eraser for iterations, and reference mirrors for self-study to match the image’s introspective vibe.

Section 1: Establishing the Gesture and Centerline (Blue Line Overlays)
The reference image prioritizes the blue centerline as the pose’s backbone, running from the neck base down the spine, through the hips, and into the legs, with additional axes along the arms for limb direction.
- Mapping the Overall Gesture: Begin with a light, sweeping blue line to capture the figure’s S-curve posture. In the photo, the subject stands with weight on her left leg, causing a gentle tilt: the spine curves rightward at the upper back, leftward at the waist, and stabilizes at the hips. This creates contraposto—opposing balances—for naturalism. Draw your centerline as a fluid arc, about 7-8 head heights tall (using the neck stub as a head placeholder), ensuring it reflects the dress’s smooth silhouette without wrinkles at this stage.
- Adding Limb Axes: Extend blue lines from the shoulders down the arms (right arm bent upward for the selfie, left hanging straight) and from hips to feet. The reference shows these as straight segments with slight bends at joints, emphasizing foreshortening in the raised arm. Position the right elbow axis at a 45-degree angle, aligning with the phone-holding hand.
- Practical Application: Sketch loosely for 30 seconds to capture energy before refining. Common mistake: Rigid lines—keep them organic to convey movement. Tip: Use a mirror to pose yourself, overlaying mental blue lines to match the reference. Exercise: Draw 3 variations of this pose (neutral, exaggerated curve, reversed weight shift) using only blue axes to build speed and intuition.
This foundation ensures your figure has rhythm and balance, preventing “wooden” poses often seen in early drafts.
Section 2: Identifying and Marking Joints (Red Circle Overlays)
Red circles in the image pinpoint articulation points, guiding where bends occur and how the dress stretches over them.
- Upper Body Joints: Circle the shoulders (at the clavicle ends), elbows (mid-arm), and wrists (near the hands). In the reference, the right shoulder circle is elevated due to the arm raise, creating tension in the dress’s strapless top. The left elbow circle hangs low, with the arm relaxed, allowing the fabric to drape smoothly.
- Torso and Hip Joints: Mark the hip joints (greater trochanters) with larger circles to denote the pelvis’s width—wider than shoulders for feminine proportions (about 1.2:1 ratio). The image uses a red polygon around the hips to frame this, highlighting the hourglass shape amplified by the tight dress.
- Lower Body Joints: Place circles at knees (patellas) and ankles (malleoli), noting how the left knee locks for support while the right bends slightly. The dress’s midi length conceals lower calves, so focus circles on visible transitions.
- Integration Tips: Connect circles mentally to the blue axes for limb segments. For clothed figures, adjust for fabric compression—e.g., circles at hips show where the dress cinches. Avoid error: Unequal circle sizes; scale them to joint prominence (larger for load-bearing like hips). Exercise: Trace the reference photo, adding your circles, then erase the photo to redraw from overlays alone.
These markers add precision, transforming abstract gestures into anatomically sound structures.
Section 3: Outlining the Torso and Pelvis (Red Polygon Overlays)
The red lines form simple polygons around the bust, waist, and hips, simplifying the body’s contours under the dress.
- Upper Torso Construction: Draw a red trapezoid for the bust and shoulders, tapering to the waist. The reference emphasizes the dress’s form-fitting nature, with the polygon hugging the curves to show compression at the underbust.
- Pelvic Region Breakdown: Use a wider hexagon or diamond for the hips, connecting to the thigh lines. The image’s overlay captures the exaggerated hourglass (bust-hip ratio ~1:1.3), with the dress flaring slightly at the hem for movement.
- Fabric Interaction: Note how the red lines follow the dress’s seams—straight at the sides, curved at the bust and glutes. This teaches rendering clothing as a “second skin,” with polygons indicating where shadows or highlights will fall.
- Proportional Guidelines: Divide the figure: head to bust (2 units), bust to hips (1.5 units), hips to feet (3.5 units). Tip: For digital artists, use shape tools for polygons, then distort for perspective. Common pitfall: Ignoring gravity—ensure lower polygons sag subtly under dress weight. Exercise: Apply polygons to a full-body mirror selfie of yourself in similar attire, comparing to the reference for accuracy.
This step solidifies form, aiding in shading and detailing later.
Section 4: Refining the Pose and Adding Details for Finished Drawings
Synthesize the overlays into a cohesive sketch, transitioning to refined lines and values.
- Combining Overlays: Erase or fade guidelines, using red polygons as outer contours and blue axes for internal structure. Add subtle dress details: pleats at the hem, strap tension at shoulders, and hand/phone grip.
- Shading and Volume: Apply light hatching along blue lines for depth—darker undersides (e.g., inner thighs) and highlights on curves (bust, hips). The pink fabric in the reference suggests soft, diffused lighting from the mirror side.
- Advanced Variations: Adapt for different dresses (e.g., flowing vs. tight) or poses (e.g., walking). Incorporate ethnicity or body type diversity by adjusting polygon widths.
- Final Touches and Critique: Add the head (short hair as in photo) for completion. Flip the drawing horizontally to spot asymmetries.
Additional Professional Tips and Resources
- Tools Recommendations: Vine charcoal for gestures, colored pencils for overlays; digitally, brushes with pressure sensitivity.
- Anatomical References: Cross with “Dynamic Figure Drawing” by Burne Hogarth for pose dynamics.
- Practice Regimen: Weekly: 10-minute sessions overlaying photos, building to freehand.
- Ethical Considerations: Use diverse references to avoid idealized stereotypes; credit sources like this image (artist unknown, but pose common in social media studies).
This tutorial turns a simple selfie into a powerful learning tool, empowering you to draw graceful, clothed figures with confidence. Experiment with your poses, and share progress in art forums for feedback!