Step-by-Step Tutorial on Rendering Shiny Black Attire: Shading, Lighting, and Detailing a Form-Fitting Dress on a Female Figure for Digital Artists

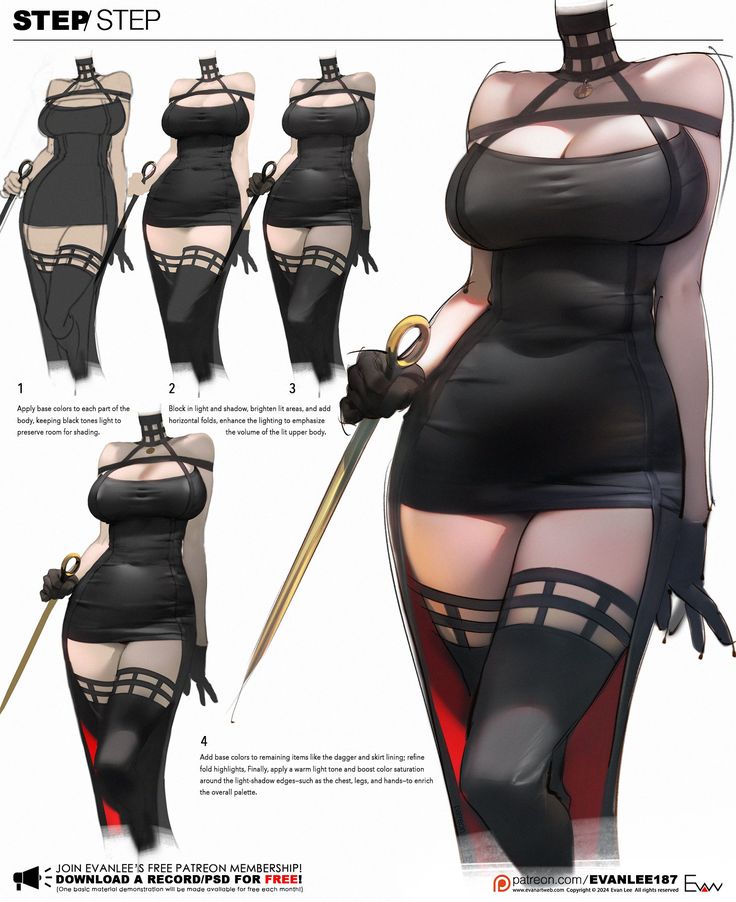
In the realm of digital character illustration and concept art, rendering shiny, form-fitting materials like latex, leather, or vinyl on a curvaceous female figure requires a keen understanding of light behavior, volume enhancement, and subtle color variations to achieve a realistic, high-gloss finish. This professional tutorial is inspired by a detailed step-by-step reference image from artist EvanLee187 (available on Patreon as EvanLee187), titled “STEP STEP,” which demonstrates the painting process for a headless female torso clad in a provocative black mini-dress with strappy halter top, thigh-high stockings with grid patterns, gloves, and a held dagger. The artwork emphasizes a stylized, anime-influenced aesthetic with exaggerated curves, dramatic lighting, and a dark, seductive theme. The reference is laid out in a horizontal progression of four stages, followed by a finalized render and close-up details on the skirt slit, thigh highs, and hand accessories, showcasing the evolution from base colors to polished highlights and accents.
This guide is perfect for intermediate to advanced digital artists using software like Clip Studio Paint, Photoshop, or Procreate, where layers, blending modes, and brush tools (e.g., soft airbrushes for gradients, hard-edged brushes for details) are essential. We’ll break it down into the four core steps from the reference, incorporating anatomical considerations for the female form (e.g., emphasizing bust, hips, and thighs), lighting principles (top-down directional light for dramatic shadows), and material properties (high reflectivity for black fabric). Additional sections cover preparation, common pitfalls, and extensions for full-body integration. Aim for a non-destructive workflow: use separate layers for base, shadows, highlights, and colors to allow easy adjustments. Practice on a pre-sketched line art of a similar pose—standing with weight shifted to one hip, arm extended holding an accessory—to replicate the dynamic tension in the fabric. By the end, you’ll be equipped to create compelling, glossy attire renders suitable for fantasy art, pin-up illustrations, or game character designs.
Preparation: Setting Up Your Canvas and Base Sketch
Before diving into the steps, prepare your digital canvas to mirror the reference’s setup. Start with a high-resolution file (e.g., 3000×4000 pixels at 300 DPI) in RGB mode for vibrant colors.
- Line Art Foundation: Import or draw a clean outline of the female figure in a three-quarter view, focusing on exaggerated proportions: ample bust (emphasizing cleavage with halter straps), narrow waist, wide hips, and toned thighs. Include accessories like the choker, grid-patterned thigh highs (with horizontal bands), long gloves, and a slender dagger with a gold hilt. The reference omits the head to concentrate on body rendering, but you can add a placeholder neckline for context.
- Color Palette Selection: Establish a limited palette dominated by blacks and grays for the dress—deep charcoal (#1A1A1A) for bases, mid-grays (#4D4D4D) for shadows, and near-whites (#E6E6E6) for highlights. Add accents: red (#B22222) for skirt lining, gold (#DAA520) for dagger hilt, and skin tones (#FFDAB9 base, with rosy highlights). Use a color wheel for harmony; the reference employs warm undertones to boost saturation in finals.
- Layer Organization: Create layers: “Base Color” (clipped to line art), “Shadows,” “Highlights,” “Details/Accents,” and “Overlays” (for glows or saturation boosts). Set blending modes—Multiply for shadows, Screen or Overlay for highlights—to enhance realism.
- Lighting Reference: Assume a strong top-left light source, as in the image, casting long shadows down the body and emphasizing curves. Use a reference photo of shiny fabric under similar lighting to guide your observations.
This setup ensures a structured approach, preventing muddy colors or lost details during rendering.
Step 1: Applying Base Colors and Preserving Shading Room
The first stage in the reference shows a flat-colored figure with uniform black on the dress, gloves, and stockings, keeping certain areas lighter to allow for layered shading.
- Base Color Application: Fill the dress, gloves, and thigh highs with a solid mid-tone black or dark gray on your base layer. The annotation reads: “Apply base color to each part of the body, keeping black lights to preserve room for shading.” Use a hard brush or bucket tool for clean edges, ensuring the halter straps and grid bands remain distinct. For skin-exposed areas (e.g., cleavage, midriff tease, thighs between bands), apply a neutral skin base, slightly desaturated to contrast the black.
- Preserving Highlights: Intentionally lighten potential highlight zones—e.g., the bust’s upper curves, thigh highs’ tops, and glove elbows—by 10-20% value. This “preserves room” for additive lighting later, avoiding over-darkening.
- Initial Form Blocking: Lightly sketch in basic forms: round the bust as soft spheres, taper the waist, and curve the hips outward. The reference’s figure holds a relaxed pose with one arm akimbo, so ensure fabric clings tightly to accentuate anatomy.
Tips for Success: Work at 50-70% zoom for even coverage. Common error: Flat blacks without variation—add subtle noise or texture (e.g., via a scatter brush) for material interest. Exercise: Render just the base on three body types (slender, athletic, curvy) to see how fabric adapts.
This step establishes a neutral canvas, ready for depth-building.
Step 2: Blocking in Light and Shadow for Volume
The second image adds basic shading, brightening key areas to define the upper body’s form.
- Shadow and Light Blocking: On a Multiply layer, use a soft airbrush to add shadows along the undersides: under the bust, along the waist crease, inner thighs, and glove folds. The note states: “Block in light and shadow. Brighten areas, add horizontal folds, enhance the lighting to emphasize the volume of the upper body.” Switch to a Screen layer for highlights on protruding areas like bust tops, shoulder straps, and thigh curves.
- Volume Enhancement: Emphasize the upper body’s curves by graduating light from bright (exposed to source) to dark (recessed). Horizontal folds on the dress suggest subtle wrinkles at the hips, drawn as soft lines then blended.
- Material Reflectivity: For shiny black, add specular highlights—small, sharp white dots where light hits directly (e.g., bust edge, dagger blade if present early).
Application Notes: Clip layers to the base for containment. Avoid over-blending; keep edges crisp for latex sheen. Exercise: Isolate the upper body and experiment with light directions (top vs. side) to alter mood.
Step 3: Refining Lighting and Adding Details
The third stage refines the render, introducing the dagger and enhancing overall polish.
- Lighting Refinement: Build on Step 2 by intensifying highlights and deepening shadows. The reference shows smoother gradients, with light wrapping around forms for 3D illusion. Add rim lighting along the silhouette for separation from the background.
- Detail Integration: Introduce the dagger in the hand, with basic gold on the hilt. Refine strap details on the halter and thigh highs, ensuring shadows follow their geometry.
- Pose and Anatomy Check: Adjust for the figure’s contrapposto—shadows longer on the weighted leg, highlights emphasizing the extended arm’s tension.
Advanced Tip: Use Overlay mode for color dodging to warm highlights subtly. Pitfall: Uneven volume—use value check (grayscale mode) to balance.
Step 4: Adding Final Colors, Refinements, and Saturation Boost
The final progression adds vibrant accents and polishes the piece.
- Color Additions and Refinements: On a new layer, paint red lining in the skirt slit, gold on the dagger, and subtle hues to remaining items. The annotation: “Add base colors to remaining items like the dagger and skirt lining; refine fold highlights. Finally, apply a warm light tone and boost color saturation around the light edges—such as the chest, legs, and hands—to enrich the overall palette.”
- Fold and Edge Detailing: Refine horizontal folds with high-contrast highlights, making them appear creased yet smooth. Boost saturation selectively: warmer reds/oranges on edges for glow.
- Final Polish: Add hand details (glove wrinkles), thigh high sheen, and overall sharpening. The close-ups in the reference highlight the slit skirt’s red interior, thigh bands’ transparency, and dagger’s metallic gleam.
Exercise for Mastery: Replicate the full process timed (1 hour), then vary materials (e.g., matte fabric).
Additional Professional Advice and Extensions
- Tools and Brushes: Soft round for blending, textured for fabric; opacity 20-50% for gradients.
- Common Challenges: Shiny materials can look plastic—study references like latex photos under lights. For diversity, adapt to different skin tones or body types.
- Extensions: Integrate a head (e.g., stern expression to match the dagger’s menace) or full scene (dark background for contrast). Explore variations: add environmental lighting or motion blur for action.
- Ethical Notes: When rendering stylized figures, promote body positivity by varying proportions in your portfolio.
This tutorial, drawing from EvanLee187’s expert process, will elevate your digital rendering skills, producing glossy, captivating attire that draws the eye. Join communities like Patreon for more resources, and share your renditions for feedback!


