Step-by-Step Tutorial on Drawing Vases, Bottles, and Jars: Geometric Construction, Proportions, and Shading Techniques for Realistic Forms

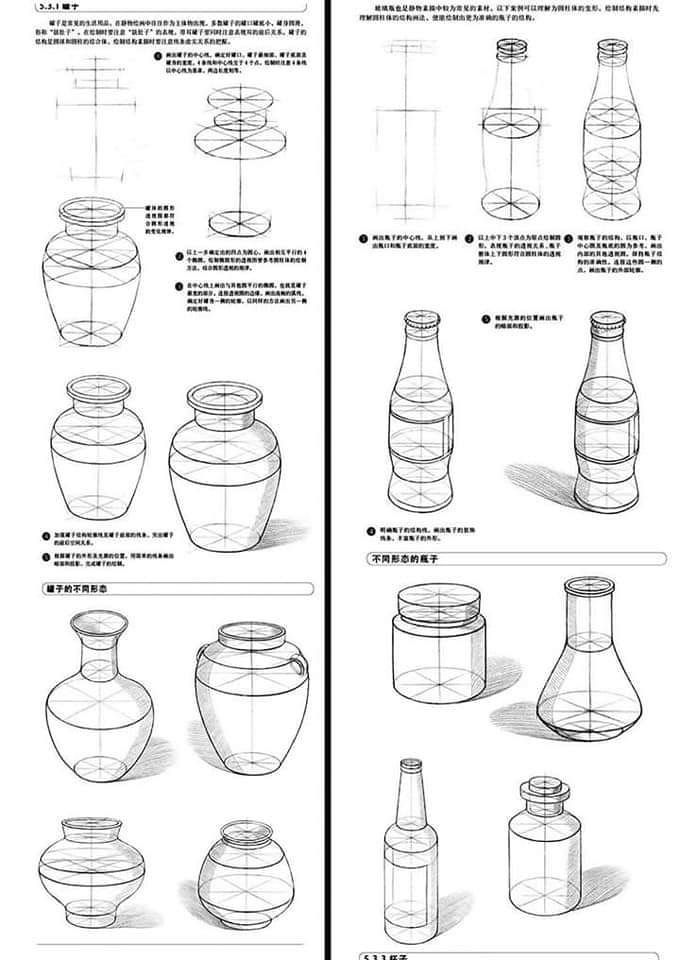
In the field of still life drawing and object rendering, mastering the depiction of everyday vessels like vases, bottles, and jars is crucial for developing skills in perspective, proportion, and volume. This comprehensive tutorial is based on a detailed reference illustration from a Chinese art instructional page (likely from a book or online resource, with annotations in simplified Chinese), which demonstrates systematic approaches to constructing symmetrical, three-dimensional forms using basic geometric shapes such as circles, ellipses, cylinders, and axes. The image is laid out in a vertical two-column format: the left column focuses on rounded vases and pots with progressive complexity, while the right column emphasizes elongated bottles and laboratory-style flasks, incorporating shading for depth. Each example includes construction lines (e.g., center axes, horizontal guidelines, and elliptical cross-sections) to guide the building process from rough sketches to refined, shaded finals.
Ideal for beginner to advanced artists working in pencil, ink, or digital software like Adobe Illustrator or Affinity Designer, this guide breaks down the reference into sequential steps. We’ll explore techniques for achieving symmetry, handling foreshortening in curved surfaces, and applying subtle shading to suggest material qualities like glass or ceramic. Key principles include using a central vertical axis for balance, dividing forms into segments for accurate proportions, and observing how light interacts with contours. By practicing these methods, you’ll gain the ability to draw realistic objects from observation or imagination, applicable to still life compositions, product design sketches, or illustrative work. Always start with light, erasable lines to allow for adjustments, and use references like real objects under controlled lighting to verify your drawings.
Section 1: Understanding Basic Geometric Construction for Symmetrical Forms (Top-Left and Top-Right Examples)
The upper sections of the reference introduce foundational techniques, using simple vases and bottles to illustrate how to build forms from primitives. Annotations emphasize maintaining proportionality through measured divisions and elliptical guidelines, which represent cross-sections at different heights.
- Initial Axis and Outline Setup: For any vessel, begin with a vertical centerline (as shown in the top-left simple vase and top-right bottle sketches). This axis ensures symmetry—draw it lightly down the middle of your page. Add horizontal lines at key points: one for the base, one for the widest point (belly), one for the neck, and one for the rim. In the left example, a basic pot starts as stacked circles: a large bottom circle for the base, a wider middle ellipse for the body, and a smaller top circle for the opening. The Chinese text notes “使用中心轴线” (use central axis) and “椭圆辅助” (ellipse assistance) to connect these smoothly.
- Refining Contours and Proportions: Connect the guidelines with curved lines, mirroring on both sides of the axis. For the vase on the left, taper the neck inward using subtle curves; annotations like “比例均匀” (even proportions) remind you to measure distances—e.g., the body height should be 1.5-2 times the neck. On the right, the bottle’s elongated form uses a taller cylinder base with a conical neck; draw ellipses that widen slightly at the shoulder for realism.
- Practical Application and Tips: Sketch 3-5 variations, rotating the object mentally for different views. Common error: Uneven sides—use a mirror or flip your drawing digitally to check symmetry. Exercise: Draw a real vase from life, overlaying construction lines. This builds intuition for volumetric forms, preventing flat appearances.
These basics apply to all subsequent examples, forming the core of rotational symmetry in object drawing.
Section 2: Building Complex Vases with Multi-Segment Bodies (Middle-Left Examples)
The middle-left portion advances to more intricate vases, showing how to layer segments for organic shapes like amphora-style pots. Shading is introduced lightly to indicate volume.
- Segmented Construction: Divide the form into parts: base, body, shoulder, neck, and rim. The first middle-left vase uses multiple horizontal ellipses stacked along the axis—e.g., a bulbous bottom (wide ellipse), narrowing waist (smaller ellipse), and flaring neck (inverted cone). Annotations such as “分段构建” (segmented building) and “曲线连接” (curve connection) guide blending these into a seamless silhouette.
- Adding Details and Foreshortening: For the wider pot below, incorporate handles or lips by sketching small circles at attachment points. If viewing from an angle (though the reference is frontal), adjust ellipses to ovals for perspective—wider at the front, compressed at the back. The text highlights “注意阴影” (pay attention to shadows), suggesting cross-hatching at the base for grounding.
- Shading for Depth: Apply gradient shading from dark (underside) to light (highlights), using the object’s curves to guide value changes. Tip: For glass-like materials, leave white highlights along edges. Avoid mistake: Over-rendering early—build form first, shade last. Exercise: Render the same vase in three lighting setups (side, top, diffuse) to practice tonal variation.
This section is key for drawing antique or decorative vessels, enhancing your ability to handle irregular curves.
Section 3: Drawing Elongated Bottles and Flasks with Perspective and Shadows (Middle-Right and Bottom-Right Examples)
The right column specializes in slim, vertical forms like soda bottles and Erlenmeyer flasks, emphasizing transparency and cast shadows for realism.
- Cylindrical and Conical Combinations: Start with the top-right bottle: a long cylinder for the body, topped by a smaller cylinder neck and cap. Use ellipses at top and bottom for roundness; the reference notes “圆柱体基础” (cylindrical base) and “锥形过渡” (conical transition) for smooth shoulder curves. For the flask below, add a triangular taper at the base—draw guidelines sloping inward.
- Incorporating Transparency and Reflections: In glass bottles, imply thickness with inner contours parallel to the outer (as in the shaded examples). Annotations like “透明材质表现” (transparent material expression) suggest subtle internal lines for liquid levels or refractions. Add cast shadows: elliptical ovals beneath, elongated based on light direction.
- Advanced Perspective Adjustments: For the bottom-right jars and bottles, practice slight tilts—foreshorten the top ellipse if viewed from above. Exercise: Draw a bottle lying on its side, adapting vertical axes to horizontal. Common pitfall: Ignoring thickness—thin lines make objects look flat; double them for volume.
These techniques are invaluable for scientific illustrations or product packaging designs, where precision is paramount.
Section 4: Rounded Jars and Pots with Bulbous Forms (Bottom-Left Examples)
The lower-left focuses on squat, bulbous shapes, contrasting the taller forms above and reinforcing variation in proportions.
- Bulbous Body Construction: The left-bottom vase uses a large central sphere intersected by ellipses; connect with flowing curves for a swollen appearance. Text advises “球形辅助” (spherical assistance) for the belly, ensuring the base is stable and wider than the neck.
- Compact Proportions and Detailing: For the smallest pot, compress heights—body only 1-1.5 times the base width. Add rims or lids as flat ellipses. Shading emphasizes roundness: darker at the sides, lighter at the center.
- Integration with Composition: Group multiple jars in a still life; use overlapping to suggest depth. Tip: Vary line weights—thicker for foreground, thinner for receding areas.
Additional Professional Tips for Mastery
- Tools and Materials: Use 2H pencils for construction, HB-2B for contours, and 4B for shading on smooth cartridge paper. Digitally, employ vector shapes for perfect ellipses.
- Common Challenges and Solutions: If forms warp, use grids or rulers for axes. For shading glass, study photos under natural light.
- Exercises and Resources: Daily sketch 2-3 objects, timing for 10 minutes each. Reference books like “Drawing on the Right Side of the Brain” by Betty Edwards or Chinese art texts (e.g., translations of “素描基础” or basic sketching fundamentals).
- Variations and Extensions: Adapt for colored media—add tints for ceramic glazes—or stylize for cartooning by exaggerating curves.
This tutorial demystifies complex forms by reducing them to geometrics, empowering you to tackle any vessel with confidence. Practice consistently, and soon you’ll create compelling still lifes that capture light and texture flawlessly. For more on perspective or composition, check our related guides!