Comprehensive Tutorial on Drawing the Human Body: Anatomy, Proportions, Gender Differences, and Dynamic Poses for Aspiring Artists

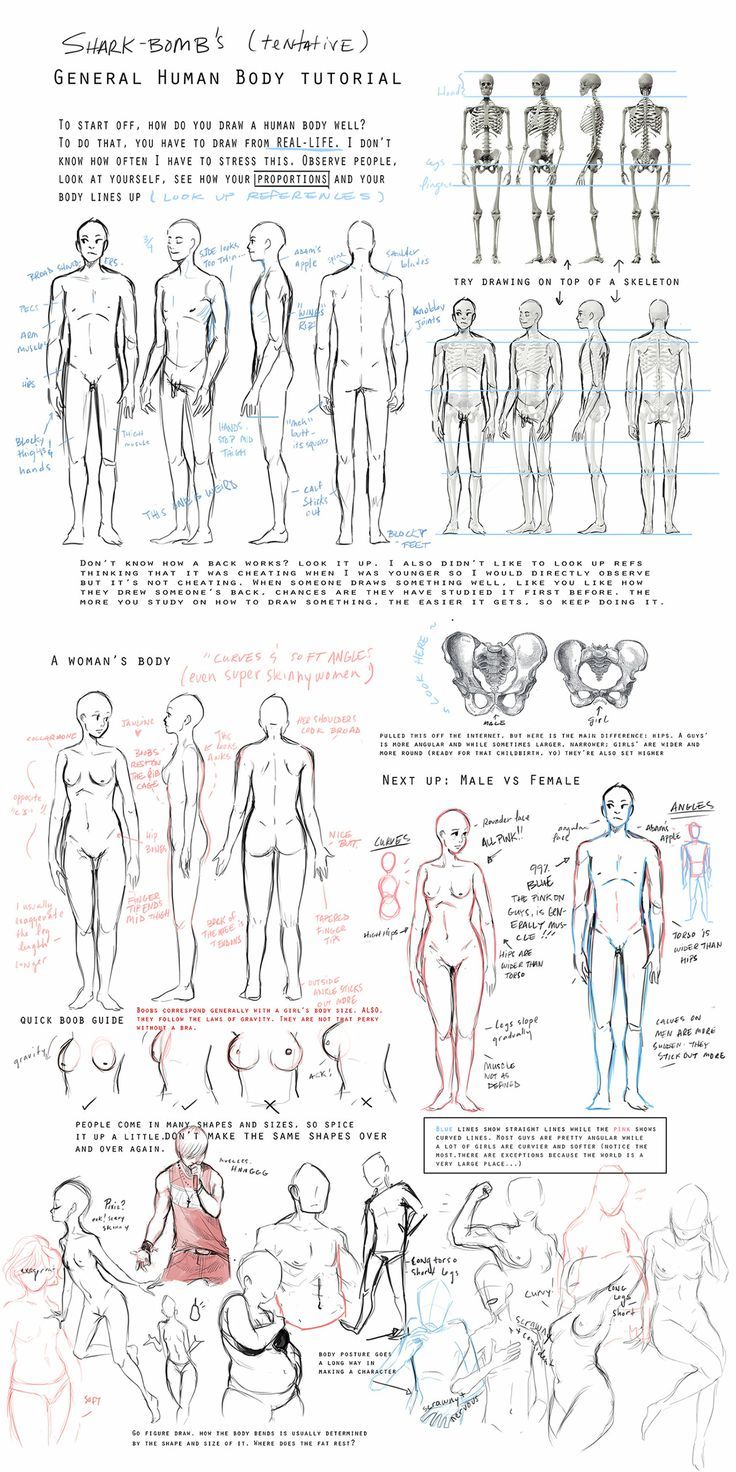
Drawing the human body is one of the most rewarding yet challenging aspects of visual art, requiring a deep understanding of anatomy, proportions, and variation to capture lifelike forms and movements. This in-depth tutorial is inspired by a detailed reference sheet titled “Shark-Bomb’s (Tentative) General Human Body Tutorial,” which presents a hand-drawn, annotated guide in a vertical layout. The image combines skeletal diagrams, simplified figure constructions, gender-specific breakdowns, and diverse body types, all rendered in pencil with red accents for emphasis. It emphasizes observational drawing, reference use, and iterative practice, making it an excellent resource for beginners and intermediate artists in fields like illustration, animation, or concept art. The tutorial is divided into top-to-bottom sections mirroring the reference: starting with skeletal foundations and basic male figures, moving to female anatomy and gender comparisons, and concluding with body variations and posing tips.
Whether you’re sketching traditionally with graphite on sketchbook paper or digitally using tools like Krita or Autodesk SketchBook, this guide provides step-by-step instructions to replicate and expand on the reference. We’ll cover key techniques such as gesture lines, proportional measurements (e.g., using head units for body height), and avoiding common pitfalls like stiff poses or inaccurate fat distribution. By the end, you’ll have the tools to create diverse, anatomically sound figures suitable for character design, storyboarding, or fine art. Practice with live models, photos, or mirrors to internalize these concepts, and remember: observation trumps memorization—always “look up references” as the sheet advises.
Section 1: Building from the Skeleton – Foundations of Human Proportions (Top Section)
The upper portion of the reference sheet focuses on the skeletal structure as the blueprint for any figure drawing, stressing the importance of understanding bones before adding flesh. It features rows of skeletons in front, side, and back views, alongside simplified male figures with labels for major muscle groups and proportions.
- Skeletal Breakdown and Proportions: Begin by drawing a basic skeleton to establish posture and scale. The human body is typically 7-8 head heights tall for adults (as noted with arrows indicating “Try Drawing on Top of a Skeleton”). Divide the figure vertically: 1 head for the skull, 2-3 for the torso (ribs to pelvis), 4 for the pubic bone, 5-6 for thighs, and 7-8 for lower legs and feet. In side views, account for the S-curve of the spine for natural stance. Labels like “Angled” highlight how bones tilt—e.g., the femur angles inward from the hips.
- Overlaying Muscles on Bones: Transition to fleshed figures by adding basic shapes: ovals for the ribcage and pelvis, cylinders for limbs. The reference shows male figures with annotations such as “Broad Shoulders,” “Narrow Hips,” and “Blocky” forms. Use light construction lines to map major muscles like the deltoids (shoulders), pectorals (chest), and quadriceps (thighs). For back views, emphasize the trapezius and latissimus dorsi with curved lines.
- Practical Tips and Exercises: Sketch a skeleton grid (front, side, back) and overlay simplified bodies. Common mistake: Ignoring weight distribution—ensure feet align under the center of gravity. Exercise: Time yourself for 2-minute gestures over skeletons to build speed. Reference advice: “Don’t know how a back works? Look it up!”—use anatomy books like “Atlas of Human Anatomy” by Frank Netter for accuracy.
This section lays the groundwork, preventing distorted figures by rooting your drawings in real anatomy.
Section 2: Drawing the Female Body – Curves, Angles, and Soft Forms (Middle-Upper Section)
Shifting focus to female anatomy, the reference contrasts softer, curvier forms with male structures, including pelvic diagrams and full-body views. Red annotations like “Curves & Soft Angles (Even Super Skinny Women)” guide the construction.
- Female Proportions and Key Differences: Female figures often measure 7.5-8 heads tall, with wider hips relative to shoulders (pelvis diagram shows a broader, more rounded structure). Start with the head, then draw the ribcage as a tapered egg shape. Hips are labeled “Wider and More Angular than for Children,” with the waist dipping inward for an hourglass silhouette. Back views emphasize the gluteus muscles as rounded forms.
- Incorporating Curves and Angles: Use flowing S-curves for the spine and limbs to convey femininity—avoid straight lines. The sheet notes “The Main Difference: Hips. Guys’ Are Narrower; Girls’ Are Wider and More Round/Angular.” Add breasts as teardrop shapes following gravity, positioned between the second and third head units.
- Application and Variations: Draw side-by-side comparisons with male figures. Tip: For diverse body types, adjust hip-to-shoulder ratios (e.g., pear-shaped vs. athletic). Error to avoid: Over-exaggerating curves, leading to unnatural poses—study real-life references. Exercise: Sketch 3 female poses from different angles, focusing on pelvic tilt.
This builds on skeletal knowledge, highlighting how gender influences form without stereotyping.
Section 3: Male vs. Female Comparisons and Specialized Guides (Middle Section)
A direct side-by-side analysis clarifies gender dimorphism, followed by a “Quick Boob Guide” for realistic breast rendering.
- Gender Comparison Breakdown: Male figures are depicted as “Angular, Blocky” with broader shoulders and narrower hips, while females are “Curvy, Soft” with emphasized waist and hips. Use construction lines: males with straight, V-shaped torsos; females with hourglass contours. Annotations like “Guys: Usually Taller, Broader Shoulders” provide ratios—male shoulders 1.5-2 times hip width, female hips 1.2-1.5 times shoulders.
- Quick Boob Guide: This subsection illustrates breast variations in shape, size, and angle. Draw them as spheres influenced by gravity: “They Follow the Law of Gravity. They Are Not That Perky.” Show profiles (e.g., teardrop for natural sag) and front views with cleavage lines. Include dos and don’ts: avoid perfectly round shapes unless stylized.
- Integration Tips: Combine with full bodies—e.g., a female figure with “Nice Butt” curves. Practice shading to add volume, using hatching for soft transitions. Common pitfall: Static symmetry—add subtle asymmetries for realism.
Section 4: Diversity in Body Types and Dynamic Poses (Lower Section)
The bottom of the sheet celebrates variation with sketches of different shapes, sizes, and poses, emphasizing that “People Come in Many Shapes and Sizes. So Spice It Up a Little.”
- Body Type Variations: Illustrations range from slender to curvy, muscular to soft, with labels like “Chubby,” “Muscular,” and “Skinny.” Fat distribution notes: “Go Figure Draw. How the Body Bends Is Usually Determined by the Shape and Size of Fat. Where Does the Fat Rest?” Use blue lines for “Straight Lines Show While the Pink Shows Curved or Softer Sections.”
- Posing and Gesture: Dynamic sketches show bending, twisting, and weight shifts—e.g., a figure leaning with “Body Posture Goes a Long Way in Making a Character.” Start with action lines (curved for flow), then build forms around them.
- Exercises for Mastery: Draw 10 quick poses varying body types. Tip: Use mirrors or pose apps like Magic Poser. Avoid error: Uniform fat—distribute realistically (e.g., more on abdomen for some types).
Additional Professional Advice and Resources
- Tools and Materials: HB pencils for outlines, softer grades (2B-4B) for shading; digitally, use pose references in 3D software like Blender.
- Advanced Topics: Extend to clothed figures or ethnic variations by layering over these bases.
- Practice Regimen: Daily 30-minute sessions observing people or using sites like Line of Action for timed poses.
- Ethical Notes: When using references, respect privacy and diversity—avoid objectification.
This tutorial transforms the reference sheet into a practical roadmap for human figure drawing. With dedication, you’ll progress from rigid sketches to fluid, expressive art. If you’d like expansions on specific areas like hands or clothing, explore our related tutorials!