Shozart Method: How to Draw the Human Head from ANY Angle – Complete Step-by-Step Perspective Tutorial

Mastering the human head from every conceivable angle—extreme foreshortening, dramatic upshots, downturned views, and dynamic three-quarter poses—is one of the most valuable skills an artist can develop. This powerful, modern approach, popularized by artist Shozart (widely shared across drawing communities), combines the classic sphere + box construction with clear perspective rules to make even the most challenging head angles feel logical and approachable.
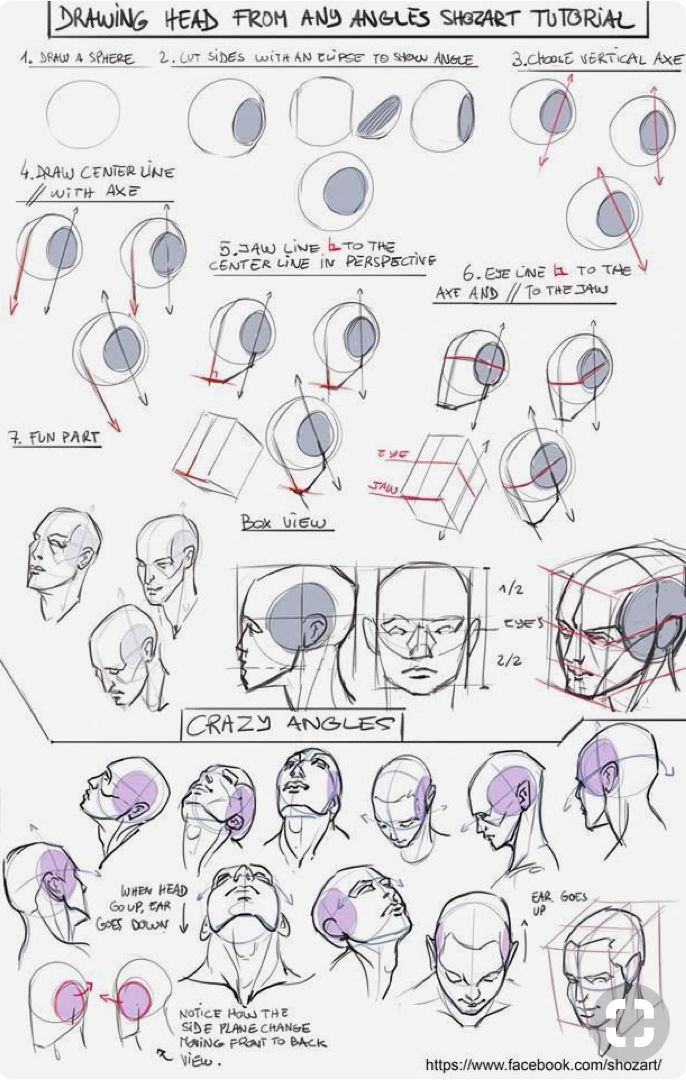
The method treats the head as a sphere with sliced planes (to show tilt and rotation) + a vertical central axis that controls direction + a simplified box for the jaw and facial mass. By following these precise steps, you’ll be able to construct accurate heads consistently, no matter how extreme the viewpoint.
Materials Recommended
- Pencil (HB or 2B for light construction, 4B–6B for final lines)
- Eraser (kneaded for subtle corrections)
- Straightedge (optional for initial axis lines)
- Sketch paper or toned paper for practice
Core Shozart Construction Steps
Step 1 – Start with a Perfect Sphere Draw a clean circle. This represents the cranium—the round upper portion of the skull that remains relatively constant regardless of angle.
Step 2 – Slice the Sides to Show the Angle (Tilt) Cut vertical slices off both sides of the sphere using curved or straight lines. These cuts visually indicate how much the head is tilting left/right (yaw) or tipping forward/backward (pitch). The more extreme the slice, the stronger the angle. Think of it as carving a 3D form out of the sphere.
Step 3 – Choose & Draw the Vertical Central Axis This is the most important line in the entire method.
- It runs through the center of the face (from the top of the head through the nose, chin, and neck).
- The axis shows the direction the head is facing (left, right, up, down).
- Keep this line straight and bold—it acts as your unchanging reference no matter how crazy the angle becomes.
Step 4 – Draw the Center Line Parallel to the Axis Add the facial center line (the line that divides the face symmetrically). This line must stay parallel to the vertical axis you chose in Step 3. It curves slightly with perspective but never breaks parallelism with the axis.
Step 5 – Establish the Jaw Line Draw the jaw line parallel to the center line in perspective. The jaw plane sits lower than the cranium and angles outward. This creates the characteristic wedge shape of the lower face.
Step 6 – Place the Eye Line The eye line (horizontal through the eyes) must be:
- Parallel to the jaw line
- Parallel to the horizontal axis of the head (perpendicular to the vertical axis) This ensures correct foreshortening and alignment across extreme angles.
Step 7 – The “Fun Part”: Turn the Sphere into a Box + Add Features Now transform the sliced sphere into a three-dimensional box:
- The top plane = forehead/cranium
- The front plane = face
- The bottom plane = jaw/chin
- Side planes = cheeks and temples Add the basic features using the established guides:
- Eyes sit on the eye line (halfway down the head in most adults)
- Nose bridge aligns with the center line
- Mouth sits roughly halfway between nose base and chin
- Ears align horizontally with the eye line and nose base From here, refine into a full portrait, adding hair, neck, expression, etc.
Special Focus: Crazy Angles & Extreme Perspectives
The real power of the Shozart method shines in dramatic views:
- Looking straight up (worm’s-eye): Jaw becomes huge, eyes small, forehead foreshortened. The vertical axis tilts strongly upward.
- Looking straight down (bird’s-eye): Forehead dominates, jaw recedes, eyes appear lower on the face.
- Side planes shift dramatically: Notice how the side of the head (cheek/temple plane) moves forward/back depending on tilt.
- Ear position rule: When the head tilts up, ears move down relative to the face. When head tilts down, ears move up.
- Purple shading in the reference illustrates these shifting planes beautifully—use it as a visual reminder that the face is not flat.
Key Principles & Pro Tips
- Always maintain parallelism: Center line || vertical axis, eye line || jaw line.
- Use the box mindset: Even in organic portraits, imagine the head as a transparent box to check perspective.
- Practice the sequence daily: 10 quick heads from random angles (use a dice or angle reference photos).
- Start loose: Keep early steps light and gestural—refine only at the end.
- Common mistake to avoid: Forcing features to stay level with the paper instead of following the axis and planes.
This method, shared widely through Shozart’s tutorials and beloved in drawing communities, gives you the structural freedom to draw heads in motion, emotion, and extreme perspective without losing proportion or believability.
Challenge yourself: Pick 5 wildly different angles (looking up, down, 3/4 upshot, profile with neck twist, extreme foreshortening) and construct them using these exact steps. Within weeks, heads from any angle will become second nature.
Master the Shozart method, and the entire human figure—and portraiture—opens up to you. Draw fearlessly from every viewpoint!
Happy drawing! ✏️ (With thanks to Shozart for this clear, powerful system)


