Ultimate Beginner’s Guide to Essential Watercolor Tools: Brushes, Paper, Paints & Must-Have Accessories (Illustrated Tutorial)

Watercolor is a beautiful yet unforgiving medium—its transparency, fluidity, and luminosity reward thoughtful preparation and the right tools. This comprehensive, hand-illustrated guide (originally shared by talented watercolor artist @emilymarieewatercolors) breaks down everything a beginner (and even intermediate painter) needs to start strong and avoid common frustrations.
From choosing the correct brush shapes to understanding paper weight and surface texture, to mastering water control and protecting white areas, this tutorial covers the foundational tools that make the difference between muddy results and vibrant, confident paintings.
1. Brushes – The Heart of Watercolor Control
Your brush is your most important tool. Invest in quality synthetic or natural/synthetic blends that hold a sharp point when wet and release color smoothly.
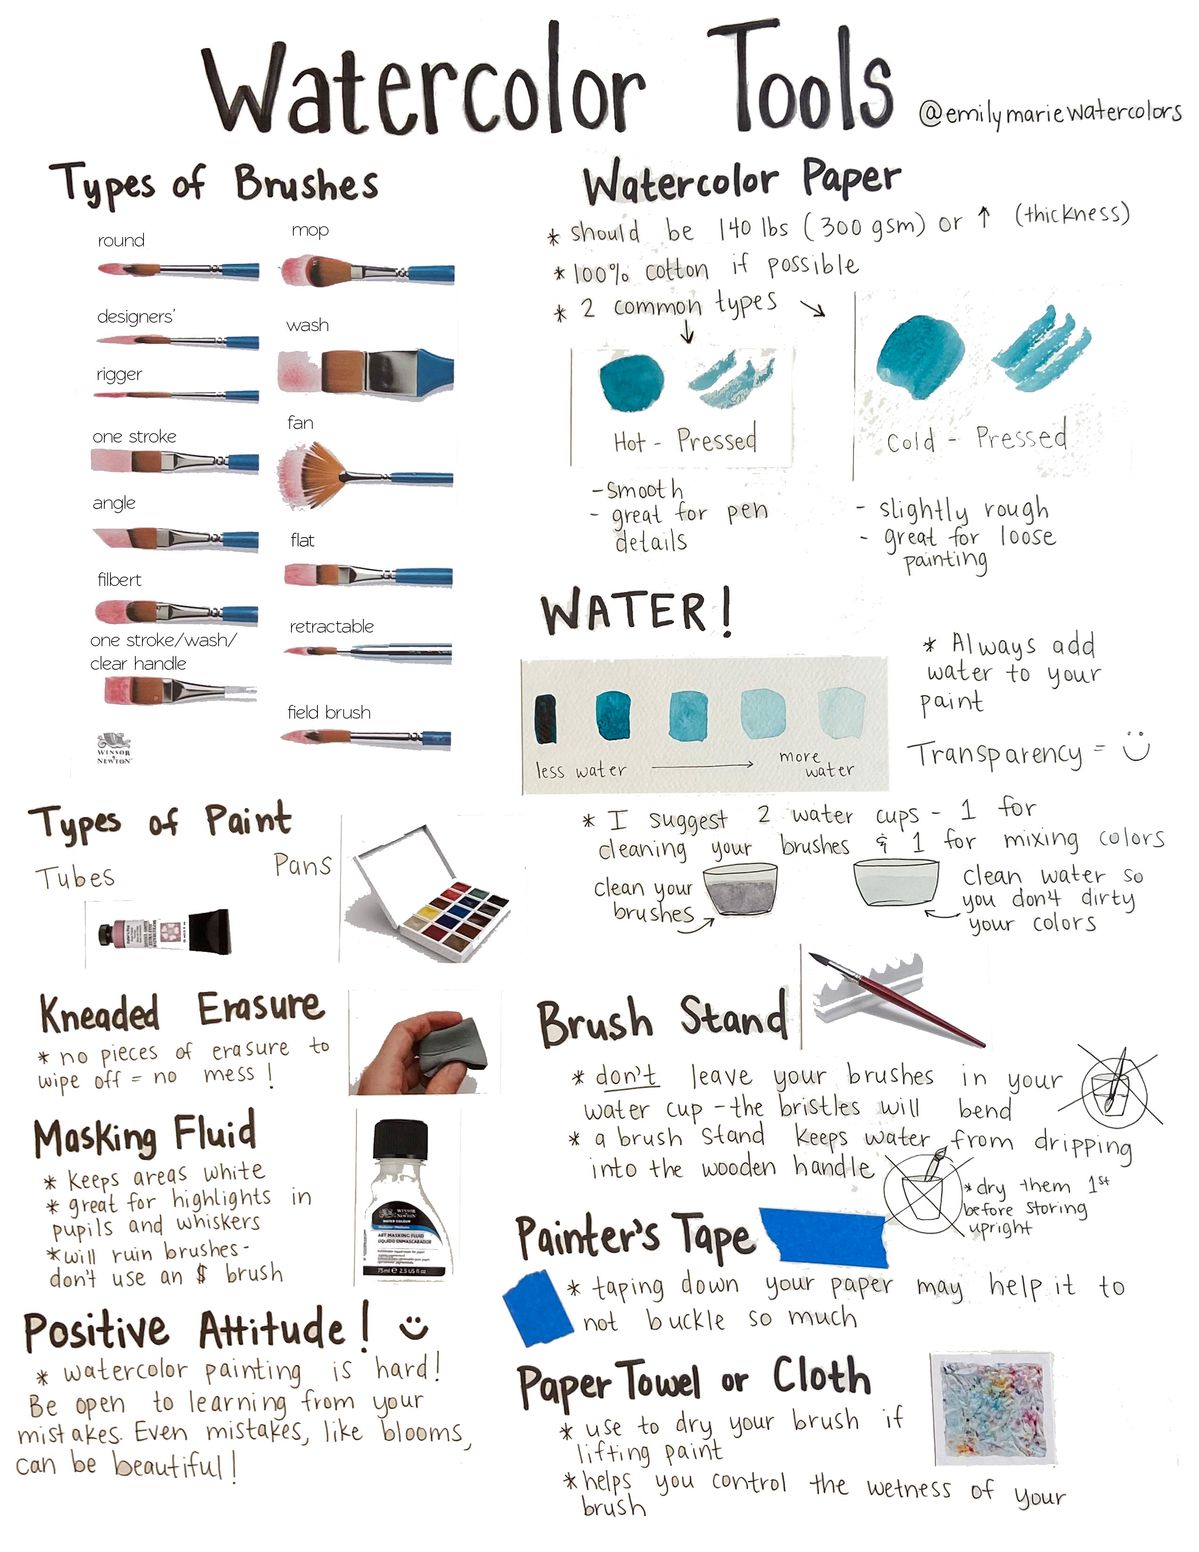
Key Brush Types & Their Uses (with illustrated examples):
- Round – The workhorse brush. Excellent for fine details, lines, and varied strokes (thin to thick).
- Mop – Large, fluffy brush for big, soft washes and wetting large areas quickly.
- Wash – Flat, wide brush perfect for broad, even sky or background washes.
- Rigger (also called liner/script) – Long, thin bristles for crisp, flowing lines (great for branches, hair, text).
- One-Stroke / Flat – Square-edged for clean edges, petals, leaves, and architectural details.
- Angle / Dagger – Angled tip for precise strokes and foliage.
- Filbert – Oval flat brush; soft edges for blending and organic shapes.
- Fan – Spread bristles for texture (grass, fur, tree foliage).
- Designers’ / Quill – Extra-pointy rounds for ultra-fine detail work.
- Field Brush – Retractable travel brush with clear handle (perfect for plein air).
- Whiskers – Special brush for lifting and softening edges.
Pro Tip: Never leave brushes standing bristle-down in water—it permanently bends the hairs. Use a brush stand or lay them flat to dry.
2. Watercolor Paper – The Single Most Important Surface
Paper quality directly affects how paint flows, lifts, and layers.
Essential Requirements:
- Weight: Minimum 140 lb (300 gsm) — anything lighter will buckle and warp excessively.
- Material: 100% cotton rag paper is the gold standard (superior absorbency, longevity, and lifting ability). Cellulose papers are more affordable but less forgiving.
- Two most popular surfaces:
- Hot-Pressed (HP) – Smooth as glass. Ideal for detailed botanical work, pen & ink + watercolor, and fine illustrations.
- Cold-Pressed (CP / NOT) – Slightly textured (“tooth”). The most versatile choice—great for loose, expressive painting and natural granulation.
Recommendation for Beginners: Start with Cold-Pressed 140 lb blocks or pads (blocks are glued on all four sides and resist buckling).
3. Paint – Tubes vs. Pans
Both are excellent; the choice is personal.
- Tubes – Richer, more pigment-dense. Ideal for big washes and mixing large amounts. Squeeze out what you need onto a palette.
- Pans – Convenient, portable, dry quickly. Great for travel and beginners. High-quality brands (Winsor & Newton, Daniel Smith, Schmincke, Sennelier) perform almost as well as tubes when re-wetted.
Water Control is Everything Watercolor’s magic lies in transparency. The more water you add, the lighter and more transparent the color becomes.
Rule of Thumb: Less water → more intense, opaque color More water → delicate, luminous washes
Practical Setup:
- Use two water cups:
- Cup 1: Clean water for wetting brushes and mixing clean colors
- Cup 2: Rinse water (for cleaning brushes between colors)
- Keep rinse water fresh—dirty water muddies your palette.
4. Essential Accessories & Smart Practices
- Kneaded Eraser – Lifts graphite lines without damaging paper. No crumbs!
- Masking Fluid – Preserves pure white highlights (pupils, sparkles, foam). Apply with an old/cheap brush—masking fluid ruins good brushes.
- Painter’s Tape – Tape all four edges of your paper to a board. Prevents buckling and creates crisp white borders.
- Brush Stand – Keeps brushes elevated and drying upright.
- Paper Towel or Soft Cloth – Critical for:
- Wiping excess water from brush
- Lifting paint (creating highlights or softening edges)
- Controlling wetness
- Positive Attitude – Watercolor is challenging! Blooms, back-runs, and “mistakes” often become beautiful effects. Embrace learning from every painting.
Quick Starter Kit Checklist for Beginners
- Cold-Pressed 140 lb (300 gsm) watercolor block or pad (100% cotton preferred)
- Round brushes (sizes 2, 6, 10 or 12)
- One mop or large wash brush
- Small set of quality paints (12–24 half pans or 5–8 tubes)
- Two water cups
- Kneaded eraser
- Masking fluid + cheap brush
- Painter’s tape
- Paper towels
- Brush stand or rest
- Pencil (2H or HB) for light sketching
With these tools and a willingness to experiment, you’ll be ready to create luminous, joyful watercolors. Remember: the medium teaches patience, observation, and courage—every stroke is a step forward.
Happy painting! 🌊✨ (With gratitude to @emilymarieewatercolors for this beautifully illustrated and thoughtful reference guide)