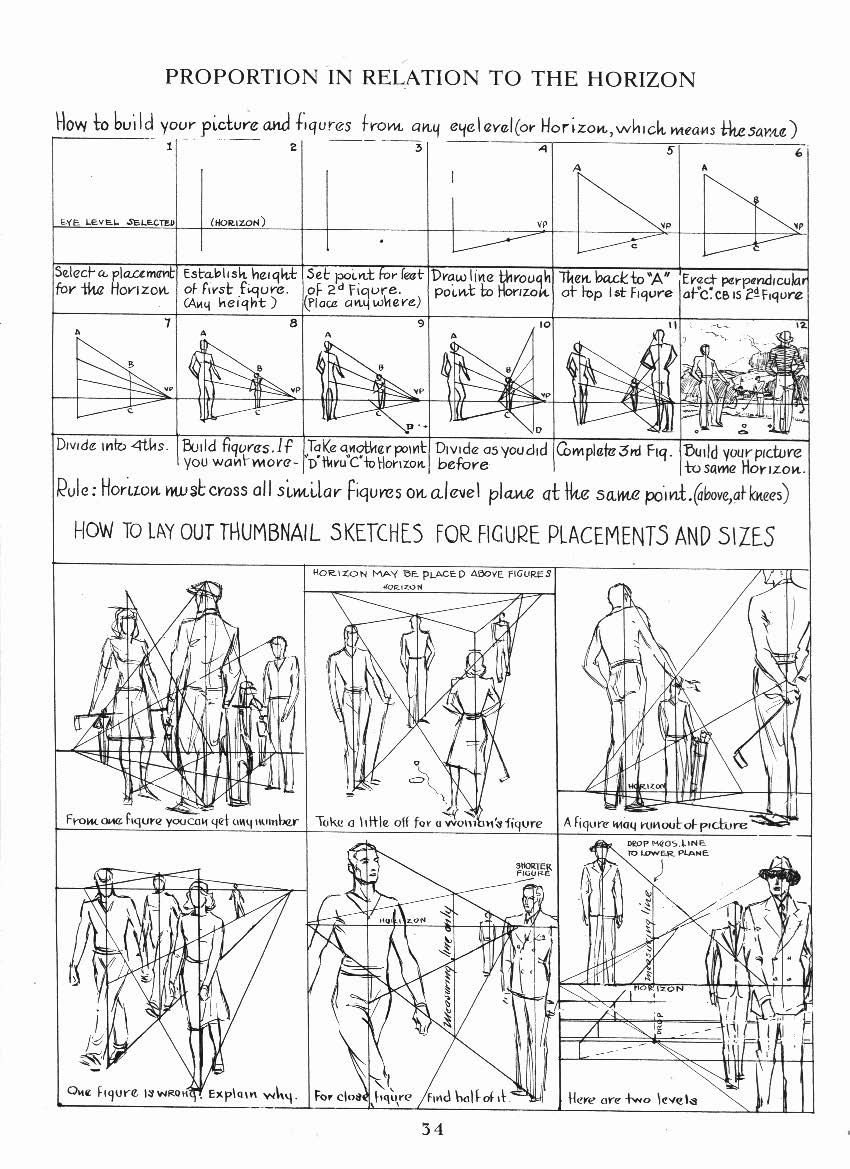
Mastering Figure Proportion & Placement Relative to the Horizon: A Complete Perspective Tutorial for Artists

This comprehensive tutorial explores one of the most essential skills in figure drawing and composition: how to accurately place and scale human figures in relation to any chosen eye level (horizon line). The detailed schematic illustrations demonstrate a precise, step-by-step system for constructing figures of consistent height and correct proportional scale across a scene—whether you’re drawing a single character, a group of people, or an entire crowd in a landscape, cityscape, or interior environment.
The method shown here is a classic technique used by professional illustrators, concept artists, and fine art painters. It ensures that every figure respects the laws of perspective, so figures standing on the same flat ground plane appear naturally taller when closer to the viewer and shorter as they recede toward the horizon. This system eliminates guesswork and produces believable, harmonious compositions every time.
Perfect for beginners learning perspective fundamentals and advanced artists refining complex multi-figure scenes, this tutorial breaks down the exact process illustrated in the diagrams.
Tools & Materials Recommended
- Large sketch paper or sketchbook
- Pencils (HB for construction lines, 2B–6B for figures)
- Straightedge or ruler
- Eraser
- Optional: colored pencils to highlight horizon, vanishing points, and key measuring lines
Core Principle – The Golden Rule
“The horizon line must cross all similar figures standing on the same level ground plane at exactly the same anatomical point (for example, at the knees, waist, or chest).” This single rule guarantees correct relative size and perspective for every figure in your picture, no matter how many you add.
Step-by-Step Construction Method
- Select & Draw Your Horizon Line (Eye Level) Draw a horizontal line across your page—this is your eye level. Place it anywhere: high (bird’s-eye view), low (worm’s-eye view), or at average human eye height. The position of this line determines how dramatic your perspective will be.
- Place Your First Figure – Establish the Master Height Choose where the first figure stands on the ground. Draw a vertical line from the ground up to the horizon—this represents the height of your figure. Mark point A at the top of the head and point C at the ground level. Connect A to a vanishing point (VP) on the horizon. This line represents the receding top edge of all figures.
- Set the Ground Contact Point for the Second Figure Decide where the second figure stands farther back. Place point B on the ground line where the second figure’s feet touch. Draw a line from B up through the vanishing point—this creates the correct height for the second figure. The intersection of this line with the horizon is the same anatomical point (e.g., knees) as on the first figure.
- Complete the Second Figure From the horizon intersection, drop a vertical line down to the ground—this gives you the exact height for the second figure. Connect the top of the head back to the vanishing point to close the figure. Repeat the process for any additional figures.
- Divide the Figure into Proportional Units (Optional for Precision) Divide the first figure’s height into fourths (head, torso, pelvis, legs). Use these divisions to locate key anatomical landmarks consistently across all figures. This is especially helpful when drawing detailed poses or clothing.
- Add More Figures – Scale Any Number Instantly Place new ground points anywhere on the picture plane. Draw lines from each ground point through the vanishing point. Where these lines cross the horizon determines the correct height. You can generate dozens of figures in perfect perspective with just one initial measurement.
- Adjust for Male vs. Female Figures For female figures, subtract a small amount from the total height (slightly shorter than male). The same vanishing-point method still applies—only the master height changes slightly.
- Handle Special Cases
- Figures running out of the picture frame: Continue the measuring lines off the page.
- Figures on different ground levels (stairs, hills): Use separate horizon intersections for each level.
- Close-up figures: Find the halfway point of the figure for accurate foreshortening.
Thumbnail Sketching – Quick Composition Planning
The lower section of the illustrations shows how to use this system for rapid thumbnail layouts:
- Draw the horizon first
- Place a few key figures with simple measuring lines
- Add as many additional figures as needed
- Instantly see correct relative sizes and spacing
- Experiment with crowd density, depth, and focal points before committing to a final drawing
Common Mistakes & How to Fix Them
- One figure looks wrong: Its ground contact point was not connected through the vanishing point—always trace back to the same VP.
- Figures appear floating: The horizon did not cross them at the same anatomical point.
- Crowd looks uneven: You guessed sizes instead of measuring with perspective lines.
- Too many vanishing points: Use only one VP per ground plane for consistent scale.
Practical Applications
- Street scenes with crowds
- Historical battle paintings
- Fantasy armies marching
- Urban concept art with people walking
- Storyboard sequences with multiple characters
- Any composition where accurate depth and scale matter
By mastering this horizon-based measuring system, you’ll never again struggle with “How tall should this person be?” or “Why does my crowd look flat?” The method is fast, reliable, and works in any perspective setup—1-point, 2-point, or even curvilinear.
Practice by recreating the thumbnail examples first, then apply the technique to your own original scenes. Start with 3–5 figures, then challenge yourself to fill an entire page with perfectly scaled people.
Once you internalize this rule, your figure compositions will instantly gain professional depth and believability. What scene will you tackle first with this powerful tool? Share your thumbnails or finished pieces—we’d love to see your progress!
Happy drawing!