Understanding Lens Effects in Perspective Drawing: Wide-Angle vs. Long (Telephoto) Lenses – A Visual Tutorial on Distortion, Foreshortening, and Vanishing Points

Description:
In both traditional illustration and digital concept art, the choice of “camera lens” dramatically shapes how your figures feel in space—whether heroic and grounded or dramatically exaggerated and immersive. This eye-opening comparison by artist miyuli masterfully demonstrates the core differences between wide-angle and long (telephoto) lenses when drawing dynamic human figures in perspective.
Perfect for character designers, comic artists, storyboarders, animators, and anyone who wants their poses to feel cinematic rather than accidentally distorted, this tutorial breaks down exactly why the same pose can look completely different depending on your virtual lens choice. Learn to intentionally control exaggeration, foreshortening, edge distortion, and vanishing-point behavior to match the mood and storytelling purpose of your artwork.
Why Lens Simulation Matters in Drawing
Real cameras (and by extension, our “mental camera” when sketching) alter anatomy and space in predictable ways:
- Wide-angle lenses (short focal length: ~16–35 mm) push foreground elements toward the viewer, stretch edges, and cause strong barrel distortion—ideal for dramatic “in-your-face” shots, heroic low-angle hero poses, or claustrophobic tension.
- Long / telephoto lenses (long focal length: ~85–200 mm+) flatten space, compress depth, reduce edge stretching, and make distant vanishing points feel farther away—perfect for elegant portraits, powerful standing hero shots, cinematic distance, or when you want anatomy to look more “correct” and less caricatured.
Understanding these effects lets you choose (or fake) the right lens for narrative impact instead of letting random perspective choices dictate your figure’s proportions.
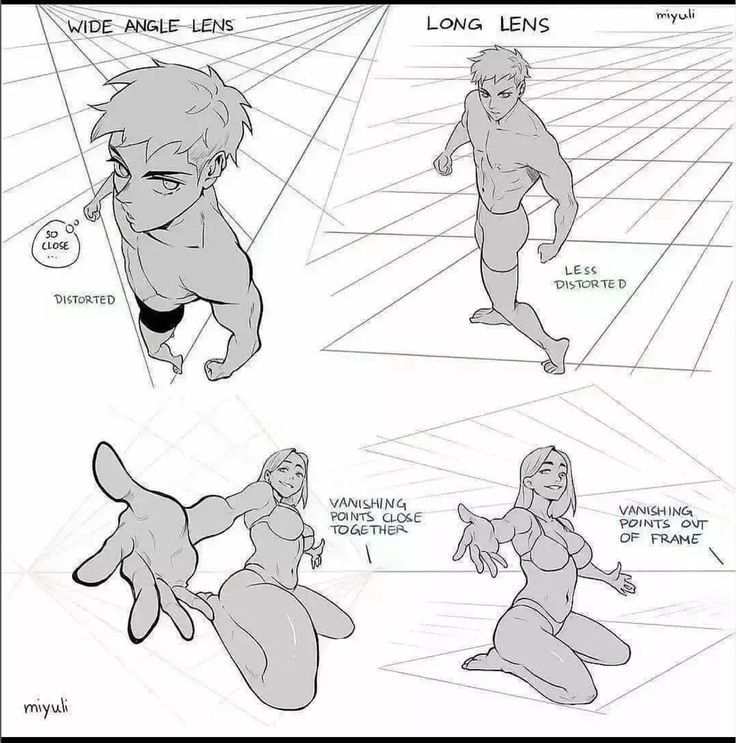
Side-by-Side Breakdown: Wide-Angle vs. Long Lens (Based on the Reference Illustration)
Top Row – Standing / Crouching Dynamic Pose
Wide-Angle Lens (Left)
- Extremely close camera position (“SO CLOSE…”)
- Pronounced foreshortening: head appears much smaller relative to torso and limbs
- Barrel distortion stretches arms, hands, and lower body outward toward the picture edges
- Vanishing points are pulled very close together on the horizon line → radial “fisheye” spreading of limbs and perspective lines
- Result: intense, in-your-face energy; great for action, intimidation, POV shots, or emphasizing power from below
Long Lens (Right)
- Camera placed farther back
- Minimal foreshortening: proportions remain closer to anatomical “truth” even at dramatic angles
- Edges show almost no stretching → limbs and torso retain more natural shape
- Vanishing points are pushed much farther apart (often outside the frame entirely) → straighter, more parallel-looking perspective lines
- Result: clean, heroic, cinematic feel; ideal for confident standing poses, portraits, or when you want anatomy to read clearly without exaggeration
Bottom Row – Kneeling / Seated Expressive Pose
Wide-Angle Lens (Left)
- Massive radial distortion: arms and thighs appear hugely elongated and curve outward dramatically
- Hands and feet balloon toward the viewer
- Vanishing points cluster very closely together near the center of the figure → extreme “explosion” of perspective rays from a near-center point
- Creates a sense of being right up in the character’s personal space—intimate, overwhelming, slightly uncomfortable (in a good storytelling way)
Long Lens (Right)
- Much flatter perspective: arms and legs extend more naturally without extreme stretching
- Vanishing points are located far outside the edges of the frame → perspective lines appear nearly parallel across most of the figure
- Proportions feel balanced and elegant even in an extreme pose
- Conveys poise, confidence, distance, and cinematic grandeur
Key Takeaways & Practical Tips for Artists
- Decide your story mood first Want raw power, vulnerability, or “in the moment” intensity? → Wide-angle + low or very close camera. Want elegance, distance, heroism, or classic beauty? → Long lens + medium-to-far placement.
- Control your vanishing points intentionally
- Pull vanishing points close together → wide-angle distortion & fisheye feel
- Push vanishing points far apart or off-frame → telephoto compression & natural proportions
- Foreshortening cheat sheet
- Extreme size difference between near and far body parts = wide-angle + close distance
- Near and far parts similar in scale = long lens or far distance
- Avoid accidental distortion If hands or feet suddenly look cartoonishly huge and you didn’t intend it, you’ve probably placed your “camera” too close with a wide-angle mindset. Step back mentally (or zoom in your perspective grid) and widen the vanishing-point spacing.
- Quick workflow trick Sketch your figure using 2-point or 3-point perspective first. Then ask: “Do I want these lines to feel explosive (wide) or calm & parallel (long)?” Adjust vanishing-point distance accordingly before finalizing anatomy.
- Applications across genres
- Shonen / action manga: wide-angle low shots for epic attacks
- Romance / portraiture: long lens for flattering, intimate close-ups
- Horror: wide-angle + Dutch tilt for unease
- Sci-fi concept art: mix both—wide for massive environments, long for character hero shots
This deceptively simple diagram is one of the clearest visual explanations of lens effects in figure drawing available. Study it, redraw the same pose with both “lenses,” and watch how quickly your storytelling power increases.
Big thanks to artist miyuli for creating and sharing this invaluable reference—highly recommended for any artist working with dynamic characters and cinematic composition.
Keep experimenting with lens simulation in your sketchbook. Your figures will thank you.
Happy drawing—choose your lens, shape your story!