Mastering One-Point Perspective Drawing: A Comprehensive Tutorial with Photographic Reference and Step-by-Step Sketching Guide

Description:
In the realm of visual arts and architectural illustration, one-point perspective is a fundamental technique that allows artists, designers, and architects to create realistic, three-dimensional representations of spaces on a two-dimensional surface. This tutorial delves deeply into the principles of one-point perspective, using a real-world photographic example of a school courtyard to demonstrate how parallel lines converge toward a single vanishing point, creating the illusion of depth and distance. Whether you’re a beginner artist honing your skills, an architecture student exploring spatial representation, or a professional illustrator seeking to refine your techniques, this guide provides a professional, step-by-step approach to understanding and applying one-point perspective. We’ll break down the process using the provided reference image—a composite of a color photograph overlaid with guiding lines and a corresponding hand-drawn sketch—to illustrate key concepts in a practical, hands-on manner.
Understanding the Basics of One-Point Perspective
One-point perspective, also known as single-point or frontal perspective, is ideal for depicting scenes where the viewer faces a subject head-on, such as hallways, streets, or courtyards. In this system, all parallel lines that recede into the distance appear to meet at a single point on the horizon line, called the vanishing point (VP). This mimics how the human eye perceives depth in the real world, where objects farther away seem smaller and closer together.
Key elements include:
- Horizon Line (Eye Level): An imaginary horizontal line across the composition that represents the viewer’s eye level. Objects above this line appear to slope downward, while those below slope upward.
- Vanishing Point (VP): The spot on the horizon line where all receding parallel lines converge. In outdoor scenes like the one in our reference, it’s often placed centrally for symmetry.
- Orthogonal Lines: These are the diagonal lines that guide the recession toward the VP, representing the edges of buildings, paths, or other structures.
- Transversal Lines: Horizontal or vertical lines that remain parallel to the picture plane and do not converge.
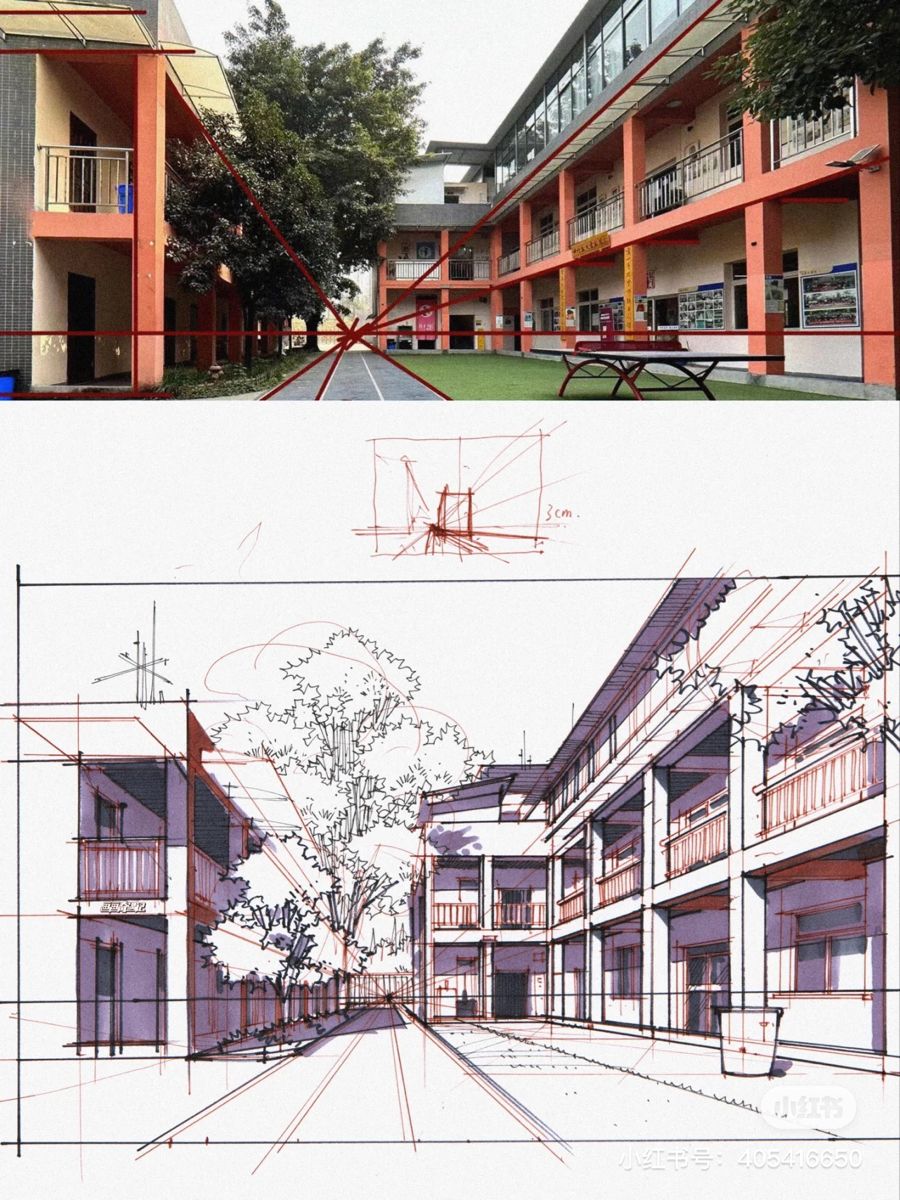
In our reference image, the top section shows a real photograph of a school courtyard in what appears to be an educational campus in Asia (noted by signage in Chinese characters). The scene features two multi-story buildings with orange balconies flanking a central pathway that leads to a grassy area with a ping-pong table. Red orthogonal lines have been overlaid, converging sharply to a central VP located near the midpoint of the distant building, emphasizing the depth of the corridor-like space. The bottom section is a monochromatic hand-drawn sketch replicating the same view, with lighter construction lines in red to map out the perspective grid before adding details like trees, windows, and shadows.
This dual-image approach serves as an excellent teaching tool: the photo provides a realistic reference for observation, while the sketch demonstrates how to translate that into an artistic rendering.
Step 1: Analyzing the Reference Photograph
Begin by studying a real-world scene to train your eye for perspective. Select a photo or view similar to our example—one with strong linear elements like buildings or pathways.
- Identify the Horizon Line: In the provided photo, the horizon is implied at approximately eye level, running horizontally across the middle of the image. It’s where the tops of the buildings and the ground plane meet the sky (though partially obscured by structures). To find it, imagine standing at the photographer’s position; the horizon would be at your eye height.
- Locate the Vanishing Point: Trace the edges of the buildings, balconies, and pathway. In this image, red lines highlight how the balcony railings, window ledges, and ground path all converge to a single point roughly in the center, just above the ping-pong table in the distance. This VP creates the illusion that the courtyard extends far back, even though the actual space might be compact.
- Observe Scale and Proportion: Notice how elements closer to the viewer (foreground buildings) appear larger and more detailed, while distant objects (like the far-end wall) shrink. The tree in the middle ground partially obscures the view, adding natural complexity—account for overlaps in your analysis.
- Note Additional Details: The photo includes elements like signage, benches, and greenery, which add realism. Measure relative sizes; for instance, the balcony height diminishes as it recedes, following perspective rules.
Pro Tip: Use photo-editing software or overlay grids on printed images to draw your own red lines, as shown here. This exercise builds intuition for spotting perspective in everyday environments.
Step 2: Setting Up Your Perspective Grid in the Sketch
Transition from observation to creation by constructing a perspective grid on paper or digitally. The bottom sketch in the image exemplifies this process, with faint red lines forming the foundational structure.
- Draw the Horizon Line: Start with a light horizontal line across your page at the desired eye level. In our sketch example, it’s placed about one-third from the top, allowing room for the buildings above and ground below.
- Place the Vanishing Point: Mark a dot on the horizon line where lines will converge. Here, it’s centered for a symmetrical composition, but you can offset it for dynamic views.
- Establish the Foreground: Draw vertical lines for the nearest structures (e.g., the building pillars and doors). These remain perpendicular to the horizon and do not converge.
- Add Orthogonal Lines: From the tops and bottoms of your verticals, draw diagonals toward the VP. In the sketch, these lines define the balcony edges, rooflines, and pathway sides. The image shows them extending from the foreground buildings, narrowing as they approach the VP.
- Incorporate Transversals: Add horizontal lines at intervals to represent floors, windows, or steps. These stay parallel to the horizon and get closer together as they recede, simulating distance.
The sketch also includes a small inset diagram in the top-right corner, labeled “3 cm,” which appears to be a quick scale reference or thumbnail for planning the VP and initial lines. Use such thumbnails to experiment before committing to the full drawing.
Step 3: Adding Details and Refinements
Once the grid is in place, layer in realistic elements to bring the scene to life.
- Buildings and Architecture: Outline windows, doors, and balconies along the grid lines. In the example sketch, the buildings are rendered with varying line weights—thicker for foreground, thinner for background—to enhance depth.
- Natural Elements: Add trees, grass, and pathways with organic shapes that still adhere to perspective. The central tree is drawn with branches tapering toward the VP, and its trunk aligns vertically.
- Furniture and Props: Include items like the ping-pong table or benches, scaling them appropriately. Their tops and sides should follow orthogonals to the VP.
- Shading and Texture: Apply hatching or cross-hatching for shadows, as seen in the sketch’s subtle gradients on the buildings and ground. This adds volume; for instance, the left building has darker tones to suggest side lighting.
- Annotations: The sketch includes handwritten notes and measurements (e.g., “小红书号: 4034146650”), which could be artist credits or references—incorporate your own for tutorials.
Common Mistakes to Avoid: Ensure all receding lines hit the VP exactly; inconsistencies can flatten the image. Also, maintain consistent scale—don’t make distant objects too large.
Step 4: Practice and Variations
To master this, replicate the provided image: Print the photo, overlay your grid, then sketch it freehand. Experiment with variations:
- Shift the VP left or right for asymmetrical views.
- Apply to indoor scenes, like a classroom hallway.
- Combine with two-point perspective for corners.
Tools Needed: Pencil, ruler, eraser, and paper. For digital, use software like Procreate or Photoshop with perspective guides.
Conclusion: Why One-Point Perspective Matters
This technique isn’t just for art—it’s essential in fields like interior design, game development, and urban planning. By studying examples like this school courtyard, you’ll develop an eye for spatial accuracy, transforming flat drawings into immersive worlds. Practice regularly, and soon you’ll intuitively apply perspective to any scene. For more advanced tutorials, explore multi-point perspectives or atmospheric effects. Share your sketches in the comments below, and let’s build a community of perspective enthusiasts!