Skill-Builder Fence: Mastering Linear Perspective and 3D Depth in Landscape Drawing – A Step-by-Step Tutorial

Introduction to Perspective in Outdoor Scenes
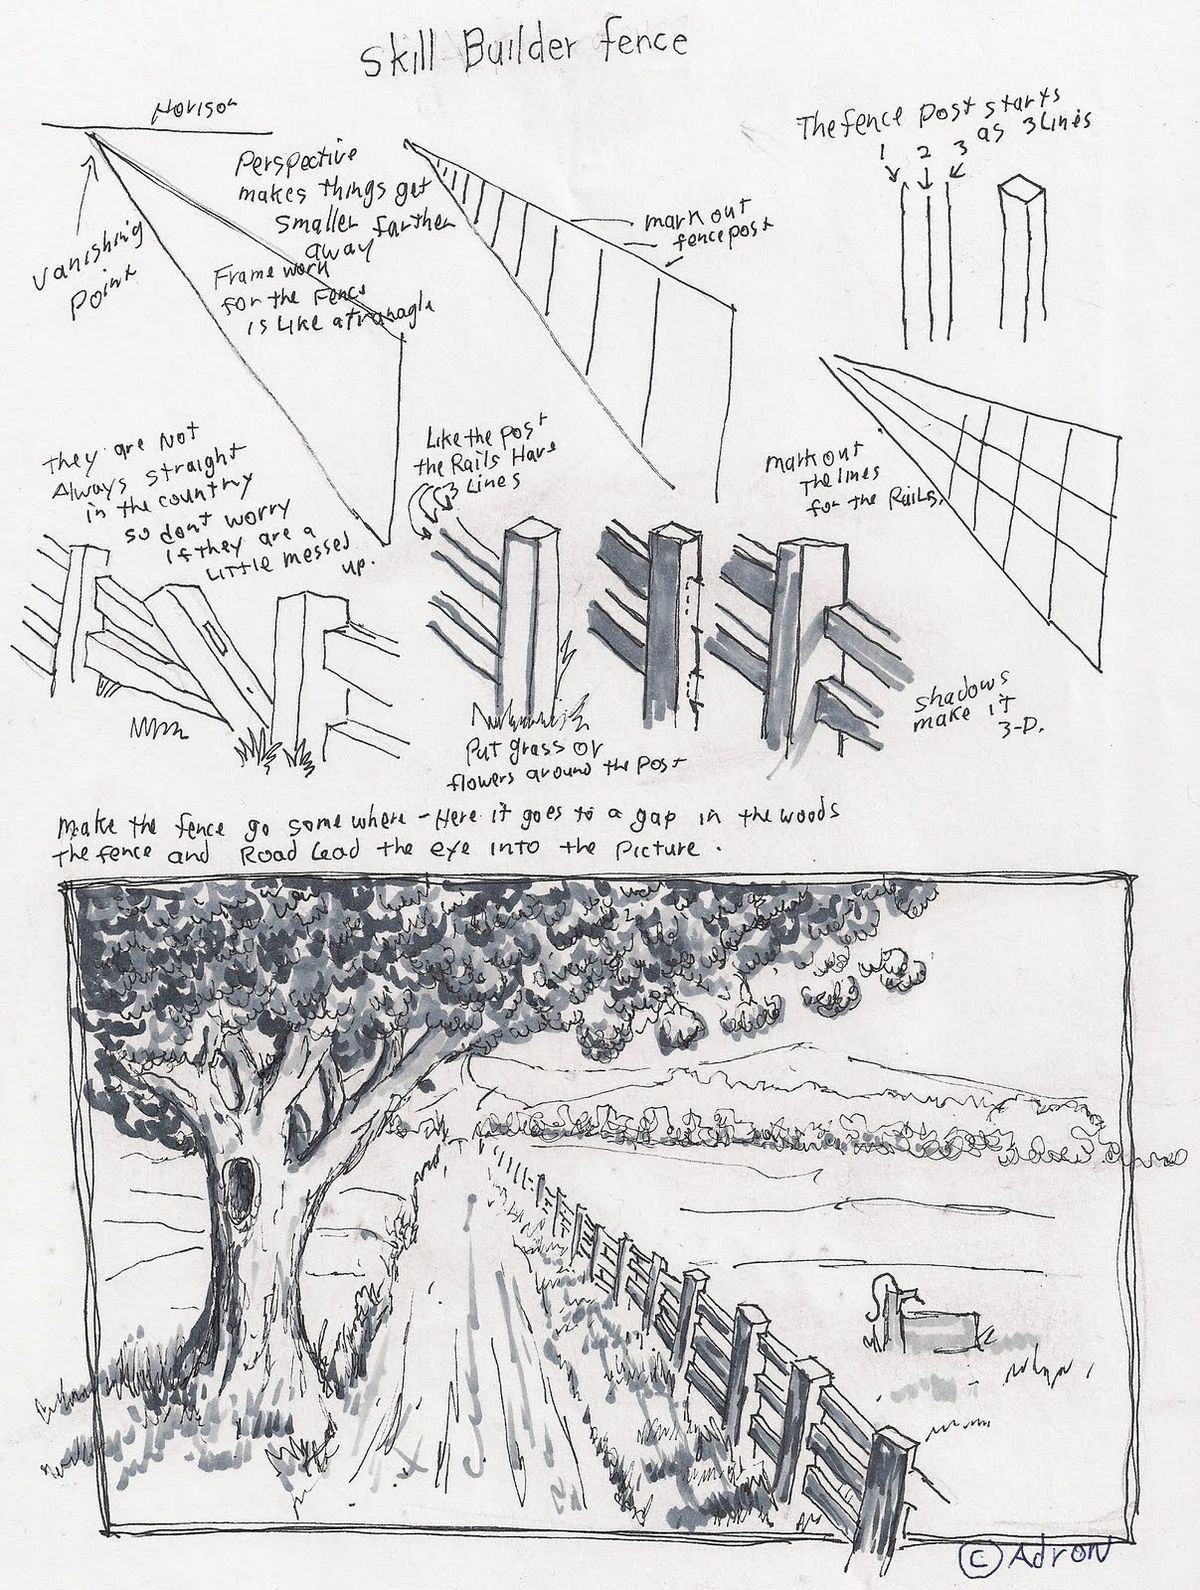
Drawing convincing outdoor environments—whether for plein air sketching, concept art, storyboarding, or illustration—hinges on one foundational skill: linear perspective. The hand-drawn worksheet you see here, titled Skill-Builder Fence, is a masterclass in miniature. Created by artist C. Adron, this single page packs multiple lessons into one cohesive exercise: constructing a realistic wooden fence that recedes into a forest gap using one-point perspective, vanishing points, convergence, scale reduction, and atmospheric depth.
This tutorial transforms the raw sketch into a professional, step-by-step guide suitable for beginners and intermediate artists alike. We’ll break down every annotation, diagram, and technique shown in the image, then show you how to apply them to your own landscapes. By the end, you’ll be able to draw fences, roads, rivers, or forest paths that feel three-dimensional and lead the viewer’s eye deep into your composition.
Overview of the Worksheet
The page is divided into three zones:
- Top Section: Conceptual diagrams and core rules of perspective applied to fence construction.
- Middle Section: Close-up studies of fence posts, rails, and shading techniques.
- Bottom Section: Full contextual scene showing the fence integrated into a forested landscape with a road gap.
Let’s explore each zone in detail.
Zone 1: Core Perspective Principles (Top Diagrams)
1. Vanishing Point (VP) and Horizon Line
- Key Annotation: “Vanishing Point”
- Explanation: All parallel lines in the real world (like fence rails or road edges) appear to converge at a single point on the horizon when drawn in perspective. This is the vanishing point.
- In the Diagram: A small arrow points to a dot on the horizon line where the top and bottom rails of the fence converge.
- Pro Tip: Always establish your horizon line first—it represents eye level. Everything above it is sky; everything below is ground.
2. Perspective Makes Things Get Smaller
- Key Annotation: “Perspective makes things get smaller farther away”
- Explanation: Objects of the same size appear progressively smaller as they move toward the vanishing point. This is foreshortening and scale diminution.
- In the Diagram: Fence posts are drawn at full height near the viewer, then taper in size as they recede.
- Exercise: Draw five identical rectangles. Place them along converging lines toward the VP. Reduce height and width proportionally.
3. Frame the Focal Point Like a Triangle
- Key Annotation: “Frame the focal is like a triangle”
- Explanation: The strongest compositions use converging lines to frame the subject. Here, the fence rails form a triangular tunnel that points directly to the gap in the woods—the focal point.
- Composition Rule: Use man-made or natural lines (fences, paths, tree lines) to create a visual arrow guiding the viewer’s eye.
4. Fence Post Starts as Slanted Lines
- Key Annotation: “The fence post starts as slanted lines 1, 2, 3 as lines”
- Explanation: Posts are built using converging verticals. Even though real posts are upright, in perspective, their sides slant inward toward the top and bottom rails.
- Step-by-Step:
- Draw two converging guidelines from the VP.
- Mark equal intervals for post locations.
- Connect with short verticals—these are your posts.
Zone 2: Construction Details (Middle Diagrams)
1. Fence Rails Follow Convergence
- Key Annotation: “Like the post the Rails Have top lines”
- Explanation: Rails are horizontal in reality but slant downward toward the vanishing point in drawing.
- Technique: Draw the top rail first as a straight line from foreground to VP. The bottom rail follows parallel but lower.
2. Posts Are Straight in the Country – Don’t Overthink!
- Key Annotation: “They are straight in the country so don’t worry if they are a little messed up.”
- Explanation: Real fence posts are vertical and evenly spaced. In perspective, they appear to lean, but maintain consistent height intervals in your construction lines.
- Beginner Tip: Use a ruler for the first 2–3 posts, then freehand the rest to build confidence.
3. Shading for 3D Form
- Key Annotations:
- “Put grass on flowers around the post”
- “Shadows make it 3-D”
- “Mark out the lines for the Rails”
- Techniques Demonstrated:
- Cast Shadows: Darken the side of each post away from the light source (implied sun from left).
- Form Shadows: Gradual shading on the post faces to suggest roundness.
- Texture: Quick scribbles for wood grain; cross-hatching for depth.
- Ground Cover: Grass and flowers at the base anchor the fence to the terrain.
Zone 3: Full Scene Integration (Bottom Illustration)
This is where theory meets art. The fence now exists in a complete environment.
Key Elements:
- Foreground: Detailed fence with full-sized posts, strong shadows, grass texture.
- Midground: Fence continues into the distance, posts shrinking, rails converging.
- Background: Dense forest with a gap where a road or path enters—our focal point.
- Atmospheric Perspective:
- Distant trees are lighter in value.
- Less detail in far foliage.
- Slight blue-gray tint (implied) for air haze.
Leading the Eye
- The fence acts as a visual pathway.
- The road gap in the woods is the destination.
- Together, they create depth and narrative: “Where does this path go?”
Step-by-Step Tutorial: Draw Your Own Perspective Fence
Materials Needed
- Sketchbook or drawing paper
- Pencil (HB or 2B)
- Ruler (optional for beginners)
- Eraser
Step 1: Set Up the Horizon and Vanishing Point
- Draw a horizontal line across the middle of your page — this is the horizon.
- Mark a dot on the horizon — this is your vanishing point (VP). Place it off-center for dynamic composition.
Step 2: Draw the Ground and First Post
- From the bottom of the page, draw a vertical line upward — this is your nearest fence post.
- Add width: draw two short slanted lines from the top and bottom, converging slightly toward the VP.
Step 3: Plot Post Positions
- Draw two converging guidelines from the VP down to the bottom of the page (like a V shape).
- Mark 5–7 equal intervals along the bottom guideline — these are post locations.
- From each mark, draw short verticals upward, getting shorter as they approach the VP.
Step 4: Add Rails
- Draw the top rail: a straight line from the top of the first post to the VP.
- Draw the bottom rail: parallel, from the base of the first post to the VP.
- Connect each post to the rails with short horizontal crossbars (optional for split-rail style).
Step 5: Add Depth Cues
- Shading: Darken the left side of each post (assuming light from right).
- Texture: Add wood grain with quick vertical lines.
- Ground: Scribble grass, rocks, or flowers at the base.
- Distant Posts: Reduce detail and contrast as posts recede.
Step 6: Build the Environment
- Behind the fence, sketch a forest edge.
- Leave a gap where a road or path enters — align it with the fence’s convergence.
- Use lighter pressure and softer lines for distant trees.
- Add atmospheric haze: smudge or lighten far elements.
Advanced Variations
| Variation | How to Modify |
|---|---|
| Two-Point Perspective | Place VP off the page; draw fence on a corner (e.g., wrapping around a hill). |
| Curved Path | Bend the convergence lines slightly for a winding road. |
| Night Scene | Use moonlight; reverse shadows; add fireflies. |
| Digital Workflow | Use Procreate/Photoshop perspective grids; lock layers for rails. |
Common Mistakes & How to Fix Them
| Mistake | Fix |
|---|---|
| Posts stay same height | Reduce height progressively toward VP |
| Rails don’t converge | Always connect to the same VP |
| Flat shading | Add cast + form shadows |
| No focal point | Create a gap, figure, or light source at convergence |
Why This Exercise Works
The Skill-Builder Fence is a micro-gym for the eye and hand. It trains:
- Accurate convergence
- Scale judgment
- Depth perception
- Compositional framing
- Shading for form
Master this, and you can draw any receding structure: boardwalks, piers, train tracks, vineyard rows, or city streets.
Conclusion: From Sketch to Story
The humble fence is more than wood and wire—it’s a portal. In Adron’s drawing, it invites us into the mystery of the forest path. With the techniques in this tutorial, you now have the tools to build your own gateways.