How to Paint Realistic Grass in Perspective: The Professional 5-Layer Method for Depth, Texture & Atmosphere

Transform flat, cartoonish fields into lush, believable landscapes with this battle-tested, step-by-step digital (or traditional) painting technique. Used by top environment artists in film, games, and animation, this method guarantees correct perspective, natural texture variation, and cinematic depth — even on the most challenging foreground-to-background transitions.
What You’ll Learn in This Tutorial
- Why zigzag teeth = instant amateur (and how to avoid them)
- The 5-layer hierarchy that makes grass read perfectly at any distance
- How to use value, saturation, contrast, and detail gradients to sell distance
- The “big shapes first” rule that prevents over-detailing
- Pro shortcuts for Photoshop, Procreate, Clip Studio, or traditional gouache/acrylic
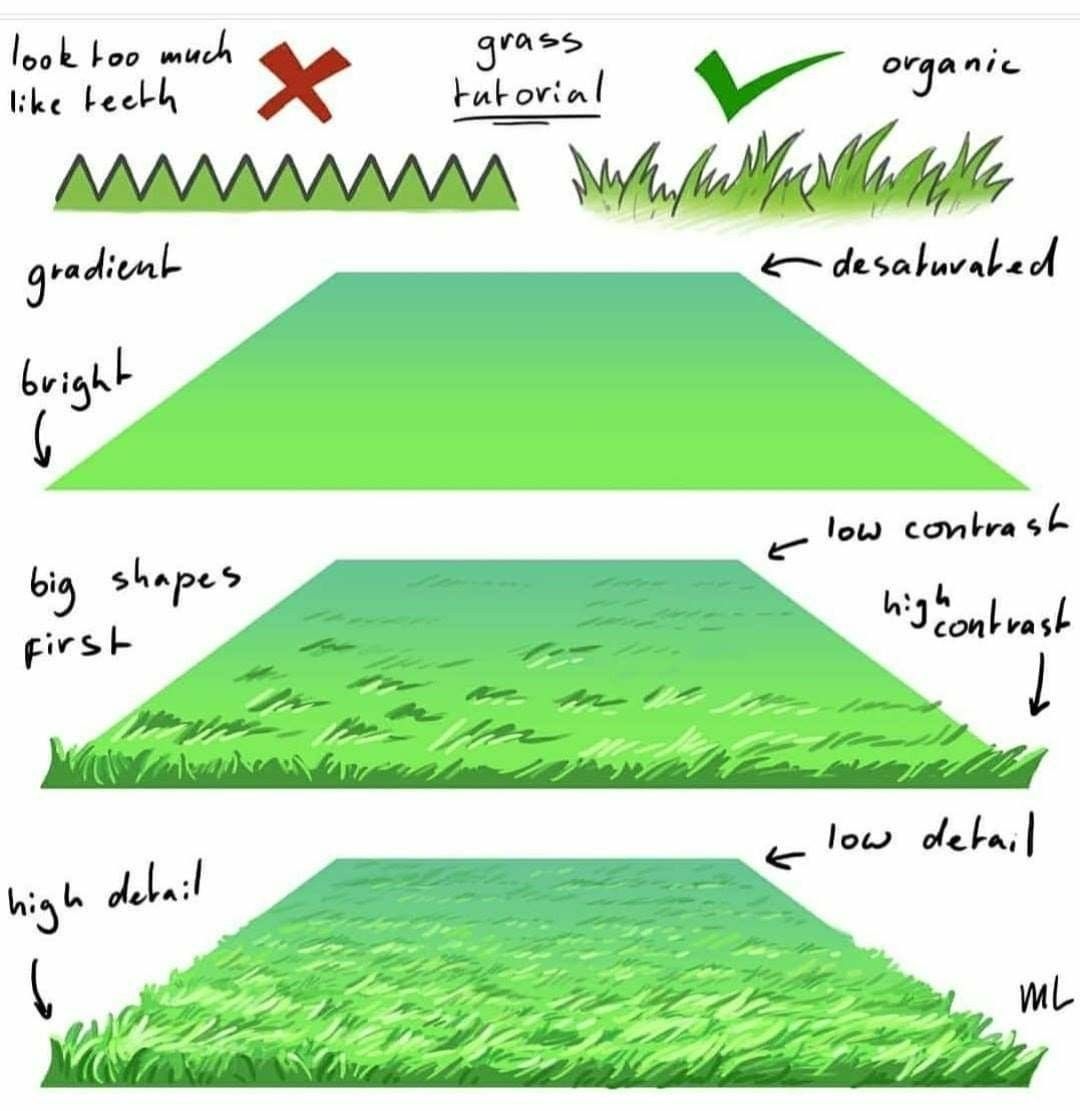
The 5-Layer Grass System – Step by Step
| Layer | Purpose | Key Settings | Pro Tip |
|---|---|---|---|
| 1. Gradient Base | Establish perspective plane and atmospheric color shift | Bright → Desaturated | Use a soft round brush on a locked layer. Paint from bright green (foreground) to cool, grayed green (distance) |
| 2. Big Shapes | Block major value zones and light direction | High → Low Contrast | Work in 3–5 broad values only. Define sunlit vs. shadowed areas with wide, sweeping strokes |
| 3. Mid-Level Texture | Add readable grass clumps without noise | Medium detail | Use a textured rake or fan brush. Keep strokes horizontal in perspective — follow the ground plane! |
| 4. High Detail (Foreground Only) | Sell tactile realism where the viewer looks closest | Max detail | Only the bottom 15–25 % of the canvas gets individual blades. Use a small spatter or grass brush |
| 5. Final Polish (ML) | Micro-lighting & edge variation | Subtle rim light | Add tiny bright highlights on blade tips and cool shadow bounce in crevices |
Critical Rules to Follow
- NO ZIGZAG TEETH ❌ Avoid uniform, repetitive “M” or shark-tooth edges ✅ Use organic, flowing silhouettes with varied heights and negative space
- Atmospheric Perspective = Your Superpower
- Foreground: High saturation, high contrast, high detail
- Midground: Medium everything
- Background: Low saturation, low contrast, zero detail
- Light Direction Must Be Consistent Decide one light source (usually top-left or top-right). Every blade, clump, and shadow must obey it.
- Work Big → Small (Always) Start with a 2-inch brush, end with a 2-pixel brush. This keeps proportions and energy intact.
Brush & Tool Recommendations
| Tool | Digital | Traditional |
|---|---|---|
| Base Gradient | Soft Round (0 % hardness) | Large flat wash brush |
| Big Shapes | Hard round or chalk brush | Filbert or fan brush |
| Texture | Custom grass/rake brush | Dry bristle brush (stippling) |
| Detail | Spatter + small liner | Rigger brush or colored pencil |
Download free Pro Grass Brush Pack (link in bio) – includes perspective-aware rake brushes!
Common Mistakes & Fixes
| Mistake | Why It Fails | Fix |
|---|---|---|
| Uniform green across entire field | Kills depth | Desaturate + cool background |
| Too much detail in distance | Creates visual noise | Blur or paint over with mid-tone |
| Vertical grass strokes | Ignores perspective plane | Rotate canvas — paint horizontally toward vanishing point |
Applications
- Fantasy meadows (Lord of the Rings–style)
- Urban park foregrounds
- Sci-fi alien plains (just change hue!)
- Matte paintings & animation backgrounds
Final Result Checklist
- Grass gets smaller, cooler, and blurrier with distance
- Only foreground has individual blades
- Light and shadow follow one direction
- Edge silhouette is organic, not geometric
Master this system once, and you’ll paint any ground cover — snow, sand, moss, alien fungus — with total confidence.
Ready to level up your environments? Follow along with the included PSD template (layered exactly as shown) and paint your first pro-level field in under 30 minutes.