Mastering Background Perspective: One-Point Perspective Fundamentals for Believable Environments – Step-by-Step Tutorial

Create convincing, immersive backgrounds that instantly pull viewers into your scene with this crystal-clear introduction to one-point perspective — the foundation of nearly every realistic environment in illustration, concept art, animation, and architectural sketching. Perfect for beginners and a powerful refresher for pros.
What You’ll Learn in This Tutorial
- The core principle of one-point perspective: “All parallel lines converge to a single vanishing point”
- How to visualize your scene like a camera on a tripod
- Why sidewalks, floor tiles, and train tracks are your best real-world teachers
- How horizon line placement controls drama, scale, and viewer eye level
- The universal rule: Same-size objects get smaller the farther away they are
- Practical exercises to train your eye and hand simultaneously
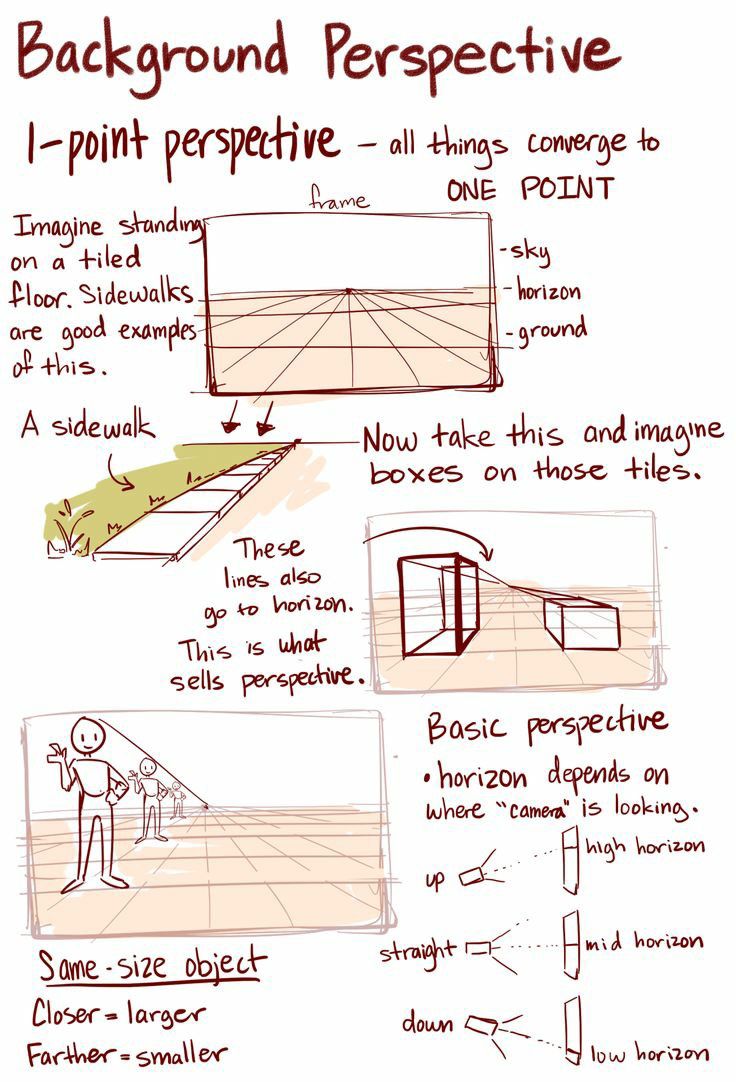
Step-by-Step Breakdown (As Shown in the Illustration)
1. Understand the Frame – You Are the Camera Imagine standing on a flat, tiled surface (a sidewalk, hallway, or street). Everything parallel to your line of sight — the edges of the ground, the tops and bottoms of walls, the cracks between tiles — converges to one single point on the horizon.
Pro Tip: Draw a simple rectangle first. This is your “viewfinder.” Everything inside must obey the rules of your chosen vanishing point.
2. Place the Horizon Line – Your Eye Level The horizon line represents where your eyes are looking straight ahead.
- High horizon = You’re looking down (bird’s-eye, dramatic, powerful)
- Mid horizon = Eye-level view (neutral, cinematic, natural)
- Low horizon = You’re looking up (worm’s-eye, epic, intimidating)
Change the horizon, change the entire mood of the scene.
3. Draw Converging Lines – Sell the Depth From the edges of your frame, draw lines that all meet at your single vanishing point.
- These represent floor tiles, sidewalk cracks, building edges, or road markings.
- The closer the lines are to the vanishing point, the narrower the gaps — this is what sells perspective.
4. Add Boxes on the Grid – Instant 3D Proof Take your 2D tile grid and place identical cubes along the lines.
- The cube closest to you = tallest and widest
- The cube halfway back = medium size
- The cube near the horizon = tiny
This simple test proves your perspective is working. If the boxes look like they’re shrinking naturally, you’ve nailed it.
5. Apply the Golden Rule
“Same-size object → Closer = Larger | Farther = Smaller”
This applies to people, windows, doors, cars, trees — everything. Use it to populate your background with believable scale.
Real-World Examples to Study
- Sidewalks – Perfect grid of rectangular tiles converging to a point
- Train tracks – Classic parallel lines vanishing into the distance
- Hallways – Ceiling lights, floor tiles, and wall panels all following the same rule
Exercise: Go outside with a sketchbook. Find a straight sidewalk. Draw it using only one vanishing point. You’ll see the principle in action immediately.
Common Mistakes to Avoid
| Mistake | Fix |
|---|---|
| Multiple vanishing points in a straight-on view | Use only one unless the camera is turning |
| Horizon too high or low without purpose | Match it to your intended mood |
| Objects not shrinking with distance | Measure against your grid |
Tools & Medium
- Traditional: Pencil, ruler, non-photo blue pencil for construction lines
- Digital: Procreate, Photoshop, or Clip Studio Paint — use a perspective ruler tool or draw manually on a grid layer
Why This Matters
One-point perspective is the backbone of background design in:
- Animation layouts (Studio Ghibli, Disney)
- Game environment concept art (The Last of Us, Cyberpunk 2077)
- Film storyboards and matte paintings
- Architectural visualization
Master it once, and every environment you draw — from quiet streets to grand sci-fi corridors — will feel solid, deep, and alive.
Ready to Level Up? Download the free One-Point Perspective Grid Template (link in bio) and follow along with the sidewalk exercise. In under 30 minutes, you’ll be drawing backgrounds that look like they belong in a professional portfolio.