Mastering Watercolor Techniques: 18 Essential Methods for Stunning Effects

Mastering Watercolor Techniques: 18 Essential Methods for Stunning Effects
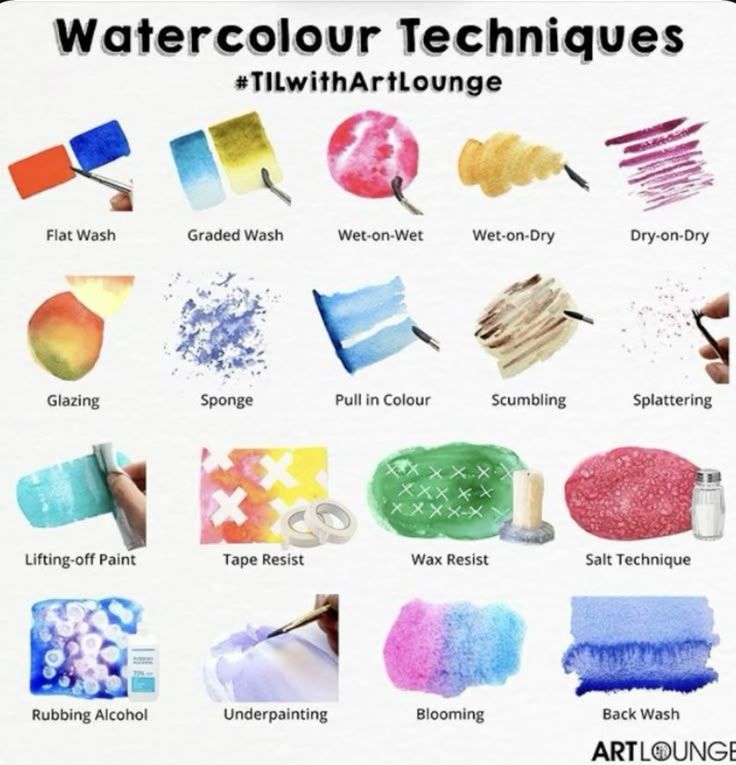
Watercolor painting is renowned for its ethereal transparency, fluid blends, and unpredictable charm, but harnessing its full potential requires a solid grasp of foundational and advanced techniques. This comprehensive tutorial, inspired by a popular infographic from Art Lounge (#TilWithArtLounge), explores 18 key watercolor techniques, each illustrated with practical examples to help you replicate and innovate. From basic washes that form the backbone of any piece to experimental resists and textures that add depth and intrigue, these methods will empower artists of all levels to create luminous, professional-grade artworks.
Whether you’re a beginner discovering the joy of wet-on-wet blooms or an experienced painter refining subtle glazing layers, this guide provides step-by-step instructions, tips for common pitfalls, and creative applications. We’ll emphasize control over water-to-paint ratios, brush handling, and timing—core elements that define watercolor’s unique behavior. By practicing these techniques, you’ll learn to embrace the medium’s spontaneity while achieving deliberate results. Let’s build your skills progressively, starting with washes and moving into textural and resist methods.
Materials You’ll Need
To experiment effectively, gather these essentials for consistent results:
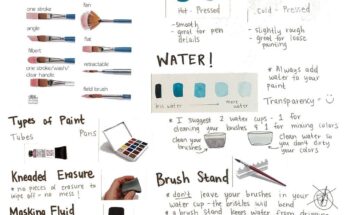
- Watercolor Paints: Artist-grade tubes or pans in a basic palette (e.g., ultramarine blue, cadmium yellow, alizarin crimson) for vibrant, lightfast colors.
- Brushes: A mix of rounds (sizes 2-10 for details and washes), flats (for broad strokes), and specialty tools like a natural sponge or fan brush.
- Paper: Cold-pressed watercolor paper (140 lb/300 gsm or heavier) to handle wet techniques without excessive buckling. Stretch it on a board for flat results.
- Water and Palette: Two jars (one for clean rinsing, one for mixing), plus a non-porous palette for blending.
- Additional Tools: Masking tape, wax crayons or candles, table salt, rubbing alcohol (70% isopropyl), cotton swabs or tissues for lifting, and a spray bottle for misting.
- Optional: Masking fluid for precise resists, though we’ll cover tape and wax alternatives.
Pro Tip: Always test techniques on scrap paper. Work in a well-lit space and allow layers to dry fully between steps to avoid unintended blending.
Understanding Watercolor Fundamentals
Watercolor’s magic lies in its interaction with water: Pigments suspended in liquid create translucent layers, where timing (wet vs. dry) dictates diffusion. Techniques fall into categories—washes for foundations, blending methods for gradients, textural applications for dimension, and resists for preserving whites. Light-to-dark layering is key, as watercolor can’t be easily covered once applied. Observe how gravity, paper tilt, and brush pressure influence outcomes for realistic effects like skies, foliage, or abstracts.
Technique Breakdown: Step-by-Step Tutorials
We’ll detail each of the 18 techniques with descriptions, steps, applications, and variations. Practice in sequence to build confidence.
- Flat Wash: A uniform layer of color, ideal for even backgrounds like serene skies or oceans.
- Steps: Mix a puddle of paint with ample water. Tilt your paper slightly (about 30 degrees). Load a flat brush and stroke horizontally from top to bottom, overlapping edges slightly to avoid streaks. Let gravity pull the paint down.
- Applications: Base for landscapes; combine with resists for added interest.
- Tips: Use consistent pressure; if beads form, blot with a dry brush. Variation: Variegated wash by introducing a second color mid-stroke.
- Graded Wash: A smooth transition from intense to pale color, mimicking sunsets or depth in water.
- Steps: Start with pigmented paint at the top, stroking horizontally. Gradually add water to dilute as you move down, blending seamlessly. Dry flat to prevent runs.
- Applications: Atmospheric effects in horizons or shaded objects.
- Tips: Practice on inclined paper; reload brush minimally. Variation: Two-color graded wash (e.g., blue to yellow) for vibrant gradients.
- Wet-on-Wet: Applying paint to a wet surface for soft, diffused edges and organic blends.
- Steps: Pre-wet paper with clean water using a mop brush. Drop or stroke in colors while damp—they’ll bleed naturally. Tilt to guide flow.
- Applications: Clouds, flowers, or abstract backgrounds.
- Tips: Control wetness—too much causes puddles; too little limits spread. Variation: Charge with multiple hues for multicolored blooms.
- Wet-on-Dry: Paint on dry paper for sharp, controlled edges.
- Steps: Ensure paper is fully dry. Apply diluted paint with a round brush for precise lines or shapes; it won’t spread beyond your stroke.
- Applications: Defined details like buildings or foliage outlines.
- Tips: Layer for depth; use for glazing over dry bases. Variation: Combine with wet-on-wet for mixed-edge effects.
- Dry-on-Dry (Dry Brushing): Using minimal water for textured, broken color.
- Steps: Load a dry brush with semi-moist paint. Drag lightly over textured paper to catch highs, leaving paper showing through.
- Applications: Rough textures like tree bark or rocky surfaces.
- Tips: Fan brushes excel here; build gradually. Variation: Scumble (see below) as an extension.
- Glazing: Layering transparent washes over dry paint for luminous depth.
- Steps: Apply a thin, diluted wash over a dry base layer. Let dry, then repeat with complementary colors.
- Applications: Skin tones, shadows, or color adjustments.
- Tips: Use light colors first; avoid overworking to prevent lifting. Variation: Optical mixing for vibrant results without muddiness.
- Sponge Technique: Dabbing with a natural sponge for organic textures.
- Steps: Wet a sponge, wring out excess, and dip in paint. Dab onto dry or wet paper for mottled effects.
- Applications: Foliage, clouds, or stone surfaces.
- Tips: Vary pressure for density; clean sponge between colors. Variation: Layer with washes for added realism.
- Pull in Colour: Drawing color into a wet area with a dry brush.
- Steps: Apply a wet wash. Use a thirsty (dry) brush to pull pigment from edges inward, creating feathered lines.
- Applications: Veins in leaves or subtle gradients.
- Tips: Work quickly before drying; ideal for directional textures. Variation: Reverse by pushing color out.
- Scumbling: Light, circular dry brushing for hazy overlays.
- Steps: With a stiff, dry brush and scant paint, scrub in small circles over dry paper.
- Applications: Mist, fur, or aged effects.
- Tips: Build opacity slowly; great for softening harsh lines. Variation: Use over glazing for atmospheric depth.
- Splattering: Flicking paint for random speckles.
- Steps: Load a brush with watery paint. Tap against another brush or finger to splatter droplets. Mask areas if needed.
- Applications: Stars, rain, or textured grounds.
- Tips: Practice control—distance affects size; protect surroundings. Variation: Toothbrush splatter for finer dots.
- Lifting-off Paint: Removing pigment to create highlights.
- Steps: While wet, blot with a tissue or dry brush. For dry paint, dampen and scrub gently with a stiff brush.
- Applications: Clouds in skies or light reflections.
- Tips: Works best on non-staining pigments; use stencils for shapes. Variation: Q-tip for precise lifts.
- Tape Resist: Using tape to block paint and preserve whites.
- Steps: Apply low-tack tape to dry paper in desired shapes. Paint over, let dry, then peel off.
- Applications: Straight lines, borders, or geometric designs.
- Tips: Press edges firmly; remove at 45 degrees to avoid tearing. Variation: Torn tape for irregular edges.
- Wax Resist: Crayon or candle wax to repel paint.
- Steps: Draw with white wax on paper. Wash over with watercolor—it beads off waxed areas.
- Applications: Highlights in waves or textured patterns.
- Tips: Wax is permanent; layer colors for reveals. Variation: Colored wax for subtle tints.
- Salt Technique: Sprinkling salt for crystalline textures.
- Steps: Apply a wet wash. While damp, sprinkle table salt; let dry, then brush off.
- Applications: Snow, rocks, or starry skies.
- Tips: Coarse salt for bold effects, fine for subtle; timing is crucial—too dry won’t work. Variation: Sugar or rice for alternatives.
- Rubbing Alcohol: Dropping alcohol for bubbly, mottled patterns.
- Steps: Paint a wet wash. Drip or spritz rubbing alcohol; it repels paint, creating light spots.
- Applications: Bokeh effects, underwater bubbles, or abstract textures.
- Tips: Use a dropper for precision; higher concentration for stronger repels. Variation: Layer over dries for complexity.
- Underpainting: Initial loose layer to guide the composition.
- Steps: Sketch lightly in pale wash. Build subsequent layers, allowing underpainting to show through.
- Applications: Establishing values in portraits or still lifes.
- Tips: Keep it faint; use warm/cool contrasts. Variation: Monochrome underpainting for tonal studies.
- Blooming (Cauliflowers): Intentional water drops for fringed edges.
- Steps: Add clean water drops to a semi-dry wash; pigments retreat, forming blooms.
- Applications: Organic textures like flowers or clouds.
- Tips: Embrace accidents—turn unintended blooms into features. Variation: Controlled blooming with a spray bottle.
- Back Wash (Back Runs): Water flowing back into drying paint for edged effects.
- Steps: As a wash dries, add water to one edge; it pulls pigment, creating dark rims.
- Applications: Tree edges, water ripples, or abstract forms.
- Tips: Tilt paper to direct flow; perfect for suggesting movement. Variation: Multi-color back washes for dynamic contrasts.
Practice Exercises and Advanced Variations
- Beginner Drill: Create a technique sampler sheet—dedicate squares to each method, noting water ratios and results.
- Intermediate Project: Paint a landscape incorporating 5+ techniques (e.g., graded wash sky, wet-on-wet clouds, salt foreground).
- Advanced Challenges: Combine resists with blending (e.g., wax under wet-on-wet) or experiment with non-traditional tools like credit cards for scraping.
- Common Challenges and Solutions:
- Uneven Washes: Stretch paper and use quality brushes; practice tilt control.
- Muddy Colors: Layer transparently and let dry fully; clean water prevents contamination.
- Overworking: Step back frequently; watercolor thrives on freshness.
Mastering these techniques will transform your watercolor practice, allowing for expressive, professional artworks. Start small, iterate, and share your experiments—perhaps tag #TilWithArtLounge for community feedback. What technique will you try first? For deeper dives, explore our related guides on color theory or composition. Happy painting!