Essential Watercolor Tools: A Comprehensive Guide for Beginners and Aspiring Artists
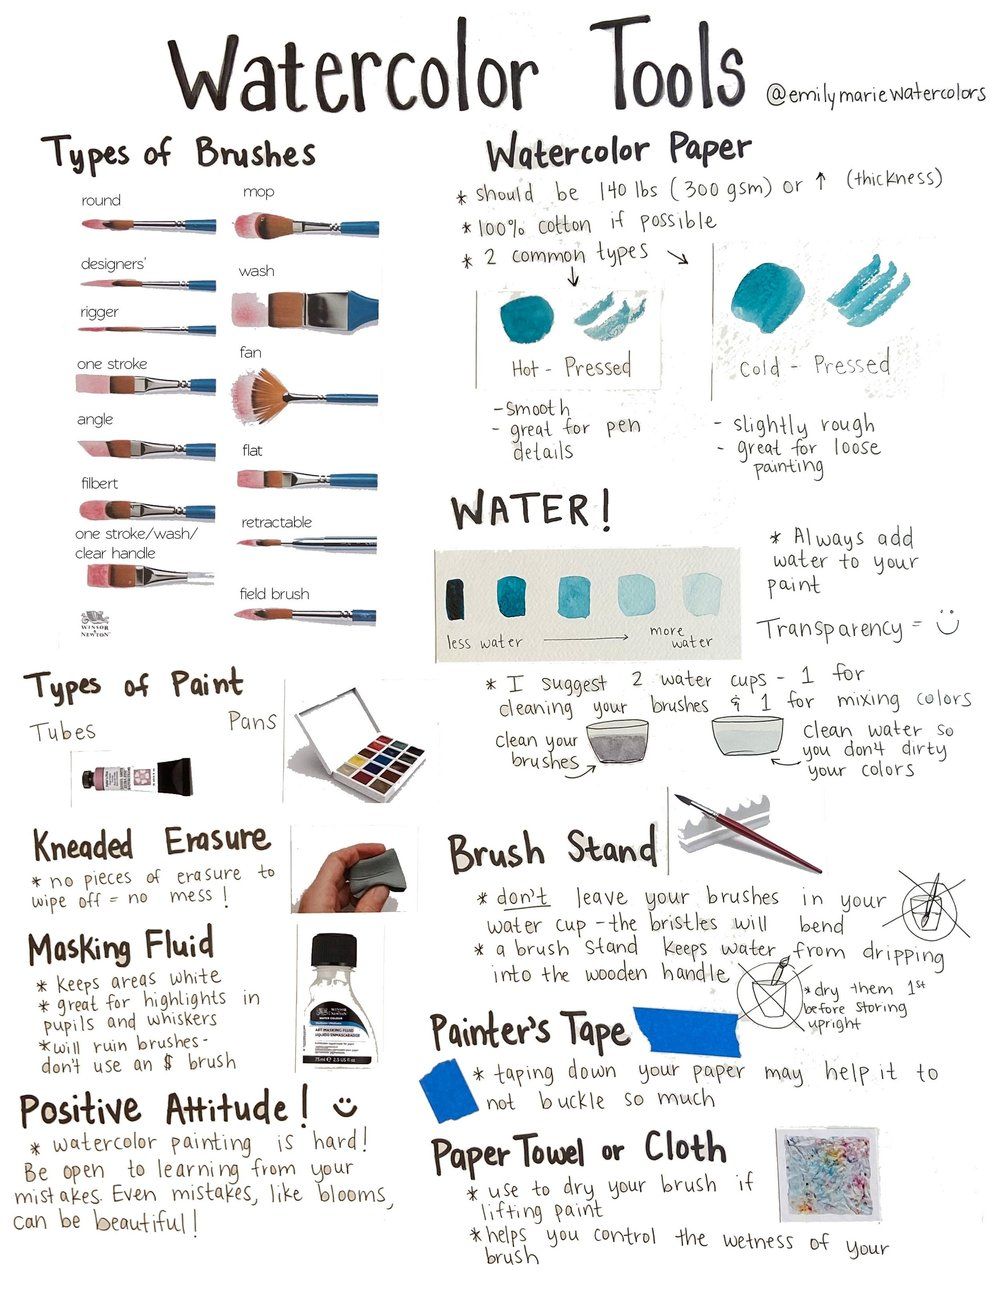
Watercolor painting is a captivating medium known for its fluidity, transparency, and luminous effects, but achieving professional results starts with understanding and selecting the right tools. This detailed guide, inspired by a popular infographic from artist Emily Marie (@emilymariewatercolors), breaks down the fundamental watercolor tools into categories, explaining their purposes, types, and best practices for use. Whether you’re a complete novice setting up your first kit or an intermediate painter refining your setup, this tutorial will help you build a solid foundation. We’ll explore each tool’s role in the creative process, offer tips for maintenance and application, and emphasize how they contribute to successful watercolor techniques like wet-on-wet blending, dry brushing, and glazing.
By investing in quality tools and learning their nuances, you’ll minimize frustrations (such as paper buckling or muddy colors) and maximize your artistic potential. Remember, watercolor rewards experimentation—embrace mistakes as learning opportunities, as even unintended “blooms” (where water spreads paint unpredictably) can add unique beauty to your work. Let’s dive in, section by section, with practical advice to get you started.
Types of Brushes: The Heart of Watercolor Expression
Brushes are your primary interface with the paper, dictating stroke precision, water retention, and texture. High-quality brushes hold ample water and paint while maintaining a fine point, allowing for everything from broad washes to intricate details. Opt for natural hair brushes (like sable or squirrel) for superior flow, or synthetic alternatives for affordability and durability.
- Round Brush: Versatile and essential for most tasks. Its pointed tip excels at fine lines and details, while the belly holds water for broader strokes. Sizes range from 0 (tiny) to 12+ (large); start with a size 6 or 8 for general use.
- Mop Brush: Ideal for large washes and absorbing excess water. Its soft, fluffy head creates smooth gradients in skies or backgrounds.
- Designer’s Brush: Slim and precise, perfect for graphic elements or lettering.
- Wash Brush: Flat and wide for even, expansive color application, like laying down initial layers.
- Rigger Brush: Long, thin hairs for ultra-fine lines, such as tree branches or whiskers.
- Fan Brush: Splayed shape for textured effects like foliage, grass, or splatters.
- One Stroke Brush: Flat with a chisel edge for bold, single-pass strokes in florals or lettering.
- Angle Brush: Slanted tip for angled lines, shading, or dry brushing textures.
- Filbert Brush: Rounded flat edge for soft blending and petal shapes.
- One Stroke/Wash/Clear Handle Brush: Multi-purpose with a transparent handle for easy color identification.
- Retractable Brush: Portable and protective, great for travel sketching.
- Field Brush: Compact for outdoor painting, often with a cap that doubles as a handle extension.
Pro Tips for Brushes:
- Always rinse brushes in clean water after use; avoid leaving them tip-down in water to prevent bristle damage.
- Use a brush stand (detailed below) for drying to maintain shape.
- For masking fluid (see below), dedicate a cheap synthetic brush, as it can ruin natural hairs—never use your best brushes!
- Practice on scrap paper: Load the brush with water and paint, then test strokes to understand flow control.
Watercolor Paper: The Foundation of Your Artwork
Paper quality directly impacts paint behavior—cheap paper absorbs unevenly, leading to frustration, while premium options allow for lifting, layering, and vibrant colors. Look for 100% cotton, acid-free paper to prevent yellowing over time.
- Weight and Thickness: Aim for 140 lbs (300 gsm) or heavier to resist buckling under wet media. Thicker paper (e.g., 300+ gsm) handles multiple washes without warping.
- Common Types:
- Hot-Pressed: Smooth surface for pen details, illustrations, or precise work like botanical art. It absorbs less water, making it ideal for controlled applications.
- Cold-Pressed: Slightly rough texture for loose painting styles. It holds water well, encouraging organic blends and textures in landscapes or abstracts.
Pro Tips for Paper:
- Stretch paper on a board with painter’s tape (see below) before painting to prevent buckling—wet it, tape down, and let dry flat.
- Test swatches: Apply paint to see how it spreads and dries on different surfaces.
- For beginners, start with blocks (pre-stretched pads) to skip the stretching step.
Water: The Magic Ingredient for Transparency
Water is watercolor’s lifeblood, controlling pigment intensity and flow. More water yields lighter, more transparent washes; less creates opaque, vibrant marks.
- Setup Recommendation: Use two cups—one for mixing colors (dirty water is okay here) and one for cleaning brushes (keep it pristine to avoid contaminating your palette).
- Transparency Scale: Experiment with ratios: Less water for bold strokes, more for ethereal glazes.
Pro Tips for Water Management:
- Always add water to paint, not vice versa, for better control.
- Change water frequently to maintain color purity.
- Use a spray bottle for misting paper to keep areas wet during blending.
Types of Paint: Tubes vs. Pans
Watercolor paints come in moist forms that activate with water, offering endless mixing possibilities. Student-grade paints are affordable for practice; artist-grade provide richer pigments and longevity.
- Tubes: Squeeze out fresh paint for intense, creamy applications. Great for large works or mixing custom palettes.
- Pans: Dry cakes in a portable box, perfect for travel or quick sketches. Re-wet as needed.
Pro Tips for Paint:
- Mix on a non-porous palette (ceramic or plastic) to keep colors vibrant.
- Avoid over-mixing on paper to prevent muddiness—layer glazes instead.
- Store tubes capped and pans closed to prevent drying out.
Kneaded Erasure: Gentle Corrections Without Mess
A kneaded eraser is a must for lifting dry paint or graphite sketches without damaging paper.
- Advantages: Moldable, no crumbs, and reusable. Pinch off used sections for a clean surface.
Pro Tips:
- Use lightly post-drying to correct highlights or soften edges.
- For stubborn marks, dampen slightly—but test first to avoid smearing.
Masking Fluid: Preserving Whites and Details
This rubbery liquid creates a temporary barrier to keep areas paint-free, ideal for highlights like sun sparkles or whiskers.
- Application: Apply with an old brush or silicone tool; let dry fully before painting over.
- Removal: Peel off gently once paint is dry.
Pro Tips:
- Thin with water if too thick; avoid good brushes, as it clings to bristles.
- Test on scrap paper—some papers tear if fluid is left on too long.
Brush Stand: Protecting Your Investments
A simple stand prevents bristle bending and water dripping into handles, which can cause swelling.
- Usage: Place brushes tip-up after rinsing; dry them first if storing upright.
Pro Tips:
- DIY with a jar of rice or buy a dedicated holder.
- Air-dry horizontally on a towel for best shape retention.
Painter’s Tape: Securing and Straightening
Low-tack tape borders your painting area and helps stretch paper.
- Benefits: Prevents buckling by holding paper taut as it dries.
Pro Tips:
- Use blue or green artist’s tape to avoid residue.
- Remove slowly at a 180-degree angle to prevent tearing.
Paper Towel or Cloth: Controlling Wetness
Absorbent materials are essential for blotting excess water or paint.
- Uses: Dab brushes to dry them mid-painting or lift wet paint for highlights.
Pro Tips:
- Opt for lint-free cloths to avoid fibers in your work.
- Fold for precision; use textured towels for stippling effects.
Positive Attitude: The Intangible Tool
Watercolor is challenging—embrace it! Mistakes like blooms (uncontrolled spreads) can become intentional effects.
Mindset Tips:
- Start small: Practice daily swatches to build confidence.
- Learn from errors: Analyze what went wrong (e.g., too much water) and adjust.
- Community: Join online forums or classes for inspiration and feedback.
Building Your Starter Kit and Next Steps
For beginners, assemble a basic set: A few round brushes (sizes 4, 8, 12), cold-pressed paper block, tube or pan set with primary colors (red, yellow, blue), two water cups, masking fluid, and a kneaded eraser. Budget around $50-100 for quality basics. As you progress, expand to specialized tools like a mop brush for advanced washes.
Practice integrating these tools: Sketch lightly, mask highlights, apply washes with a mop, detail with rounds, and correct with erasers. Experiment with techniques—wet-on-dry for sharp edges, wet-on-wet for soft blends.
This guide equips you to create stunning watercolors with confidence. Remember, the best tool is practice; start today and watch your skills flow. Share your tool setups or first paintings in the comments—what’s your favorite watercolor hack? For more tutorials, explore our series on basic techniques or advanced effects like salt texturing. Happy painting!