Tutorial: Mastering Wave Direction and Surface Patterns in Water Painting

Welcome to this comprehensive tutorial on painting realistic water surfaces, inspired by the techniques outlined in G. MacKenzie’s Essential Landscapes (page 63). This guide focuses on creating wave direction and surface patterns to achieve a lifelike depiction of water, emphasizing perspective, movement, and natural flow. Suitable for artists of all skill levels, this step-by-step process will help you transform simple lines into dynamic, realistic water scenes. Whether you’re working on landscapes, seascapes, or abstract water elements, these methods will add depth and energy to your artwork.
Introduction
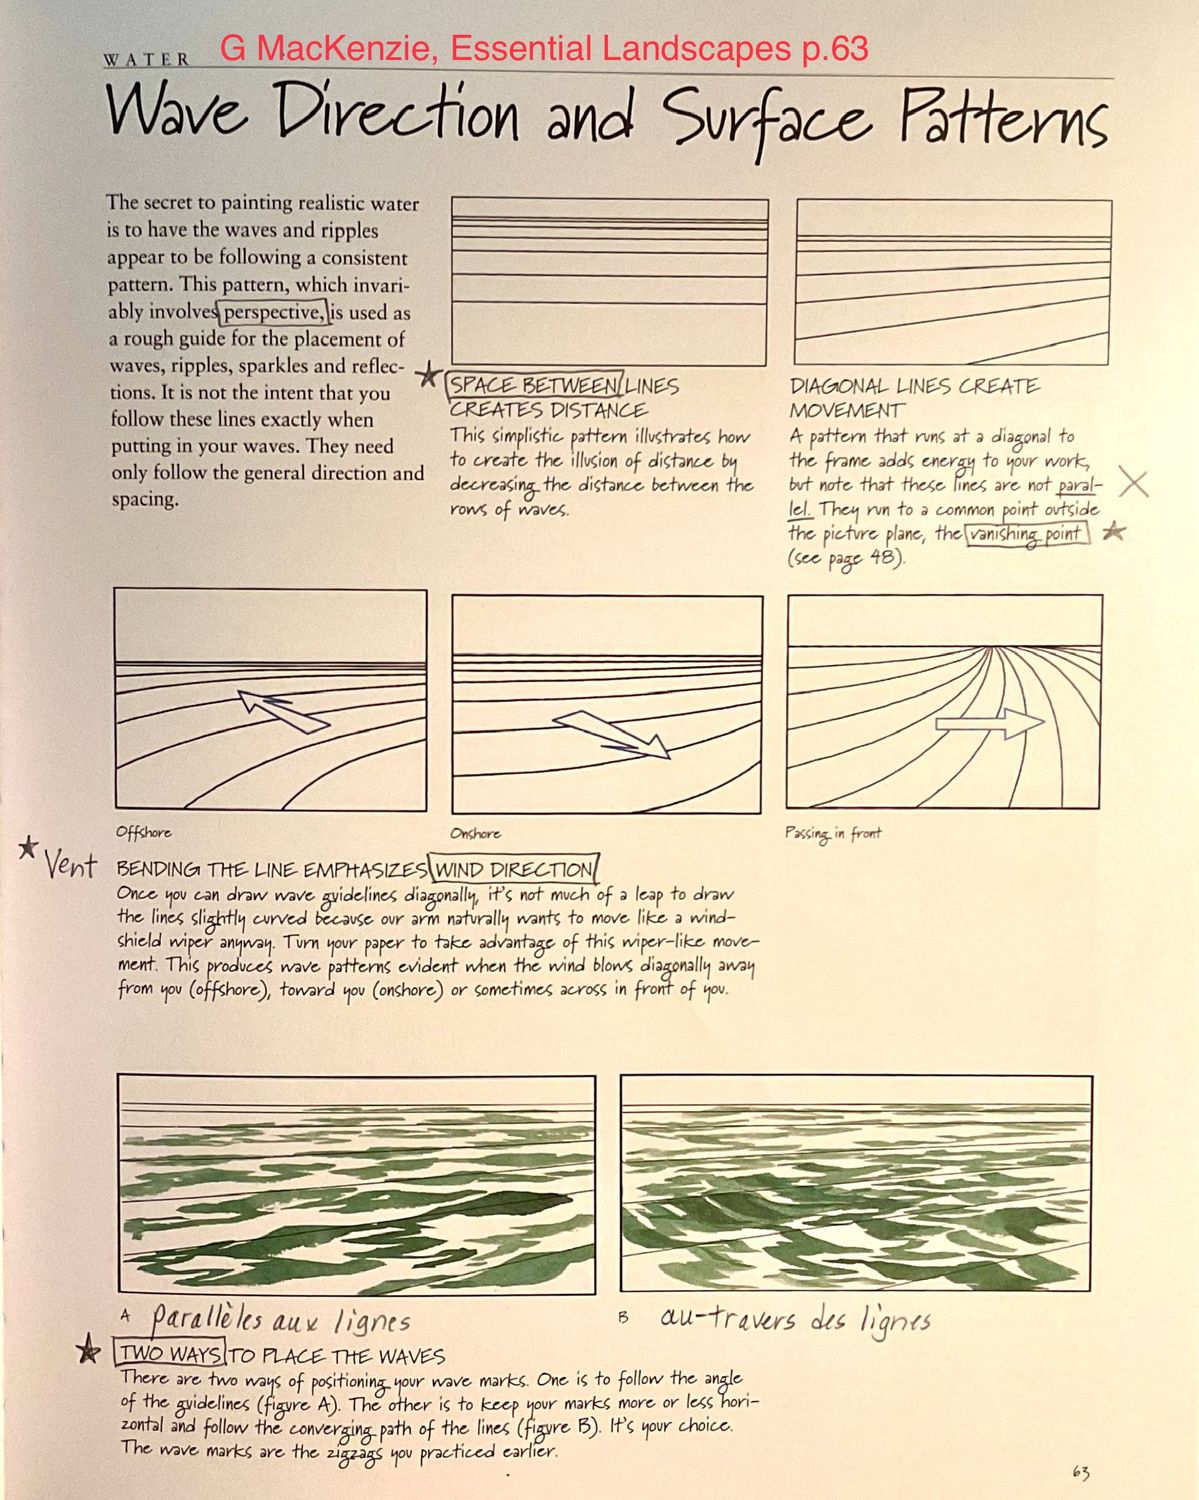
Painting water realistically requires understanding how waves and ripples follow consistent patterns influenced by perspective and wind direction. The key is using guidelines to place waves, ripples, sparkles, and reflections without rigidly adhering to them—allowing for natural variation while maintaining overall direction and spacing. This tutorial draws from fundamental principles like spacing for distance, diagonal lines for movement, and curved lines to emphasize wind effects. By the end, you’ll be able to create illusions of offshore, onshore, or cross-wind patterns, adding vitality to your paintings.
Materials Needed
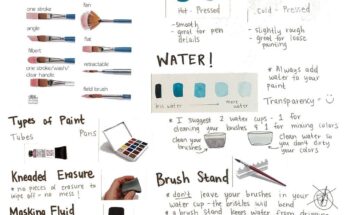
- Watercolor or acrylic paints (blues, greens, whites for highlights)
- Brushes (flat, round, and detail brushes for varying line widths)
- High-quality watercolor paper or canvas
- Pencils (HB or 2B for initial guidelines)
- Eraser (kneaded for subtle adjustments)
- Palette for mixing colors
- Reference images of water surfaces (optional for inspiration)
Step-by-Step Guide
Step 1: Establishing Basic Guidelines for Distance
- Objective: Create the illusion of depth through spacing.
- Process: Begin by drawing horizontal lines across your canvas to represent rows of waves. Start with wider spacing in the foreground and gradually decrease the distance between lines as they recede into the background. This simplistic pattern, as shown in the “Space Between Lines Creates Distance” diagram, mimics how waves appear closer together at the horizon.
- Tip: Use light pencil strokes so they can be easily erased or painted over. Keep the lines straight initially to focus on perspective.
Step 2: Introducing Diagonal Lines for Movement
- Objective: Add energy and direction to the water surface.
- Process: Shift from horizontal to diagonal lines, ensuring they converge toward a common vanishing point outside the picture plane (refer to page 48 in the source for vanishing point details). Avoid making them perfectly parallel; instead, angle them to run diagonally across the frame. The “Diagonal Lines Create Movement” illustration demonstrates how this pattern energizes the composition.
- Tip: Rotate your paper if needed to draw comfortably. Note that these lines should not be parallel—they taper to enhance the sense of perspective and motion.
Step 3: Bending Lines to Emphasize Wind Direction
- Objective: Simulate natural wind effects on water.
- Process: Curve your guidelines slightly to represent wind influence. Draw them with a gentle arc, mimicking the natural swing of your arm like a windshield wiper. This technique works for offshore (wind blowing away from you), onshore (toward you), or crosswinds (across in front). Refer to the “Vent Bending the Line Emphasizes Wind Direction” section for visual examples.
- Tip: Turn your paper to align with your natural arm movement for smoother curves. Experiment with the degree of curvature to match the desired wind strength—subtle for calm breezes, more pronounced for stronger gusts.
Step 4: Placing Wave Marks Along Guidelines
- Objective: Add texture and form to waves using two placement methods.
- Process: Choose one of two approaches to position your wave marks (zigzags practiced in earlier exercises):
- Method A: Paralleles aux Lignes – Align wave marks with the angle of the guidelines, following their diagonal or curved path (as in Figure A).
- Method B: au-Travers des Lignes – Keep wave marks more horizontal while following the converging path of the lines (as in Figure B).
Apply paint in short, zigzag strokes using a detail brush, varying thickness for ripples and larger waves.
- Tip: Mix shades of blue and green for depth, adding white highlights for sparkles. Don’t follow guidelines exactly—allow natural variations for realism.
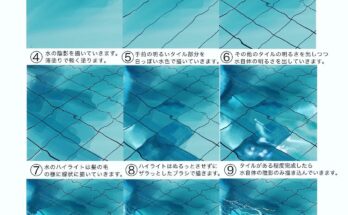
Step 5: Refining Patterns and Adding Details
- Objective: Enhance realism with reflections, sparkles, and spacing adjustments.
- Process: Build on your guidelines by adding subtle reflections where waves meet, using lighter tones. Incorporate sparkles with small white dots or lines where light hits the water. Adjust spacing to reinforce distance: closer in the background, wider upfront. Blend colors softly for a seamless surface pattern.
- Tip: Use a dry brush technique for textured ripples. Observe real water or references to ensure patterns follow a consistent direction without becoming repetitive.
Final Touches
- Layer additional glazes for depth, focusing on translucent effects in water painting.
- Erase any visible guidelines and soften edges with a damp brush.
- Evaluate the overall flow: Ensure waves convey movement toward or away from the viewer.
- Sign your artwork and consider framing it to preserve the delicate water effects.
Conclusion
Congratulations on mastering wave direction and surface patterns! This tutorial, drawn from G. MacKenzie’s expert insights, has equipped you with techniques to paint convincing water elements that capture perspective, wind, and natural movement. Practice these steps on various scenes to build confidence, and experiment with different mediums or color palettes. Share your finished pieces online or in art communities for feedback, and explore related topics like vanishing points for even more advanced landscapes.
Happy painting!