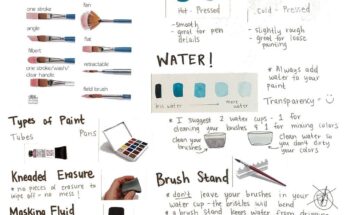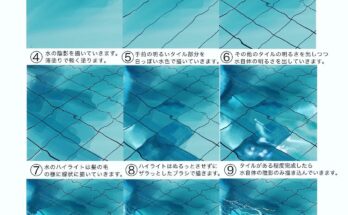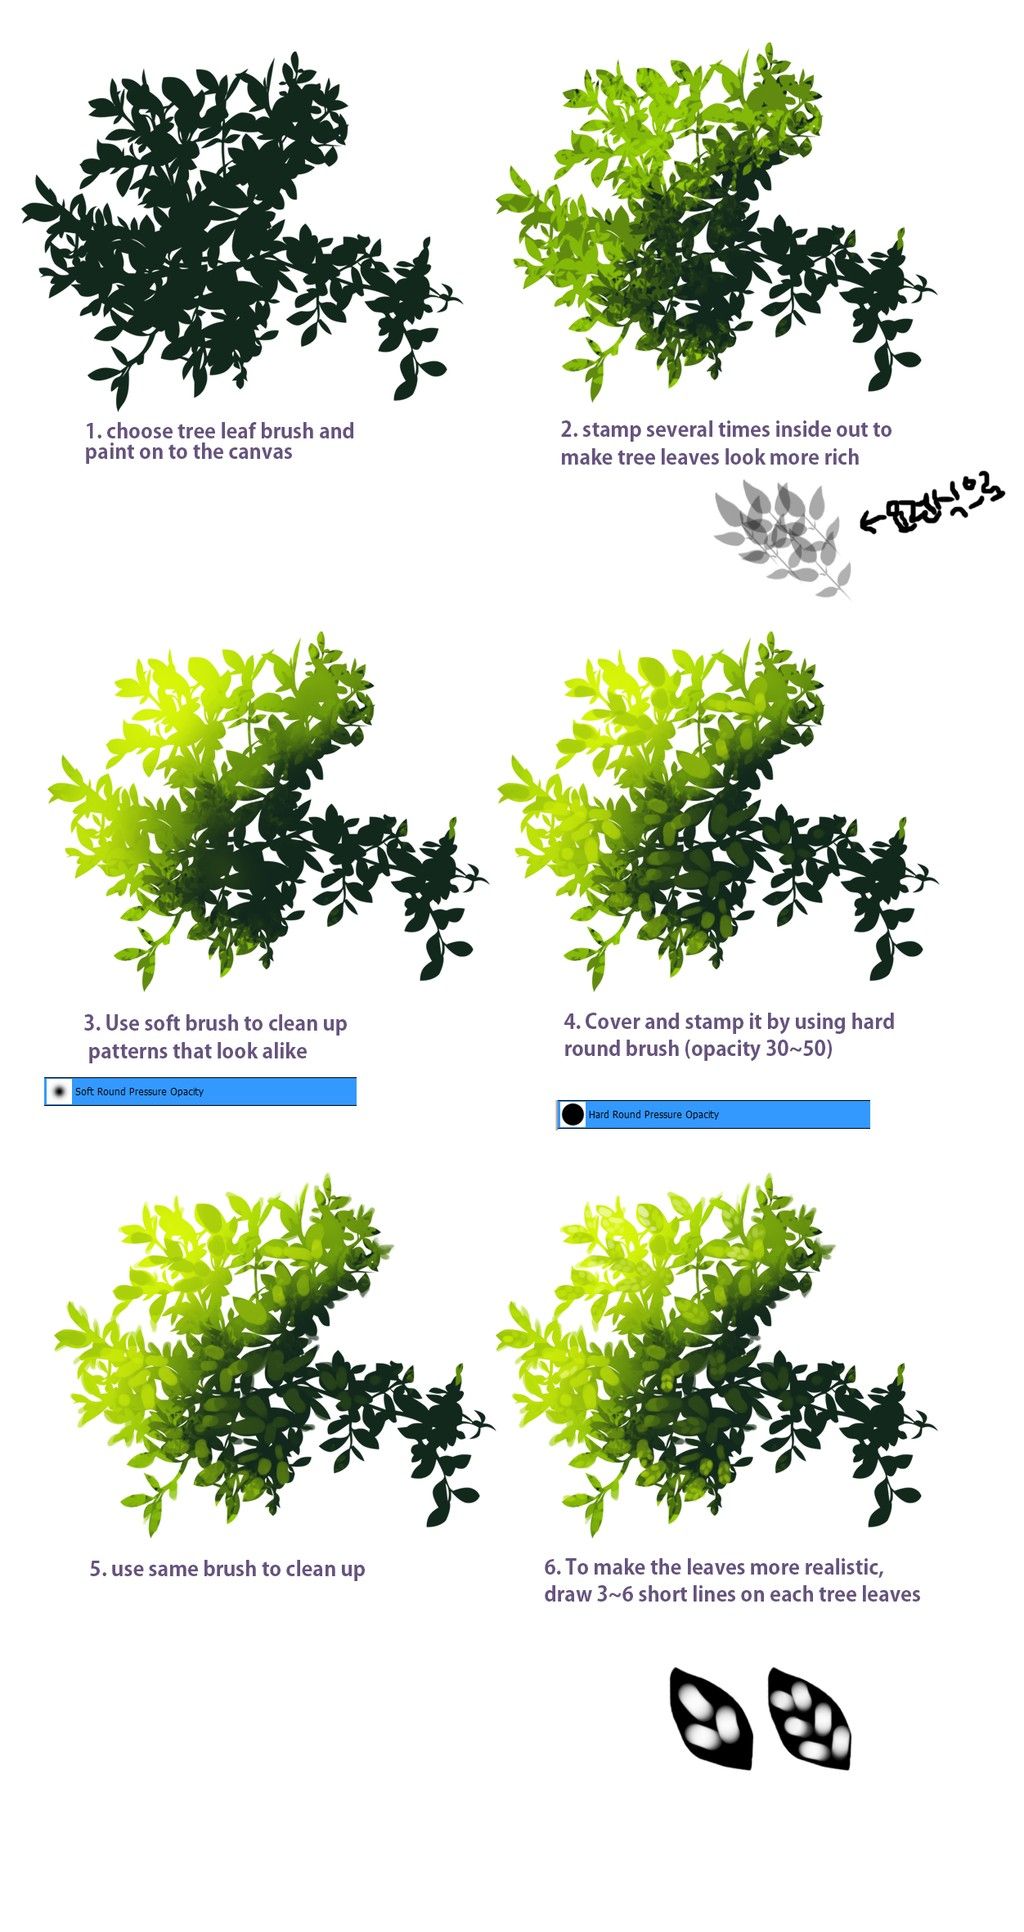

Tutorial: Creating Realistic Tree Foliage with Digital Painting Techniques
Welcome to this in-depth tutorial on creating realistic tree foliage using digital painting techniques. Designed for artists ranging from beginners to advanced users, this guide leverages the step-by-step process illustrated in the provided images to help you master the art of digital tree design. Whether you’re enhancing a landscape illustration or creating a standalone piece, these techniques will elevate your digital artwork. Gather your digital tools—such as a graphics tablet, stylus, and software like Adobe Photoshop or Procreate—and follow along.
Introduction
Digital painting offers a flexible and dynamic way to create detailed and realistic tree foliage. This tutorial breaks down the process into six clear stages, focusing on brush selection, layering, and texturing to achieve a natural look. The images provide visual cues for each step, ensuring you can replicate the process with precision.
Materials Needed
- Graphics tablet and stylus (e.g., Wacom or iPad with Apple Pencil)
- Digital art software (e.g., Adobe Photoshop, Procreate, or Clip Studio Paint)
- Custom tree leaf brush (downloadable or custom-made)
- Soft and hard round brushes
- Layers panel for non-destructive editing
Step-by-Step Guide
Step 1: Choosing and Applying the Base Leaf Brush
- Objective: Establish the initial foliage structure.
- Process: Select a tree leaf brush from your software’s library or import a custom one. Apply the brush to your canvas with a dark green or black color to create the base silhouette of the tree foliage. The first image (1. choose tree leaf brush and paint on to the canvas) shows this initial application.
- Tip: Use a light opacity setting (around 20-30%) to build up the shape gradually, allowing for easy adjustments.
Step 2: Adding Depth with Stamping
- Objective: Enhance the richness of the foliage.
- Process: Using the same leaf brush, stamp several times inside and outside the initial shape to add layers of leaves. Vary the pressure and angle to create a natural, overlapping effect. The second image (2. stamp several times inside out to make tree leaves look more rich) illustrates this layered approach.
- Tip: Introduce a lighter green shade (e.g., #A9C4A8) to suggest highlights and depth within the foliage.
Step 3: Refining with a Soft Brush
- Objective: Smooth out uniform patterns for a natural look.
- Process: Switch to a soft round brush with pressure opacity enabled. Gently blend and clean up areas where patterns look too uniform. The third image (3. Use soft brush to clean up patterns that look alike) highlights this smoothing technique.
- Tip: Keep the brush opacity low (10-20%) and work in small circular motions to avoid over-blending.
Step 4: Adding Texture with a Hard Brush
- Objective: Introduce texture and definition.
- Process: Use a hard round brush with an opacity of 30-50% to stamp and cover areas, adding texture to the foliage. The fourth image (4. Cover and stamp it by using hard round brush (opacity 30-50)) shows the textured effect.
- Tip: Vary the brush size (e.g., 5-15 px) and apply short, controlled strokes to mimic natural leaf clusters.
Step 5: Final Cleanup with the Same Brush
- Objective: Polish the foliage shape.
- Process: Revert to the original leaf brush to clean up edges and refine the overall shape. The fifth image (5. use same brush to clean up) demonstrates this final shaping stage.
- Tip: Adjust the brush size to focus on detailed areas, ensuring a cohesive silhouette.
Step 6: Enhancing Realism with Leaf Details
- Objective: Add realistic leaf vein details.
- Process: Use a small hard brush to draw 3-6 short lines on each leaf to represent veins. The sixth image (6. To make the leaves more realistic, draw 3-6 short lines on each tree leaves) includes an example of this detailing.
- Tip: Use a darker green or brown shade (e.g., #4A7043) for veins and keep the lines subtle to avoid overpowering the design.
Final Touches
- Review your layers for consistency in color and texture.
- Adjust the overall brightness and contrast to match your scene’s lighting.
- Save your work in multiple formats (e.g., PSD and PNG) to preserve layers for future edits.
Conclusion
You’ve now completed a realistic digital tree foliage design! This tutorial has guided you through selecting brushes, building layers, and adding intricate details to create a lifelike effect. Practice these steps to refine your technique, and experiment with different leaf shapes or seasonal variations. Share your creations with us or incorporate them into larger digital landscapes.