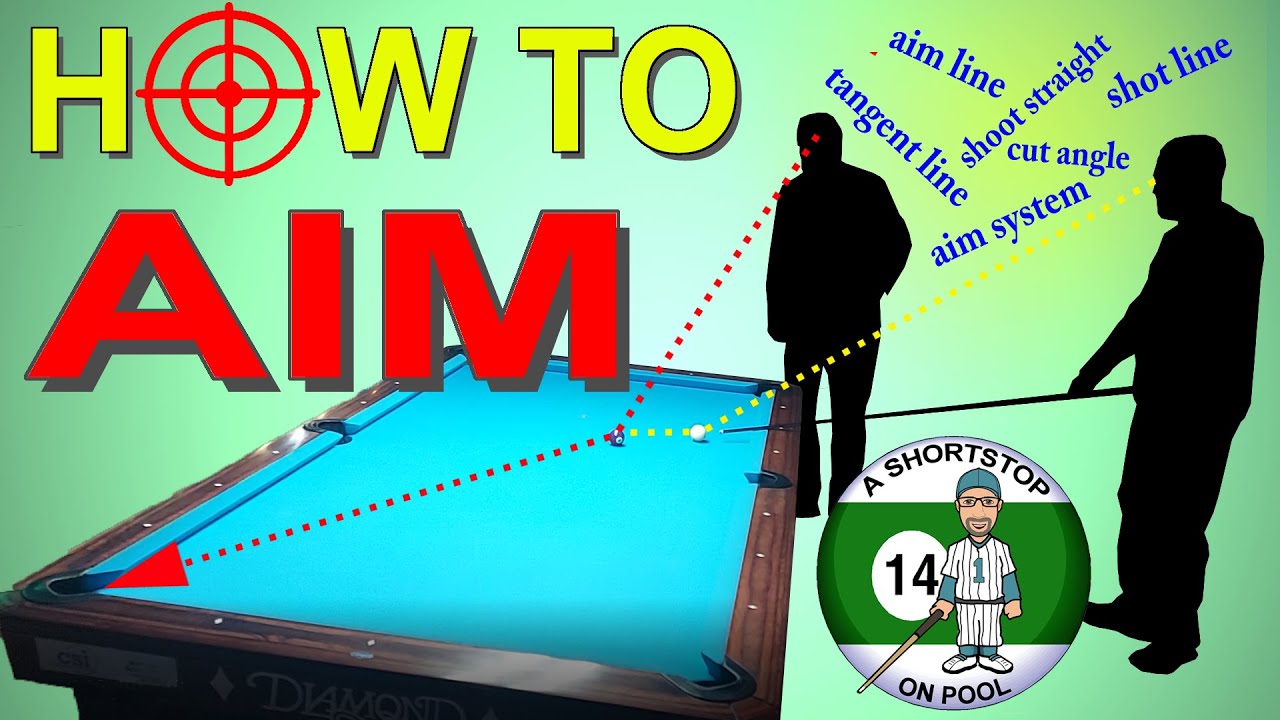
How to Aim Pool Shots, Billiard Training, Intellectual Tutorial

Aiming pool shots effectively requires a combination of technique, visualization, and practice. Below is an intellectual tutorial on how to aim pool shots, tailored for billiards training. This guide covers key methods, concepts, and tips to improve your accuracy and consistency in games like 8-ball, 9-ball, or straight pool.
1. Understanding the Basics of Aiming
Aiming in pool involves aligning your cue stick to strike the cue ball in a way that sends it to the intended target (object ball) and pockets it. The process relies on:
- Geometry: Pool is a game of angles. The path of the cue ball and object ball follows predictable geometric principles.
- Visualization: Mentally mapping the shot before executing it.
- Cue Ball Control: Striking the cue ball accurately to achieve the desired speed, spin, and direction.
Key concepts:
- Contact Point: The exact spot on the object ball where the cue ball must hit to send it toward the pocket.
- Angle of Incidence: The angle at which the cue ball strikes the object ball equals the angle at which the object ball travels (assuming no spin or friction effects).
- Ghost Ball: An imaginary ball placed at the point where the cue ball needs to contact the object ball to pocket it.
2. Popular Aiming Systems
Several aiming systems can help you align shots accurately. Here are the most effective ones:
A. Ghost Ball Method
The ghost ball method is the most intuitive aiming technique for beginners and pros alike.
- Concept: Imagine a “ghost” cue ball positioned at the exact spot where the real cue ball needs to contact the object ball to send it to the pocket.
- Steps:
- Identify the pocket you want to send the object ball to.
- Visualize a line from the center of the pocket through the center of the object ball. This is the aim line.
- Imagine a ghost cue ball touching the object ball at the point where the aim line exits the object ball.
- Aim the center of your cue ball at the center of the ghost ball.
- Tip: Practice visualizing the ghost ball by placing a real ball in its position during training to confirm your aim.
B. Contact Point Aiming
This method focuses on the precise point of contact between the cue ball and object ball.
- Steps:
- Determine the contact point on the object ball that will send it to the pocket (found by tracing the aim line from the pocket to the object ball).
- Align your cue stick to strike the cue ball so it hits that exact contact point.
- Account for the cue ball’s size: The contact point on the cue ball is opposite the contact point on the object ball.
- Tip: Use a straight edge (like a piece of chalk) to practice finding contact points during training.
C. Fractional Aiming System
This system simplifies aiming by breaking shots into fractions based on the overlap between the cue ball and object ball.
- Concept: Shots are categorized as full, 3/4, 1/2, 1/4, or 1/8 hits, depending on how much of the object ball the cue ball strikes.
- Steps:
- Visualize the cue ball’s edge aligning with a fraction of the object ball (e.g., for a half-ball hit, aim so the edge of the cue ball hits the center of the object ball).
- Adjust for the angle: A full hit sends the object ball straight, while a 1/4 hit creates a sharper angle.
- Practice common fractional shots to develop an instinctive feel for angles.
- Tip: Use a training template or mark the table to practice consistent fractional hits.
D. Double-the-Distance (or Mirror) System
This is useful for bank shots, where the object ball rebounds off a rail to reach the pocket.
- Steps:
- Imagine a mirror image of the pocket across the rail you’re banking off.
- Draw a line from the object ball to the mirror pocket.
- Aim the cue ball to strike the object ball along this line.
- Tip: Account for factors like spin, speed, and table conditions, as they affect bank shot accuracy.
E. CTE (Center-to-Edge) Aiming
Center-to-Edge is a more advanced, systematic approach used by some professional players.
- Concept: Align the cue ball’s center to the edge of the object ball, then pivot the cue stick to find the aim line.
- Steps:
- Align your cue stick from the center of the cue ball to the edge (left or right) of the object ball.
- Pivot your cue stick slightly to adjust for the shot angle, based on predefined reference points.
- Practice to develop muscle memory for pivot points.
- Note: CTE requires significant practice and study to master, as it involves specific visual alignments and pivots.
3. Key Techniques for Accurate Aiming
Beyond aiming systems, proper execution is critical. Here are essential techniques to refine your aim:
A. Stance and Alignment
- Stance: Stand with your dominant foot forward, knees slightly bent, and body low to the table for stability.
- Cue Alignment: Ensure your cue stick is aligned with your dominant eye (or vision center). To find your dominant eye:
- Point at a distant object with both eyes open.
- Close one eye at a time. The eye that keeps your finger aligned with the object is your dominant eye.
- Tip: Keep your head low and still, with your chin near the cue stick, to maintain a consistent sightline.
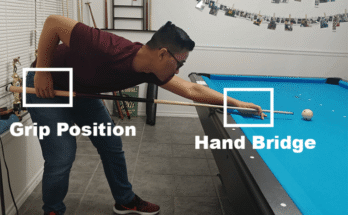
B. Stroke Mechanics
- Grip: Hold the cue lightly with your back hand, allowing a smooth, pendulum-like stroke.
- Bridge: Use a stable bridge (open or closed) to guide the cue stick accurately.
- Follow-Through: Ensure a smooth follow-through to avoid jerking the cue, which can throw off your aim.
- Practice Drill: Set up straight shots and focus on stroking through the cue ball without moving your head or body.
C. Cue Ball Control
- Spin (English): Applying top, bottom, or side spin affects the cue ball’s path after contact. For example:
- Topspin: Makes the cue ball follow the object ball.
- Backspin: Pulls the cue ball back after contact.
- Side Spin: Alters the angle of reflection off rails.
- Speed: Control the speed to ensure the object ball reaches the pocket without overshooting or undershooting.
- Tip: Practice stop shots (where the cue ball stops upon hitting the object ball) to master speed control.
D. Visualizing the Shot
- Mentally rehearse the shot before getting down to shoot. Picture the cue ball’s path, the object ball’s trajectory, and the cue ball’s final position.
- Use the table’s markings (e.g., diamonds) to gauge angles and distances.
4. Training Drills to Improve Aiming
Consistent practice is essential to develop muscle memory and precision. Try these drills:
Drill 1: Straight-In Shots
- Setup: Place the cue ball and an object ball in a straight line to a pocket, about 2–3 feet apart.
- Goal: Pocket the object ball repeatedly, focusing on aligning the cue ball’s center with the object ball’s contact point.
- Variation: Increase the distance or add slight angles to challenge your aim.
Drill 2: Angle Shots
- Setup: Place an object ball near the center of the table and the cue ball at various angles (30°, 45°, 60°).
- Goal: Pocket the ball using the ghost ball or fractional aiming method.
- Tip: Mark the table with chalk to confirm contact points.
Drill 3: Bank Shot Practice
- Setup: Place an object ball near a rail and aim to bank it into the opposite pocket.
- Goal: Use the double-the-distance method to pocket the ball consistently.
- Variation: Experiment with spin to see how it affects the bank angle.
Drill 4: Cue Ball Control
- Setup: Set up an easy shot but focus on where the cue ball stops after contact.
- Goal: Pocket the object ball while landing the cue ball in a specific zone (e.g., center table).
- Tip: Use spin and speed variations to control the cue ball’s final position.
5. Common Mistakes and How to Fix Them
- Mistake: Misjudging angles.
- Fix: Practice with a protractor or angle template to develop a better sense of angles.
- Mistake: Inconsistent stroke.
- Fix: Record your stroke or work with a coach to ensure a smooth, straight follow-through.
- Mistake: Overcomplicating shots.
- Fix: Stick to one aiming system (e.g., ghost ball) until you’re consistent, then explore others.
- Mistake: Ignoring table conditions.
- Fix: Account for factors like table speed, cloth wear, and rail bounce, which can affect shot outcomes.
6. Advanced Tips for Competitive Play
- Positional Play: Always plan where the cue ball will end up after the shot to set up your next shot.
- Safety Shots: If a shot is too difficult, aim to leave the cue ball in a position that makes it hard for your opponent to shoot.
- Practice Under Pressure: Simulate game conditions by setting up challenging shots and tracking your success rate.
- Mental Focus: Stay calm and focused. Visualize success before each shot to build confidence.
7. Resources for Further Learning
- Books:
- The Science of Pocket Billiards by Jack H. Koehler for a deep dive into the physics of pool.
- Byrne’s New Standard Book of Pool and Billiards by Robert Byrne for practical tips.
- Videos: Search for tutorials on platforms like YouTube from pros like Shane Van Boening or Dr. Dave Billiards.
- Coaching: Consider lessons from a certified instructor (e.g., BCA or WPA certified coaches).
- Apps: Use apps like Virtual Pool or Cueist for virtual practice and aiming exercises.
8. Final Thoughts
Aiming pool shots is both an art and a science. Start with the ghost ball method for simplicity, then experiment with fractional or CTE systems as you gain experience. Focus on consistent mechanics, practice drills regularly, and analyze your mistakes to improve. With time, your ability to visualize angles, control the cue ball, and execute precise shots will elevate your game to a competitive level.
If you’d like specific drills tailored to a particular game (e.g., 8-ball or 9-ball) or a visual chart of shot angles, let me know! For example, I can create a chart showing common shot angles if you confirm you’d like one.