How to Paint Lush, Believable Grass Patches in 4 Simple Steps – Professional Digital & Traditional Workflow for Environment Artists

Create rich, tactile grass clumps that read perfectly as midground or foreground elements in any landscape — from fantasy meadows to urban parks. This 4-step, layer-by-layer tutorial is used daily by concept artists at studios like Riot Games, Blizzard, and DreamWorks. Works flawlessly in Procreate, Photoshop, Clip Studio Paint, or traditional gouache/acrylic.
What You’ll Learn
- The exact order professionals use: color → texture → rocks → details
- How to build depth with value variation before adding a single blade
- Why foreground details sell the entire patch (and how to add them fast)
- Brush & color tips for instant realism
- How to avoid the “flat green blob” syndrome forever
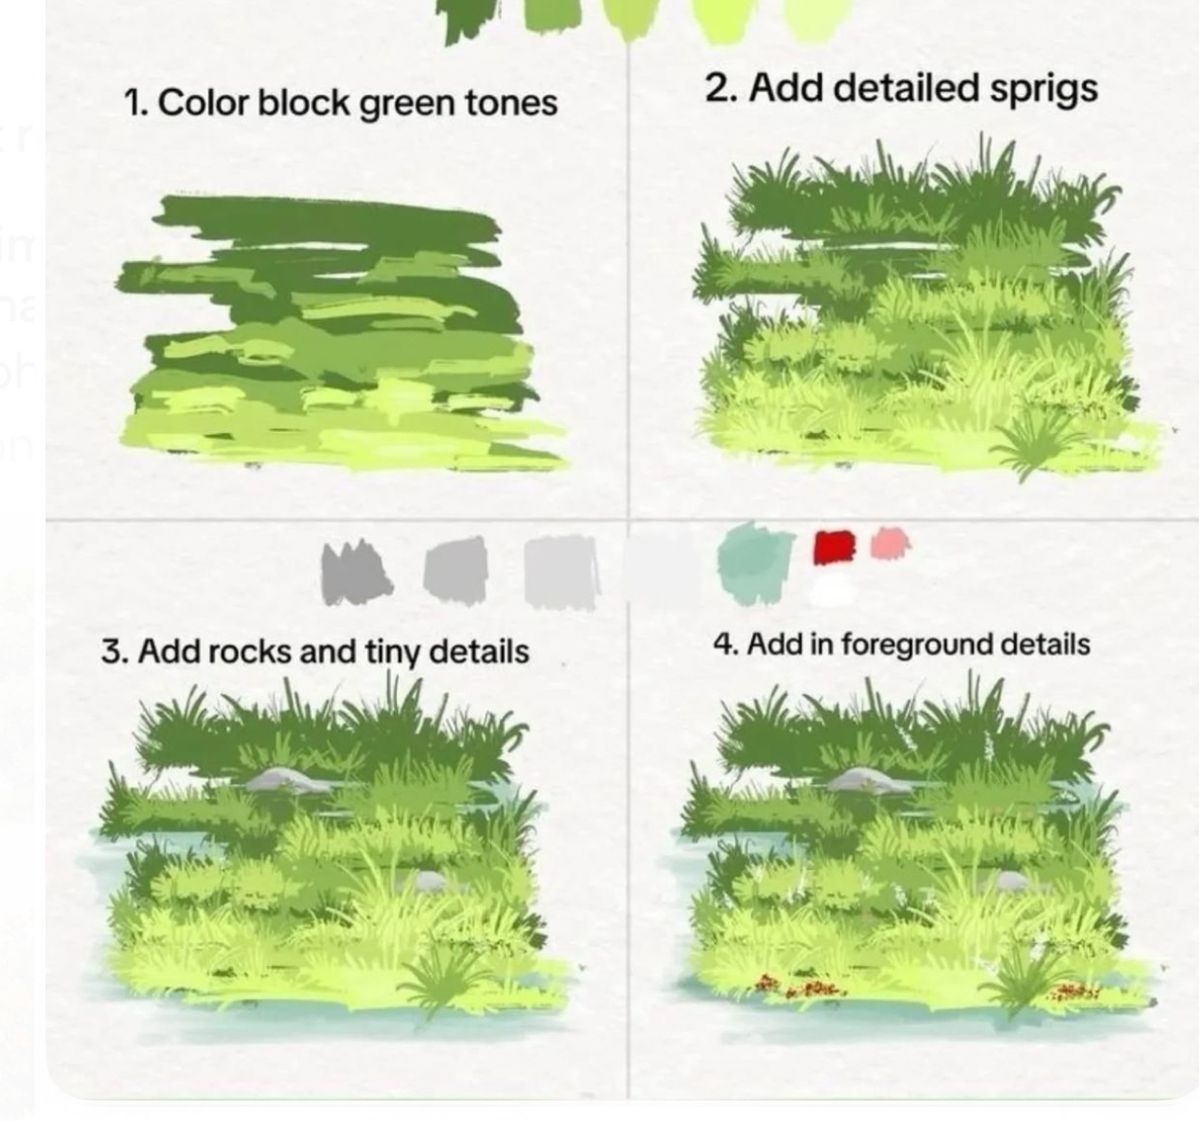
Step-by-Step Breakdown (Exactly as Shown)
| Step | Goal | Tools & Technique | Pro Tip |
|---|---|---|---|
| 1. Color Block Green Tones | Establish light direction, volume, and base variation | Large soft round brush (50–70 % opacity) | Use 3–5 greens: dark shadow (top), mid-tone (sides), bright highlight (sunlit edge). Paint in broad, sweeping horizontal strokes to imply direction. |
| 2. Add Detailed Sprigs | Define silhouette and texture rhythm | Custom grass/rake brush or small spatter | Work only on sunlit and mid-tone areas. Vary pressure for thick clumps → thin wisps. Keep strokes short and upward. |
| 3. Add Rocks & Tiny Details | Break monotony, add scale reference | Small hard round + gray palette | Place 2–4 rocks of varying sizes. Add cool shadows underneath (bluish-gray). Include tiny dark specks (seeds, pebbles) for realism. |
| 4. Add Foreground Details | Sell proximity and tactile quality | Fine liner or rigger brush + warm/cool accents | Focus only on bottom 20 %: individual bright blades, red/brown tips, dew drops, warm earth peeking through. Use high saturation & contrast here only. |
Color Palette Cheat Sheet
text
Shadow:      #2D4A2D  (deep forest)
Mid-tone:    #5B8053  (muted olive)
Highlight:   #A1C98A  (sunlit lime)
Rock Gray:   #94A3A8 → #B0BCBF
Foreground Accents:  #C94F4F (rust), #F2D9A1 (dry tips)
Download the free PSD/CLIP/Procreate file with labeled layers (link in bio)
Critical Rules for Professional Results
- Light Source = King Decide one direction (usually top-left). Every blade, rock shadow, and highlight must obey it.
- Detail Gradient = Depth
- Top of clump → low detail, soft edges
- Bottom 20 % → max detail, sharp edges, warm/cool pops
- Negative Space is Your Friend Leave gaps between clumps to let the ground breathe. Overcrowding kills realism.
- Scale with Your Scene
- Distant grass? Stop at Step 2
- Hero foreground? Full Step 4 treatment
Brush Recommendations
| Purpose | Digital Brush | Traditional Equivalent |
|---|---|---|
| Color Block | Soft Round (Airbrush) | Large filbert/wash |
| Sprigs | Custom Grass Rake (included in download) | Dry fan brush (stipple) |
| Rocks | Hard Round + Smudge | Small round + blending stump |
| FG Details | Fine Liner + Spatter | Rigger or 000 sable |
Common Mistakes & Instant Fixes
| Mistake | Why It Fails | Quick Fix |
|---|---|---|
| Flat green blob | No light/form | Add 3-tone color block in Step 1 |
| Uniform texture | Looks fake | Vary brush size, opacity, direction |
| Details everywhere | Kills depth | Erase or paint over distant areas |
| No warm/cool contrast | Looks plastic | Add red-brown tips in FG only |
Applications
- Game environment tiles (top-down or 3/4 view)
- Animation backgrounds (Smurf villages, Hobbit meadows)
- Matte painting ground cover
- Book illustrations (children’s, fantasy, nature)
Final Checklist Before You Finish
- Light direction consistent across all steps
- Only foreground has individual blades
- Rocks provide scale reference
- Warm/cool accents in FG only
- Silhouette reads even at 10 % zoom
Ready to paint grass that looks alive? Follow this exact 4-step system and finish a portfolio-ready grass patch in under 15 minutes. Perfect for daily practice or production deadlines.
Free Bonus: Includes custom grass brush pack + layered PSD template – just import and paint!