Mastering Ink Pen Techniques: A Comprehensive Guide to Brush Styles

Enhance your artistic repertoire with our detailed tutorial on mastering ink pen techniques, focusing on a variety of brush styles to elevate your illustrations. Ink pens are a powerful tool for creating precise lines, dynamic patterns, and textured effects, making them ideal for artists, designers, and illustrators. This guide provides a step-by-step exploration of ink pen brushes—divided into Ink Pen Brushes, Pattern Brushes, and Cross-Hatch Brushes—as illustrated in the provided images. Whether you’re a beginner or a seasoned professional, this tutorial will equip you with the skills to produce stunning, professional-grade artwork.
Introduction to Ink Pen Techniques
Ink pen drawing offers a unique blend of control and expressiveness, allowing artists to create everything from clean lines to intricate textures. The techniques showcased here leverage different brush styles to add depth and character to your work. The images provide a visual guide, demonstrating a range of strokes that can be applied to sketches, comics, or detailed illustrations. Gather your ink pens, paper, and a steady hand, and let’s explore the process.
Step-by-Step Tutorial
- Step 1: Mastering Ink Pen Brushes
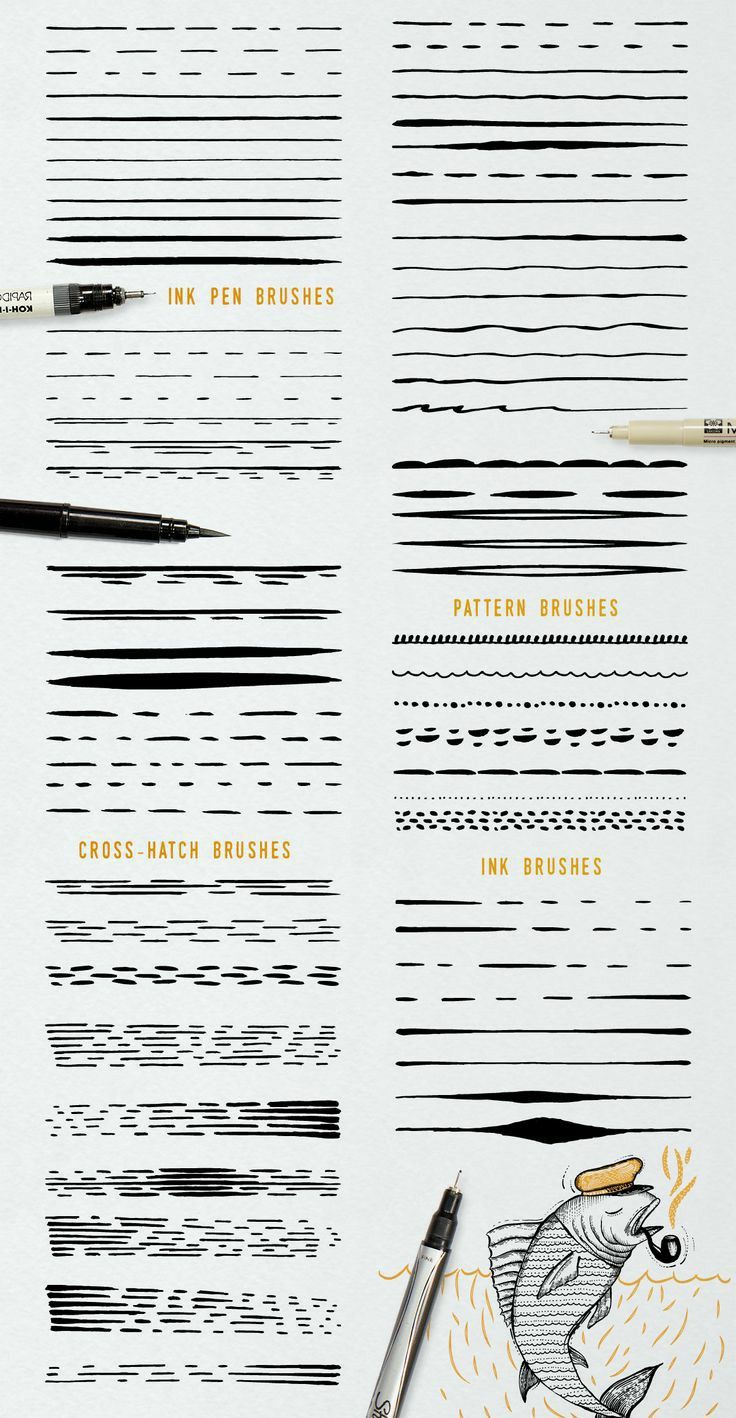
- Basic Straight Lines: Begin with the simplest technique by drawing straight, uniform lines, as shown in the top left section. Use a fine-tip ink pen and vary pressure to control thickness, with consistent spacing for a clean look.
- Varying Line Weights: Practice lines with different weights (second and third rows, left), adjusting pressure to create bold and subtle strokes, ideal for outlining or emphasis.
- Curved and Wavy Lines: Introduce curved and wavy lines (fourth and fifth rows, left) to add fluidity, perfect for organic shapes or decorative elements.
- Dynamic Strokes: Experiment with quick, expressive strokes (bottom rows, left) to capture movement, enhancing the energy of your drawings.
- Step 2: Exploring Pattern Brushes
- Repetitive Patterns: Move to pattern brushes by creating repetitive designs, as depicted in the middle right section. Start with dashed lines (top right) for a rhythmic effect, ideal for borders or backgrounds.
- Wavy and Zigzag Patterns: Draw wavy lines (second row, right) and zigzag patterns (third row, right) to add texture, suitable for water or fabric effects.
- Dotted and Stippled Designs: Use dotted lines (fourth row, right) and stippled patterns (fifth row, right) for a textured, pointillist style, great for shading or detailing.
- Complex Patterns: Combine elements like dashes and dots (bottom row, right) for intricate designs, enhancing the visual interest of your work.
- Step 3: Applying Cross-Hatch Brushes
- Basic Cross-Hatching: Advance to cross-hatch brushes by layering lines in different directions, as shown in the bottom left section. Start with simple overlays (top left) to build light shading, with tighter intersections for darker tones.
- Dense Cross-Hatching: Increase line density (middle rows, left) to create deeper shadows, varying angles for a textured effect.
- Bold Cross-Hatch Patterns: Use bold, overlapping strokes (bottom rows, left) for dramatic shading, perfect for emphasizing form and depth.
- Comparison with Ink Brushes: Note the contrast with the right section (bottom), where single-direction lines offer a smoother alternative to cross-hatching.
- Step 4: Applying Techniques with Precision
- Hold your ink pen with a steady grip, using the tip for fine lines or slight angles for broader strokes, as illustrated by the pens in the image. Maintain consistent pressure and direction to achieve uniform results. Practice on scrap paper to test flow and avoid smudging, rotating your paper as needed for natural stroke alignment.
Practical Application
Start by practicing each brush style on scrap paper to master control. Use ink pen brushes for outlines and details in portraits or comics, pattern brushes for decorative backgrounds, and cross-hatch brushes for shading in landscapes or still life. Experiment with pen types (e.g., fine liners, brush pens) and ink flow to suit your style. Combine techniques—such as pattern brushes with cross-hatching—to create complex textures like scales or foliage, as hinted by the fish illustration.
Tips for Success
- Keep your pen tip clean and test on scrap paper before starting.
- Use light initial sketches with pencil to guide your ink lines.
- Allow ink to dry fully between layers to prevent smudging.
- Practice varying pressure to achieve a range of effects with one pen.
Conclusion
Mastering ink pen techniques and brush styles is key to creating dynamic and detailed illustrations. By following this step-by-step guide and practicing with the illustrated examples, you’ll develop the skills to produce professional-quality artwork with confidence. Whether you’re designing graphics, sketching characters, or adding texture to your drawings, these methods will enhance your creative output. Explore more art tutorials on our website, and share your masterpieces with our community of artists. Start inking today and unlock the full potential of your pen!
Happy creating!


