Mastering Head Construction: A Step-by-Step Guide to Andrew Loomis’s Method for Drawing the Human Head

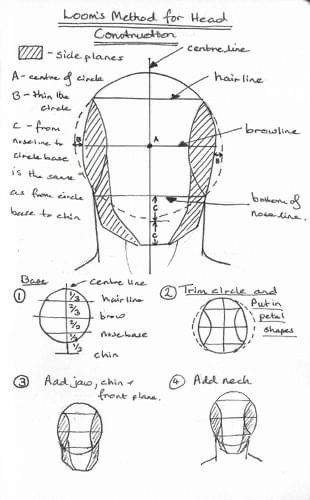
Unlock the secrets of drawing the human head with Andrew Loomis’s renowned construction method, a time-tested technique favored by professional illustrators, animators, and portrait artists. This detailed tutorial breaks down the process into clear, actionable steps, using the annotated diagram above to guide you from a basic sphere to a fully proportioned head. Ideal for beginners and intermediate artists, this guide emphasizes anatomical accuracy and dynamic angles, making it perfect for character design, comics, or realistic portraits.
Follow the step-by-step progression to construct a head from any view, incorporating the center line, hairline, browline, and facial planes with precision.
Core Principles of Loomis’s Method
- Spherical Foundation: Start with a circle to represent the cranium.
- Proportional Divisions: Use a grid system to map facial features across the head.
- Center Line: Aligns the face symmetrically, adjusting for tilt or rotation.
- Plane Integration: Add front and side planes to define volume and depth.
Step-by-Step Head Construction
1. Draw the Base Circle and Center Line
- Setup:
- Draw a circle to represent the cranium (A = center of the circle).
- Add a vertical center line through the middle, extending from top to bottom.
- Proportions:
- The circle’s diameter (B) is the base unit for head height.
- Mark the hairline and browline along the center line.
- Purpose: Establishes the head’s core structure and symmetry.
2. Trim Circle and Add Facial Grid
- Setup:
- Trim the circle’s lower half to form the jaw and chin, creating an oval shape.
- Divide the face into horizontal sections: hairline, browline, nose line, and chin.
- Grid:
- Use the center line to draw a crosshair, adding petal-like shapes for feature placement.
- Ensure the grid aligns with the trimmed circle’s new contour.
- Purpose: Maps the facial plane and prepares for feature placement.
3. Add Jaw and Chin Plane
- Setup:
- Extend the lower circle edge downward to form the jawline.
- Define the chin’s forward plane, aligning with the center line.
- Proportions:
- The jaw width is approximately the circle’s diameter.
- Adjust the angle for male (wider) or female (softer) features.
- Purpose: Adds structural depth to the lower face.
4. Add Neck and Refine
- Setup:
- Draw the neck starting from the jaw’s base, tapering toward the shoulders.
- Connect the neck to the head’s side plane for a seamless transition.
- Proportions:
- Neck width is about half the jaw width at the base.
- Tilt the neck to match the head’s angle.
- Purpose: Completes the head’s 3D form, ready for detailing.
Practical Workflow
- Sketch the Base Circle: Use a compass or template for a perfect circle.
- Add Center Line and Grid: Mark key lines (hairline, browline) with light pencil.
- Trim and Shape: Adjust the circle for jaw and chin, adding the grid.
- Define Planes: Draw the front and side planes, refining the jaw and neck.
- Refine and Detail: Add facial features (eyes, nose, mouth) using the grid as a guide.
Time Estimate: 10–15 minutes per head with practice.
Pro Tips for Success
- Angle Variation: Tilt the center line for ¾ or profile views, adjusting the grid accordingly.
- Gender Differences: Broaden the jaw for males, soften it for females.
- Feature Placement: Eyes align with the browline, nose at the midpoint, mouth ⅓ below.
- Shading: Add light shadows on the side plane to enhance 3D effect.
- Practice Drills: Sketch 5 heads daily, varying angles and proportions.
Common Mistakes & Fixes
| Mistake | Cause | Fix |
|---|---|---|
| Asymmetrical face | Off-center line | Recheck center line alignment |
| Flat jaw | No plane definition | Add side plane contour |
| Short neck | Incorrect proportion | Extend to half jaw width |
| Uneven grid | Inconsistent trimming | Redraw circle and grid |
Tools & Materials
- Pencils: HB (guidelines), 2B (outlines), 4B (shading)
- Paper: Smooth sketchbook or Bristol board
- Compass: For perfect circles
- Eraser: Kneaded for clean adjustments
- Optional: Digital tools (e.g., Procreate) with symmetry guides
Downloadable Resources
- PDF Guide: Printable Loomis head template with grid
- PSD File: Layered construction steps for digital practice
- Video Tutorial: 15-minute walkthrough of the Loomis method (coming soon)
- Reference Pack: 10 head sketches from different angles
Ideal For:
- Portrait and character artists
- Anime/manga illustrators
- Beginner to intermediate drawers
- Art students studying anatomy
- Digital artists building 3D skills
Construct Heads with Confidence. With Andrew Loomis’s method, you’ll master the art of head construction, creating anatomically sound and dynamically posed heads from any angle. This systematic approach ensures professional results every time.
Follow the detailed steps in the diagram above and start drawing heads like a pro today.